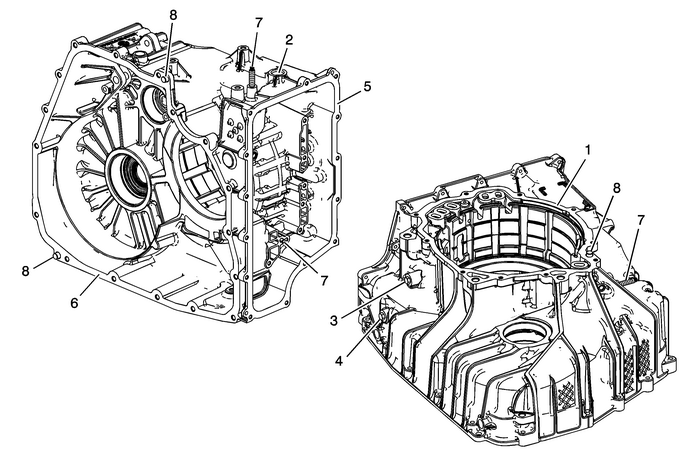
Chevrolet Equinox Service Manual: Transmission Case Cleaning and Inspection Automatic Transmission Unit

Caution:Do not use abrasive pads or bristle devices to clean thesealing surfaces. Abrasive pads produce a fine grit that can effecttransmission function. Abrasive pads can also remove enough metalto create oil leaks. Caution:After cleaning the transmission components, allow to air dry.Do not use cloth or paper towels in order to dry any transmissioncomponents. Lint from the towels can cause componentfailure. Caution:Do not reuse cleaning solvents. Previously used solvents maydeposit sediment which may damage the component. Preliminary ProceduresThoroughly clean the transmission case assembly, including case threads, with cleansolvent.Clean gasket sealing surfaces. Remove all residual gasket material.Inspect all threaded holes. If necessary, repair any thread damage. | |
1 | Case Cover Sealing Surface |
2 | Manual Shift Shaft Seal Surface Note:Refer toManual Shift Shaft Seal Replacement. |
3 | Fluid Pressure Test Plug |
4 | Fluid Drain Plug |
5 | Control Valve Body Cover Sealing Surface |
6 | Torque Converter Housing Sealing Surface |
7 | Transmission Fluid Cooler Pipe Stud-M8-x-30.5 (Qty: 2) Caution:Refer toFastener Caution. Tighten12-Y (106-lb-in) |
8 | Transmission Case Cover Locator Pin Procedure Inspect the locating pins to be fully seated in case. |
 Transfer Case Brace Replacement Automatic Transmission Unit
Transfer Case Brace ReplacementCalloutComponent NamePreliminary ProceduresRaise the vehicle. Refer toLifting and Jacking the Vehicle.Remove the right wheel drive shaft. Refer toFront Wheel Drive Shaft ...
 Transmission Control Lever Knob Replacement Automatic Transmission Unit
Transmission Control Lever Knob ReplacementCalloutComponent Name1Shift Control KnobTip:Pull knob up off shift lever. Considerable effort may berequired to remove knob from shift control lever.Place sh ...
Other materials:
Crankshaft Sprocket Installation Engine Block Cylinder Block Crankshaft Sprocket
Special ToolsEN-48589Crankshaft Rotation SocketFor equivalent regional tools, refer toSpecial Tools.Ensure the crankshaft sprocket is installed with the timingmark-(1) visible.Install the crankshaft sprocket onto the nose of thecrankshaft.Align the notch in the crankshaft sprocket with the pin inthe ...
