Chevrolet Equinox Service Manual: Front Fender Mud Flap Package Installation Moldings
Installation Instructions Part Number
19171148
Note:Please read instructions thoroughly before starting.
1 | 1 | Left Hand Mud Flap |
2 | 1 | Right Hand Mud Flap |
3 | 4 | #10 Spring Clips |
4 | 8 | #10 x 3/4” Screws |
5 | 1 | Alcohol Wipes |
7 | Installation Instructions |
Note:Turning of front wheels to the left or right will allow foradditional clearance when installing the mud flaps.

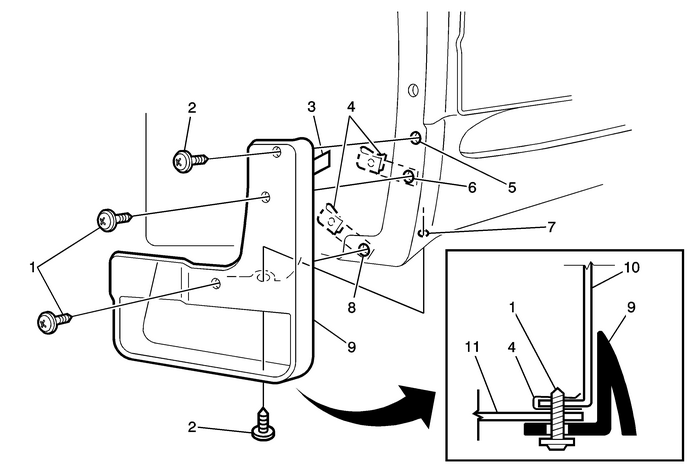
Clean and degrease body panel-(10) where frontfender mud flaps-(9) are to be located.Using 50% alcohol and water, clean area to be taped.
Note:Parts and vehicle temperature must be between 61°Fand 86°F (16°C and 31°C).
Remove existing push-pins from mountingholes-(6),(8).Note:Install supplied spring clips with turned up edge on insideof panel edge.
Pull liner-(11) forward and install suppliedspring clips-(4) over mountingholes-(6),(8).Mount front fender mud flap-(9) and installsupplied screws-(1) to mounting holes-(6),(8)while holding front fender mud flap-(9) up and into bodypanel-(10).While holding front fender mud flap-(9) firmlyagainst body panel-(10), mark and drill 3/32' (2.5mm)center pilot holes in locations-(5),(7), use frontfender mud flap-(9) as template.While holding front fender mud flap-(9) firmlyagainst body panel-(10), install the suppliedscrews-(2) to mounting holes-(5),(7)Note:Do not overtighten screws.
Push front fender mud flap-(9) forward and pulltape liner off using tab-(3) and apply twenty to thirtypounds of pressure along tape length to ensure contact.Repeat procedure for other side.Note:Mud flaps can be cleaned with any commercially availablecleaner.
 Front and Rear Side Door Outside Handle Package Installation Moldings
Installation Instructions Part Number15929604Kit ContentsQtyDescription4Outside Door Handle1Keyed Cap3Keyless Cap1Installation InstructionsRemoval ProcedureOpen the door, remove the access plug locate ...
 Rear Mud Flap Package Installation Moldings
Installation Instructions Part Number19202379Note:Please read instructions thoroughly before starting.Rear Mud Flap Kit ContentsItem No.QtyDescription11Left Hand Mud Flap21Right Hand Mud Flap36#10 Spr ...
Other materials:
Driver or Passenger Seat Recliner Actuator Cable Replacement Seats
Removal ProcedureRemove the driver or passenger seat outer adjuster finishcover. Refer toDriver or Passenger Seat Outer Adjuster Finish Cover Replacement.Use a small flat-bladed tool remove the seat recliner cablefrom the inner recliner cable clips.Remove the seat recliner cable from the outer recli ...
