Chevrolet Equinox Service Manual: Rear Mud Flap Package Installation Moldings
Installation Instructions Part Number
19202379
Note:Please read instructions thoroughly before starting.
1 | 1 | Left Hand Mud Flap |
2 | 1 | Right Hand Mud Flap |
3 | 6 | #10 Spring Clips |
4 | 6 | #10 x 3/4” Screws |
5 | 2 | Alcohol Wipes |
7 | Installation Instructions |

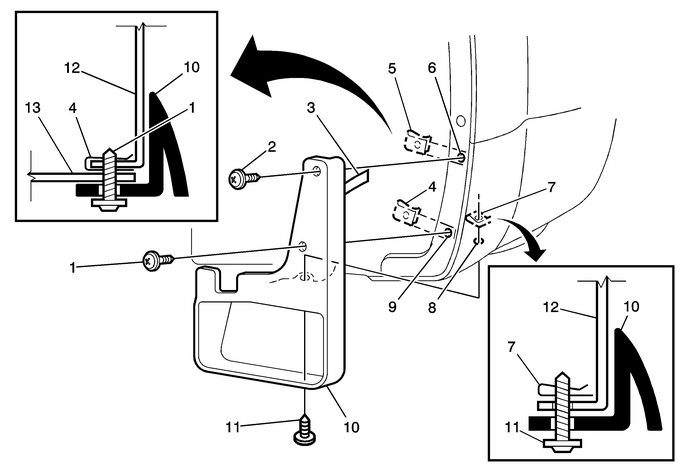
Clean and degrease body panel-(12) where rear mudflaps-(10) are to be located.Using 50% alcohol and water, clean area to be taped.
Note:Parts and vehicle temperature must be between 61°Fand 86°F (16°C and 31°C).
Remove existing push-pin from mountinghole-(9)Note:Install supplied spring clips with turned up edge on insideof panel edge.
Pull liner-(13) forward and install suppliedspring clip-(4) over mountinghole-(9).Mount rear mud flap-(10) and position inner tabbehind liner-(13). Installed suppliedscrew-(1) to mounting hole-(9), while holdingrear mud flap-(10) up and into bodypanel-(12).While holding rear mud flap-(10) firmly againstbody panel-(12), mark and drill ¼”(6.2mm) mounting holes in location-(6),(8), use rear mudflap-(10) as template.Install supplied screws-(2),(11) to mountingholes-(6),(8), use spring clips-(5),(7) asnuts. Tighten screws-(1),(2),(11) while holding rear mudflap-(10) firmly against bodypanel-(12).Push rear mud flap-(10) forward and pull tapeliner off using tab-(3) and apply twenty to thirtypounds of pressure along tape length to ensure contact.Repeat procedure for other side.Note:Mud flaps can be cleaned with any commercially availablecleaner.
 Front Fender Mud Flap Package Installation Moldings
Installation Instructions Part Number19171148Note:Please read instructions thoroughly before starting.Front Fender Mud Flap Kit ContentsItem No.QtyDescription11Left Hand Mud Flap21Right Hand Mud Flap3 ...
 Liftgate Hinge Replacement Panels
Liftgate Hinge ReplacementCalloutComponent NamePreliminary ProceduresRemove the liftgate. Refer toLiftgate Replacement.Lower the rear of the headliner to access the inner bolts.Refer toHeadlining Trim ...
Other materials:
Navigation Symbols Entertainment Audio-Visual
Following are the most common symbols that appear on a map screen.The vehicle symbol indicates the current position and heading direction of the vehicleon the map.The destination symbol marks the final destination after a route has been planned.The waypoint symbol marks one or more set waypoints.A w ...
