Chevrolet Equinox Service Manual: Trim Height Inspection
Trim Height Measurement
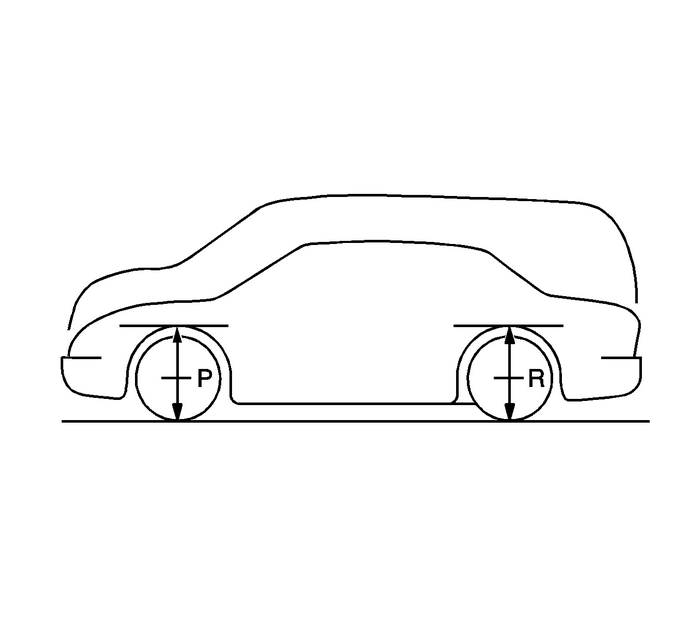
Trim height is a predetermined measurement relating tovehicle ride height. Incorrect trim heights can cause the vehicleto bottom out over bumps, damage to the suspension components andsymptoms similar to wheel alignment problems. Check the trimheights when diagnosing suspension concerns and before checking thewheel alignment.
Perform the following before measuring the trimheights:
Set the tire pressure to the specifications shown on thecertification label. Refer toVehicle Certification, Tire Placard, Anti-Theft, and Service Parts ID Label.Check the fuel level. Add additional weight if necessary tosimulate a full tank.One U.S. gallon of gasoline weighsapproximately-6.5-lbs. One liter of gasolineweights approximately-0.70-kg.
Make sure the passenger and rear compartments are empty,except tor the spare tire.Make sure the vehicle is on a flat and level surface, such asan alignment rack.For vehicles equipped with automatic level control, ensurethe system is functioning properly.Check that all the vehicle doors are securely closed.Check that the vehicle hood and rear deck lids are securelyclosed.Check for installed after market accessories or modificationsthat could affect trim height measurement:Larger of smaller than production wheels and tiresLifting or lowering kitsWheel opening flares or ground affectsMeasuring the P and R Heights
Note:The left andright-P-and-R-heightdifference should be no more than-12-mm(0.47-in).
Use the following procedure to measurethe-P-and-R-dimensions:
Lift the front bumper of the vehicle upabout-38-mm (1.5-in).Gently remove your hands and let the vehicle settle.Repeat this operation-2-more times fora total of-3-times.Measure vertically from the ground to the bottom lip of thewheel opening through the centerline of the front wheel,P-height.Push the front bumper of the vehicle downabout-38-mm (1.5-in).Gently remove your hands and let the vehicle settle.Repeat this operation-2-more times fora total of-3-times.Re-measure the-P-height as instep-4.The true-P-height is the average of themeasurements taken insteps-4-and-8. Refer toTrim Height Specifications.Repeat the above steps at the rear of the vehicle forthe-R-heights.Ifthe-P-and-R-heights areoutside of specifications, measurethe-Z-and-D-heights.Measuring the Z Height
Note:
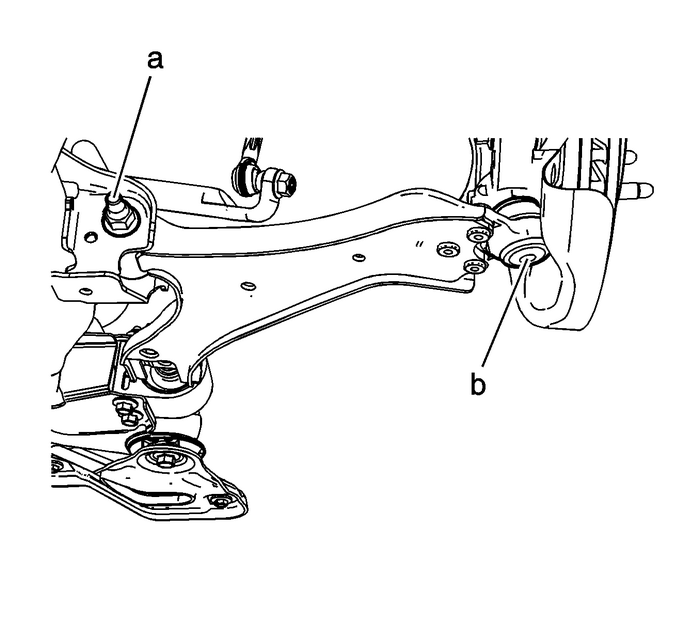
In order to obtain the proper measurement, Z- willequal inner minus the outer.The left and right-Z-height differenceshould be no more than-12-mm(0.47-in).Use the following procedure to measurethe-Z-height:
Lift the front bumper of the vehicle upabout-38-mm-(1.5-in).Gently remove your hands and let the vehicle settle.Repeat this operation-2-more times fora total of-3-times.Repeat this jouncing operation-2-moretimes for a total of-3-times.Measure from the center of the forward lower control armattaching bolt tip-(a)-to the alignmentrack.Measure from the center of the balljoint-(b)-to the alignment rack.The difference betweenthese-2-measurements-(a-b)-isthe-Z-height.Push the front bumper of the vehicle downabout-38-mm (1.5-in).Gently remove your hands and let the vehicle settle.Repeat this operation-2-more times fora total of-3-times.Re-measure the-Z-height as instep-4.The true-Z-height is the average of themeasurements taken insteps-4-and-8. Refer toTrim Height Specifications.If any of these measurements are out of specifications,inspect for the following conditions:
Worn or damage suspension componentsCollision damageMeasuring the D Height
Important:
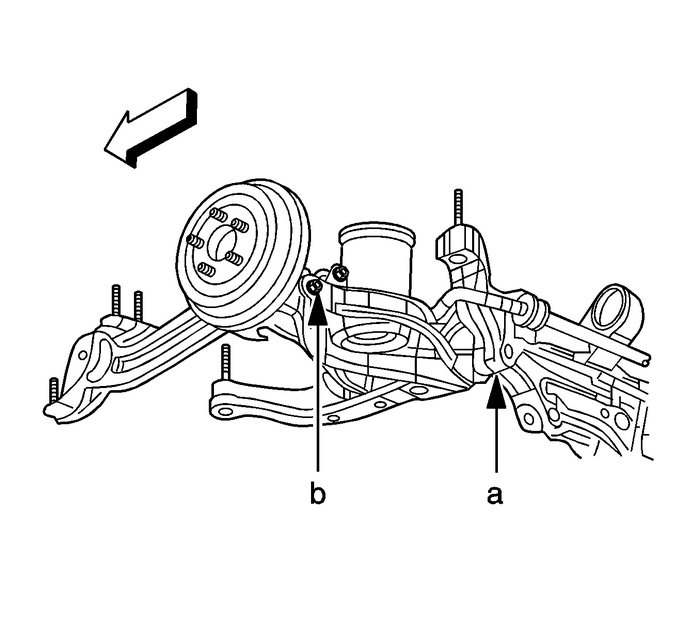
In order to obtain the proper measurement, D-willequal inner minus the outer.The left and right-D-height differenceshould be no more than-12-mm(0.47-in).Use the following procedure to measure the D height:
Lift the rear bumper of the vehicle upabout-38-mm (1.5-in).Gently remove your hands and let the vehicle settle.Repeat this operation-2-more times fora total of-3-times.Measure from the center of the inner pivotbolt-(A)-to the alignment rack.Measure from the center of the outer pivotbolt-(B)-to the alignment rack.The difference betweenthese-2-measurements isthe-D-height.Lift the rear bumper of the vehicle upabout-38-mm (1.5-in).Gently remove your hands and let the vehicle settle.Repeat this operation-2-more times fora total of-3-times.Re-measure the-D-height as instep-4.The true-D-height is the average of themeasurements taken insteps-4-and-8. Refer toTrim Height Specifications.If any of these measurements are out of specifications,inspect for the following conditions:
Worn or damage suspension componentsCollision damage Front Lower Control Arm Bushing Replacement (Front Bushing) Control Arms Lower Control Arm
Tools Required J–44971 -Control Arm Bushing Remover/InstallerFor regional equivalent tools, refer toSpecial Tools.Removal ProcedureRaise and support the vehicle. Refer toLifting and Jacking the Vehi ...
 Shock Absorber Disposal Strut Assembly Dampers/Shocks
Warning:Gas charged shock absorbers contain high pressure gas. Do notremove the snap ring from inside the top of the tube. If the snapring is removed, the contents of the shock absorber will come outw ...
Other materials:
Intake Air Duct Replacement Engine Control
Air Cleaner Inlet Duct and Resonator ReplacementCalloutComponent NamePreliminary ProcedureRemove the front wheelhouse panel. Refer toFront Wheelhouse Liner Replacement.1Front Intake Air Duct Fastener (Qty: 2)Caution:Refer toFastener Caution.Tighten10-Y(89-lb-in)2Front Intake Air DuctProcedureDisconn ...
