Chevrolet Equinox Service Manual: Transfer Case Disassemble 4WD Transfer Case
| Table 1: | Housing O-Ring, Vent Assembly, Drain and Fill Plug Removal |
| Table 2: | Intermediate Drive Shaft Removal |
| Table 3: | Rear Output Shaft Housing Removal |
| Table 4: | Right Transfer Case, Input and Output Drive Shaft Removal |
| Table 5: | Rear Output Shaft Housing Disassembly |
| Table 6: | Intermediate Drive Shaft Disassembly |
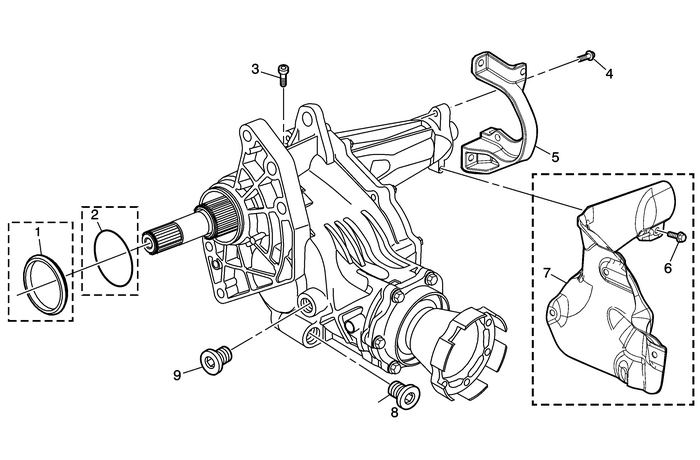
1 | Transfer Case Input Shaft Face Seal – RPO MHC Only |
2 | Transfer Case O-ring Seal – RPO-MH4 Only |
3 | Transfer Case Vent Assembly Note:Remove the vent only if damaged or blocked. |
4 | Transfer Case Bracket-to-Transfer Case Bolts (Qty: 2) |
5 | Transfer Case Bracket |
6 | Transfer Case Heat Shield Bolts (Qty: 3) – Model Dependent |
7 | Transfer Case Heat Shield – Model Dependent |
8 | Transfer Case Drain Plug |
9 | Transfer Case Fill Plug |
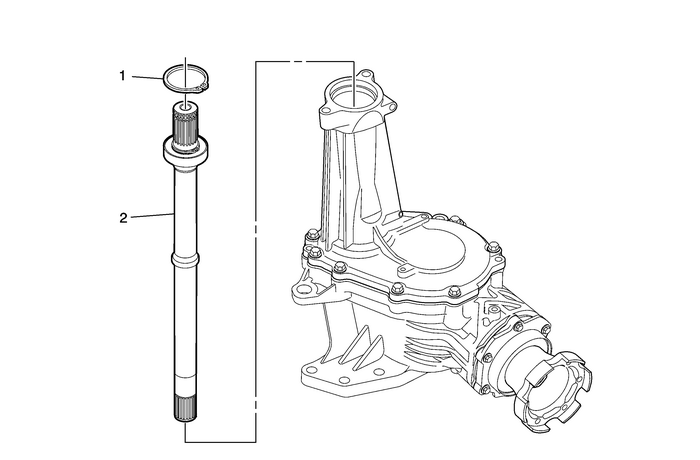
1 | Front Wheel Drive Retainer |
2 | Front Wheel Drive Intermediate Shaft |
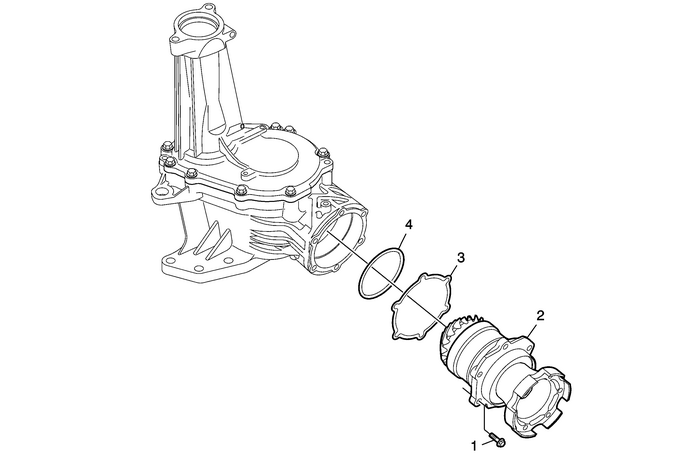
1 | Transfer Case Rear Output Shaft Housing Bolt (Qty: 6) |
2 | Transfer Case Rear Output Shaft Housing Note:Locate 2-screwdrivers or prybars to the flange area of the housing to ease removal. |
3 | Transfer Case Rear Output Shim |
4 | Transfer Case Rear Output Shaft Housing Seal O-ring Note:Discard the O-ring after removal. |
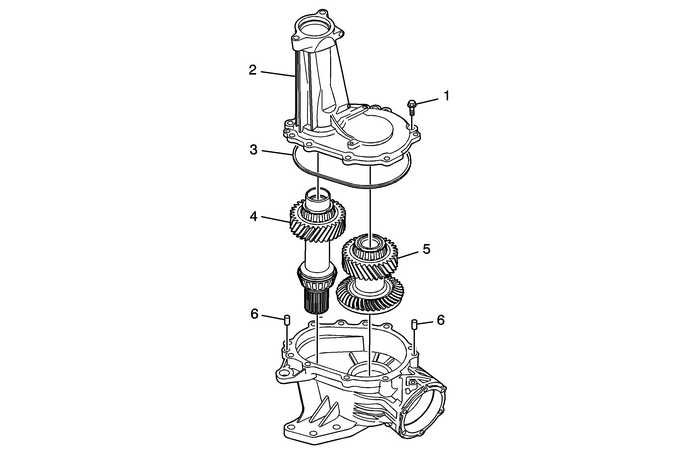
1 | Transfer Case Half Bolts (Qty: 12) |
2 | Transfer Case – Right |
3 | Transfer Case Seal-to-Transfer Case – Right |
4 | Transfer Case Input Shaft |
5 | Transfer Case Rear Output Drive Shaft |
6 | Transfer Case Half Locating Pins (Qty: 2) Note: Remove the pins only if damaged.Inspect the case for similar damage.Refer toTransfer Case Cleaning and Inspection. |
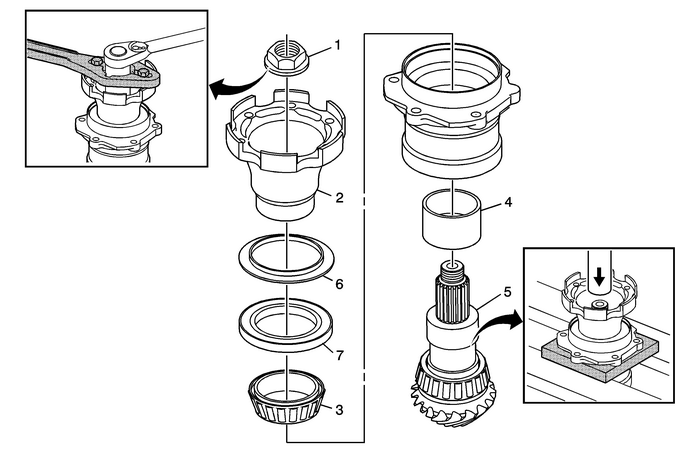
1 | Transfer Case Rear Output Drive Gear Nut Note:Use a 30-mm socket. Special Tools DT-08614-A Pinion Flange Holder and Remover For equivalent regional tools, refer toSpecial Tools |
2 | Transfer Case Rear Output Shaft Flange Special Tools DT-48146 Press Support For equivalent regional tools, refer toSpecial Tools |
3 | Transfer Case Rear Output Shaft Bearing Assembly Note:Use a press to remove the output shaft from the housing. |
4 | Transfer Case Rear Output Shaft Bearing Spacer |
5 | Transfer Case Rear Output Shaft |
6 | Transfer Case Rear Output Shaft Oil Slinger Note:Remove the slinger only if damaged. Refer toRear Output Drive Housing Cleaning and Inspection. |
7 | Transfer Case Rear Output Shaft Seal Note:Discard the seal after removal. |
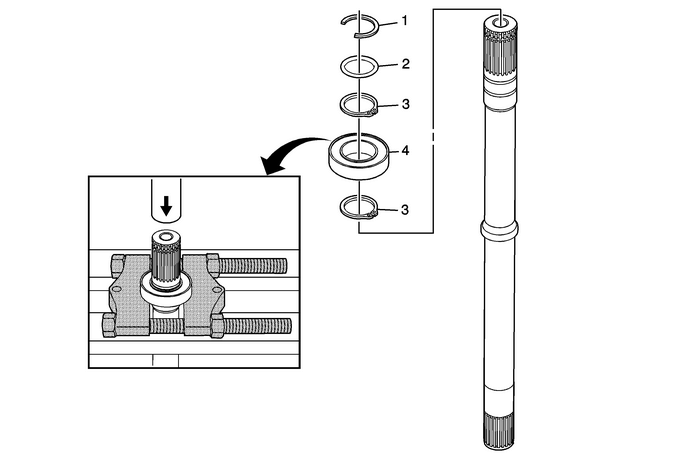
1 | Half Shaft Retainer |
2 | O-Ring |
3 | Front Wheel Drive Intermediate Shaft Bearing Retainers (Qty: 2) |
4 | Front Wheel Drive Intermediate Shaft Bearing Assembly Note:Use a press, with the Rear Pinion and Axle Bearing Remover flat side up, in order to remove the bearing assembly. Special Tools J-22912-B Rear Pinion and Axle Bearing Remover For equivalent regional tools, refer toSpecial Tools. |
 #99-04-20-002H: Information on Driveline Clunk Noise - (Apr 11, 2013)
Subject:Information on Driveline Clunk NoiseModels: 2014 and Prior GM Passenger Cars and Light Duty Trucks This bulletin is being revised to add the 2013-2014 model years. Please discard Corporat ...
 Propeller Shaft Description and Operation Driveshafts Propeller Shaft Assembly
The propeller shaft assembly is a 2-piece design.The front shaft consists of a plunging A-type constantvelocity joint at the front and a universal joint and yoke at therear.The rear shaft consists of ...
Other materials:
Power Windows Description and Operation Side Windows
Power Windows System ComponentsThe power window system consists of the following components:Driver window switchPassenger window switchLeft rear window switchRight rear window switchWindow motors in each of the doors30A FuseBody control module (BCM)K9Body Control ModuleS79RRWindow Switch - Right Rea ...
