Chevrolet Equinox Service Manual: Liftgate Applique Replacement (Terrain) Trunklid/Tailgate/Cargo Doors
Chevrolet Equinox Service Manual / Body / Doors and Enclosures / Liftgate Applique Replacement (Terrain) Trunklid/Tailgate/Cargo Doors

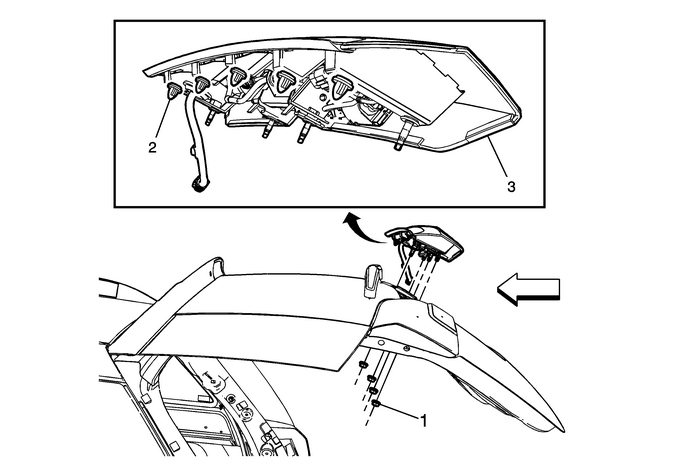
| Preliminary ProceduresOpen and support the rear liftgate.Remove the liftgate lower trim finish panel. Refer toLiftgate Lower Trim Finish Panel Replacement.Disconnect the electrical connectors. | |
1 | Liftgate Applique Nut (Qty:-4) Caution:Refer toFastener Caution. Tighten6-Y(53-lb-in) Tip:Hold the end of the bolt with a suitable pair of pliers whileremoving the liftgate applique nuts. |
2 | Trim Clip with Seal (Qty:-5) Tip:Disengage the five trim clips prior to removing the rearapplique. |
3 | Liftgate Applique Assembly with Rear View Camera ProcedureDisengage the electrical grommet from the liftgate outerpanel.Remove the liftgate applique assembly. |
 Side Door Sill Trim Plate Package Installation Doors
Installation Instructions Part Number23169367Kit ContentsQtyDescription1Left Front Side Door Sill Trim Plate Assembly1Right Front Side Door Sill Trim Plate Assembly8Tie Straps1Wire Harness1Installatio ...
 Liftgate Side Applique Replacement Trunklid/Tailgate/Cargo Doors
Liftgate Side Applique ReplacementCalloutComponent Name1Liftgate Applique Retainer (Qty:-4)2Liftgate AppliqueProcedureRemove the upper liftgate trim finish panel. Refer toLiftgate Upper Trim Finish Pa ...
Other materials:
Transfer Case Output Flange Runout Measurement 4WD Transfer Case
Special ToolsGE-7872Magnetic Base Dial Indicator Set, or equivalentNote:This measurement procedure is intended to measuretransmission or transfer case output flange runout for systems witha constant velocity (CV) joint, rubber coupling or bolt-on U-jointyoke at the transmission or transfer case.Plac ...
© 2017-2025 Copyright www.cequinox.com

