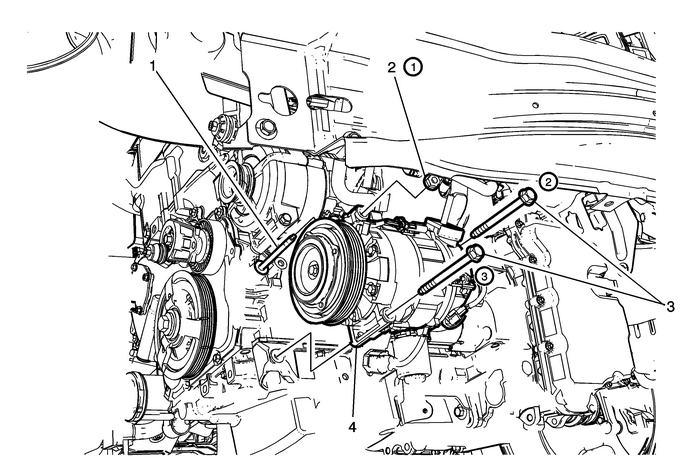
Chevrolet Equinox Service Manual: Air Conditioning Compressor Replacement (LEA) Compressor

| Preliminary ProceduresRecover the refrigerant. Refer toRefrigerant Recovery and Recharging.Raise and support the vehicle. Refer toLifting and Jacking the Vehicle.Remove engine splash shield right side. Refer toEngine Splash Shield Replacement - Right Side.Remove the drive belt. Refer toDrive Belt Replacement.Disconnect the A/C compressor electrical connector.Remove the air conditioning compressor hose. Refer toAir Conditioning Compressor Hose Replacement. | |
1 | A/C Compressor Stud Caution:Refer toFastener Caution. Tighten9-Y (80-lb-in) |
2 | A/C Compressor Nut Note:Tighten the A/C compressor mounting fasteners in sequence. Tighten22-Y (16-lb-ft) |
3 | A/C Compressor Bolt (Qty:-2) Note:Tighten the A/C compressor mounting fasteners in sequence. Tighten22-Y (16-lb-ft) |
4 | A/C Compressor |
 Air Conditioning Compressor Replacement (LFX) Compressor
Air Conditioning Compressor ReplacementCalloutComponent NamePreliminary ProceduresNote:It is important to install the A/C compressor bolts in the proper order and torquedin proper sequence to ensure p ...
 Air Conditioning Condenser Replacement Condenser
Air Conditioning Condenser ReplacementCalloutComponent NamePreliminary ProceduresRecover the refrigerant. Refer toRefrigerant Recovery and Recharging.Remove the radiator air lower baffel and deflector ...
Other materials:
Torque Converter Housing with Fluid Pump Assembly Installation (6T40/6T45/6T50 Non Hybrid) Automatic Transmission Unit Transmission Oil Pump
Torque Converter Housing with Fluid Pump Assembly InstallationCalloutComponent Name1Fluid Pump Seal Assembly2Torque Converter Housing Gasket3Torque Converter (w/Fluid Pump) Housing AssemblyNote:Rotate the differential slightly in each direction using the rotating tool to alignthe Differential Pinion ...
