Chevrolet Equinox Service Manual: 1-2-3-4 Clutch Plate and Low and Reverse Clutch Installation Automatic Transmission Unit Automatic Clutches
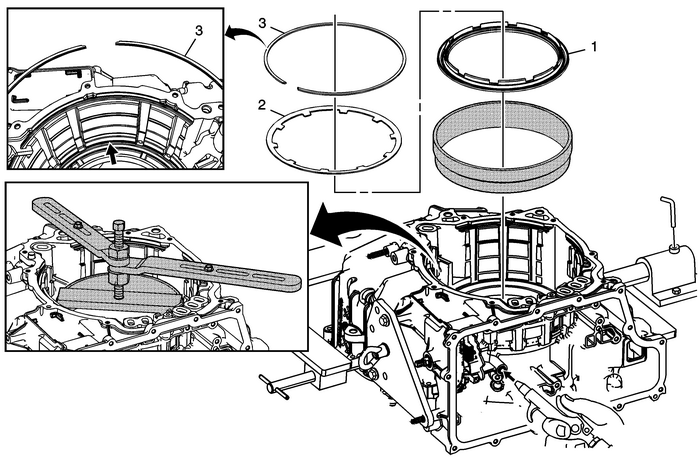
| Table 1: | Piston and Spring Installation |
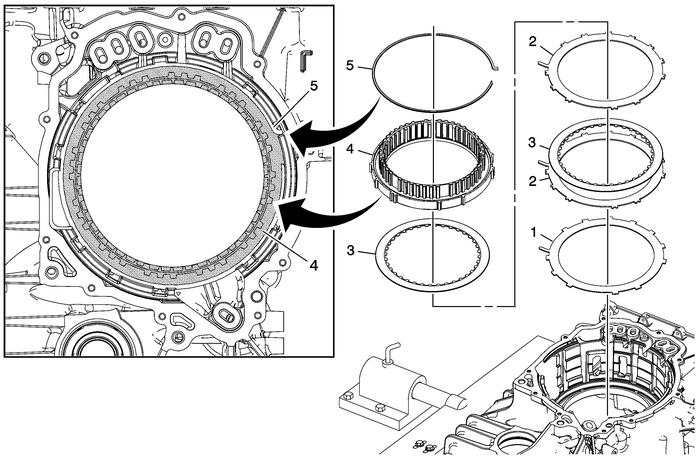
| Table 2: | 1-2-3-4 Clutch Plates and Low Reverse Clutch Installation |
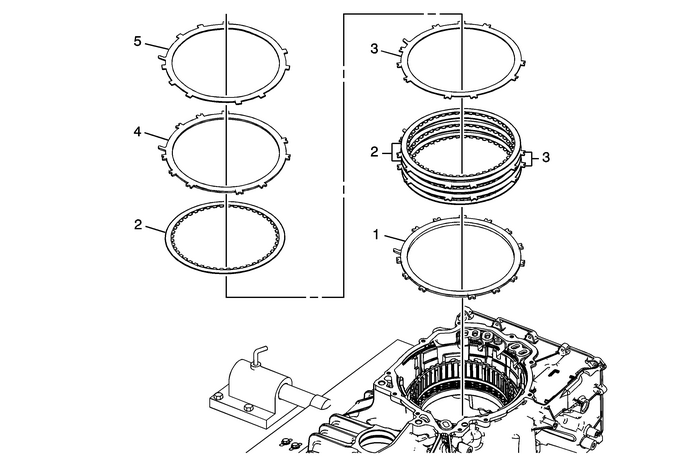
| Table 3: | Low and Reverse Clutch Plate Installation |

1 | 1-2-3-4 Clutch Piston Note:DT-46623 seal protector prevents the piston seal lip from damage during installation. Apply a thin coat ofATF to the I.D. of DT-46623 seal protector to ease the installation of the piston. Special Tools DT-46623 Piston Seal Protector For equivalent regional tools, refer toSpecial Tools. |
2 | 1-2-3-4 Clutch Spring |
3 | 1-2-3-4 Clutch Spring Retainer Ring Caution:Refer toFastener Caution. Procedure:The retainer opening should be supported by a spline tooth of the case.Install DT-46632 spring compressor and DT-48056 spring compressor bridge and retain to the case using 2-case cover assembly bolts.Turn the DT-48056 spring compressor bridge compressor bolt to compress the 1-2-3-4 Clutch Spring until the retaining ring grooveis exposed.Push retainer ring into the groove.Remove DT-48056 spring compressor bridge and DT-46632 spring compressor.Air check the piston operation by applying air to the 1-2-3-4 clutch feed passagein the case.Excessive air leaks indicate damage to the clutch piston seal.Tighten12-Y (9-lb-ft). Special ToolsDT-48056 Spring Compressor BridgeDT-46632 Piston Spring CompressorFor equivalent regional tools, refer toSpecial Tools. |

1 | 1-2-3-4 Clutch (Waved) Plate Note:The tab on the clutch plate faces the bottom of the case. |
2 | 1-2-3-4 Clutch Plate-(Qty:-2) Note:The tab on the clutch plate faces the bottom of the case. |
3 | 1-2-3-4 Clutch (w/Friction Material) Plate Assembly-(Qty:-2) |
4 | Low and Reverse Clutch Assembly |
5 | Low and Reverse Clutch Retaining Ring Note:The tab needs to go in groove at about 2-o'clock and snap ring opening needs to face3-o'clock. |

1 | Low and Reverse Clutch Backing Plate Note:The tab on the clutch plate faces the bottom of the case. |
2 | Low and Reverse Clutch (w/Friction Material) Plate Assembly-(Qty:-4) |
3 | Low and Reverse Clutch Plate-(Qty:-3) Note:The tab on the clutch plate faces the bottom of the case. |
4 | Low and Reverse Clutch Apply Plate Note:The tab on the clutch plate faces the bottom of the case. |
5 | Low and Reverse Clutch Cushion (Waved) Spring Note:The tab on the clutch plate faces the bottom of the case. |
 Manual Shift Detent Lever with Shaft Position Switch Assembly and Park Pawl Actuator Installation Automatic Transmission Unit
Table 1: Park Pawl Actuator Guide InstallationTable 2: Park Pawl Actuator InstallationPark Pawl Actuator Guide InstallationPark Pawl Actuator Guide InstallationCalloutComponent Name1Park Pawl Actuator ...
 Torque Converter and Differential Housing Assembly Assemble Automatic Transmission Unit
Table 1: Pump Assembly InstallationTable 2: Transfer Drive Gear Assembly InstallationPump Assembly InstallationPump Assembly InstallationCalloutComponent Name1Driven Sprocket Thrust Washer2Drive Sproc ...
Other materials:
Front Side Door Warning Lamp Replacement Doors
Front Side Door Warning Lamp ReplacementCalloutComponent NamePreliminary ProcedureRemove the front side door trim panel. Refer toFront Side Door Trim Panel Replacement1Front Side Door Warning LampProcedureDisconnect the electrical connector. ...
