Chevrolet Equinox Service Manual: Tire and Wheel Assembly Runout Measurement - Off Vehicle
Raise and support the vehicle.Mark the location of the wheels to the wheel studs and markthe specific vehicle position on each tire and wheel –LF, LR, RF, RR.Remove the tire and wheel assemblies from the vehicle.Closely inspect each tire for proper and even beadseating.If any of the tire beads were not properly or evenly seated,reseat the tire bead, then proceed to step-6. Refer toTire and Wheel Removal and Installation.Mount a tire and wheel assembly on a spin-type wheelbalancer.
Locate the tire and wheel assembly on the balancer with acone through the back side of the center pilot hole.
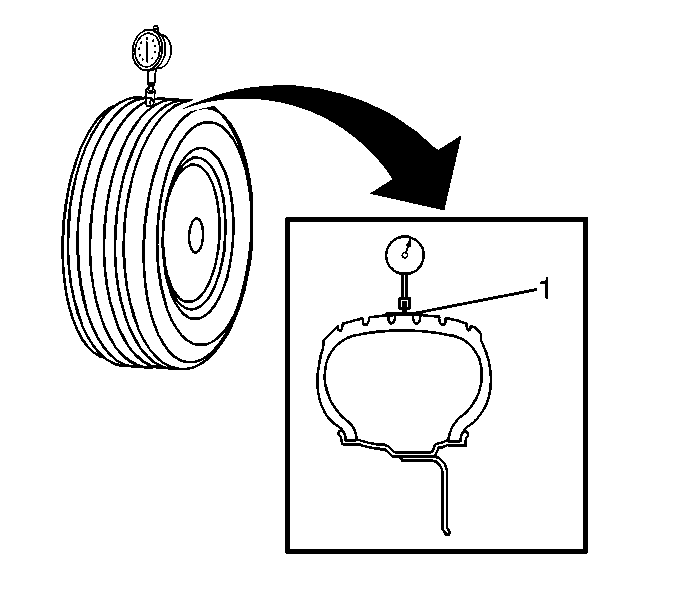
Wrap the outer circumference of each tire withtape-(1) in the center tread area.
Wrapping the tread with tape allows for a smooth and accuratereading of radial runout to be obtained.
Position the dial indicator on the taped portion of the tiretread such that the dial indicator is perpendicular to the tiretread surface.Slowly rotate the tire and wheel assembly one completerevolution in order to find the low spot.Set the dial indicator to zero at the low spot.Slowly rotate the tire and wheel assembly one more completerevolution and measure the total amount of radial runout.Specification
Maximum tire and wheel assembly radial runout –measured off-vehicle: 1.27-mm(0.050-in)
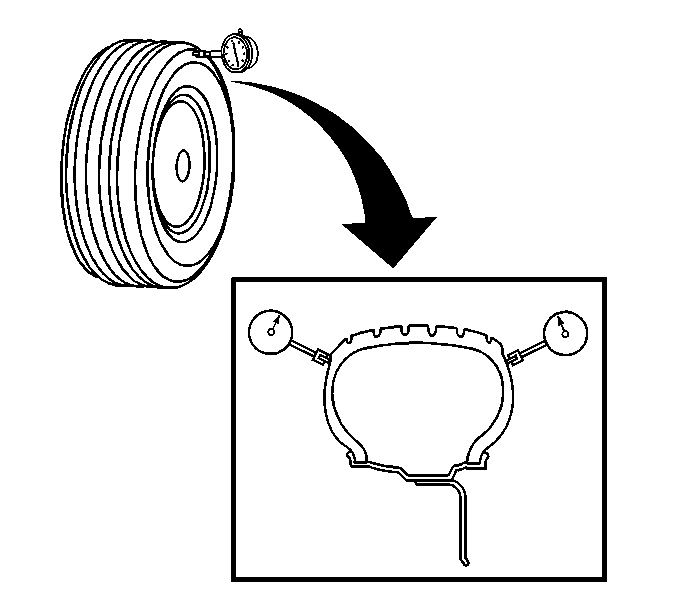
Position the dial indicator on a smooth portion of the tiresidewall, as close to the tread as possible, such that the dialindicator is perpendicular to the tire sidewall surface.Slowly rotate the tire and wheel assembly one completerevolution in order to find the low spot. Ignore any jumps or dipsdue to sidewall splices.Set the dial indicator to zero at the low spot.Slowly rotate the tire and wheel assembly one more completerevolution and measure the total amount of lateral runout. Ignoreany jumps or dips due to sidewall splices and attain an averagerunout measurement.
Specification
Maximum tire and wheel assembly lateral runout –measured off-vehicle: 1.27-mm(0.050-in)Repeat steps 6-through-15 until all ofthe tire and wheel assembly radial and lateral runout measurementshave been taken.If ANY of the tire and wheel assembly runout measurementswere NOT within specifications, proceed tostep-19.If ALL of the tire and wheel assembly runout measurementsWERE within specifications, then the off-vehicle tire and wheelassembly runout is considered acceptable.
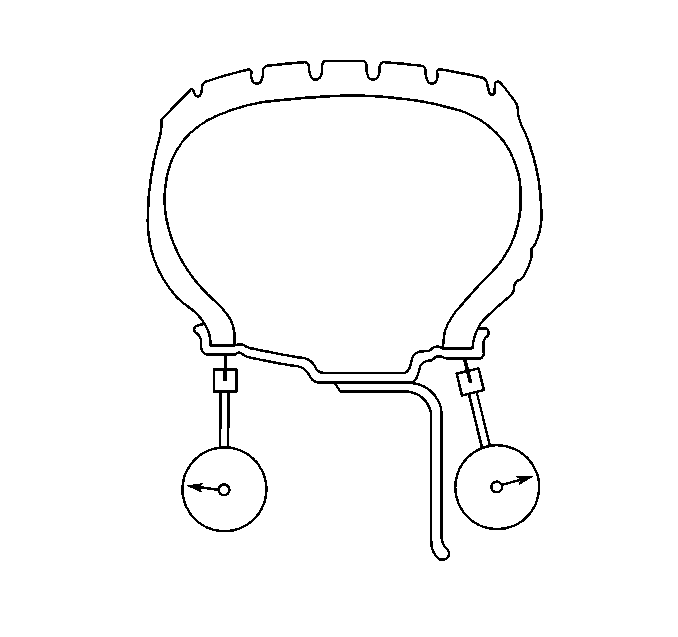
Position the dial indicator on the horizontal outer surfaceof the wheel rim flange – with the tire still mounted– such that the dial indicator is perpendicular to therim flange surface.
Wheel runout should be measured on both the inboard andoutboard rim flanges, unless wheel design will not permit. Ignoreany jumps or dips due to paint drips, chips, or welds.
Slowly rotate the tire and wheel assembly one completerevolution in order to find the low spot.Set the dial indicator to zero at the low spot.Slowly rotate the tire and wheel assembly one more completerevolution and measure the total amount of wheel radialrunout.Specification
Maximum aluminum wheel radial runout – measuredoff-vehicle, tire mounted: 0.762-mm(0.030-in)Maximum steel wheel radial runout – measuredoff-vehicle, tire mounted: 1.015-mm(0.040-in)
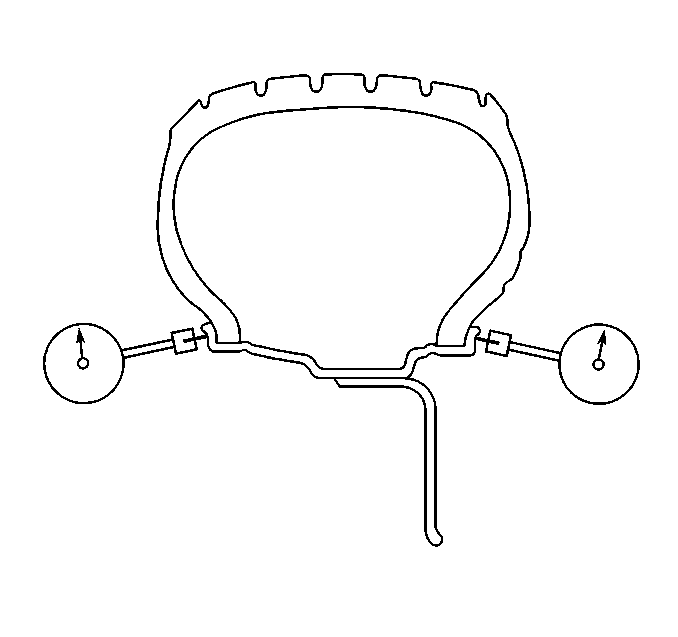
Position the dial indicator on the vertical outer surface ofthe wheel rim flange – with the tire still mounted– such that the dial indicator is perpendicular to therim flange surface.
Wheel runout should be measured on both the inboard andoutboard rim flanges, unless wheel design will not permit. Ignoreany jumps or dips due to paint drips, chips, or welds.
Slowly rotate the tire and wheel assembly one completerevolution in order to find the low spot.Set the dial indicator to zero at the low spot.Slowly rotate the tire and wheel assembly one more completerevolution and measure the total amount of wheel lateralrunout.Specification
Maximum aluminum wheel lateral runout – measuredoff-vehicle, tire mounted: 0.762-mm(0.030-in)Maximum steel wheel lateral runout – measuredoff-vehicle, tire mounted: 1.143-mm(0.045-in)Repeat steps 19-through-26 until all ofthe wheel radial and lateral runout measurements have been taken oneach of the – tire and wheel – assemblies withassembly runout measurements which were NOT withinspecifications.If any of the wheel runout measurements were NOT withinspecifications, proceed to Measuring Wheel Runout – TireDismounted.For any of the wheel runout measurements which WERE withinspecifications, while the – tire and wheel –assembly runout measurements were NOT within specifications,replace the tire, then balance the assembly. Refer toTire and Wheel Assembly Balancing - Off Vehicle.After replacement of any tires, always re-measure the runoutof the affected tire and wheel assembly, or assemblies.Using the matchmarks made prior to removal, install the tireand wheel assemblies to the vehicle.Lower the vehicle.Wheel Runout Measurement – Tire DismountedOn the tire and wheel assembly, or assemblies with wheelrunout measurements – tire mounted – which wereNOT within specifications, mark each tire and wheel in relation toeach other.Dismount the tire from the wheel. Refer toTire Dismounting and Mounting.Mount the wheel on a spin-type wheel balancer.Locate the wheel on the balancer with a cone through the backside of the center pilot hole.
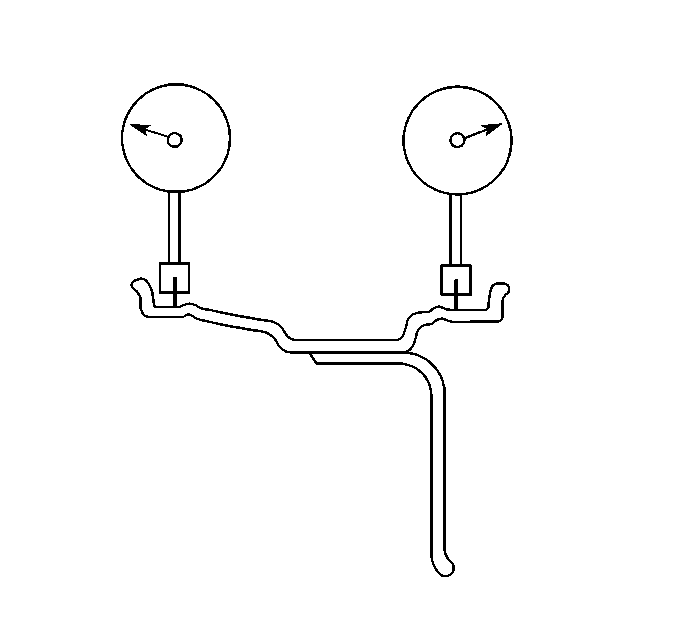
Position the dial indicator on the horizontal inner surfaceof the wheel rim flange – with the tire dismounted– such that the dial indicator is perpendicular to therim flange surface.
Wheel runout should be measured on both the inboard andoutboard rim flanges. Ignore any jumps or dips due to paint drips,chips, or welds.
Slowly rotate the wheel one complete revolution in order tofind the low spot.Set the dial indicator to zero at the low spot.Slowly rotate the wheel one more complete revolution andmeasure the total amount of wheel radial runout.Specification
Maximum aluminum wheel radial runout – measuredoff-vehicle, tire dismounted: 0.762-mm(0.030-in)Maximum steel wheel radial runout – measuredoff-vehicle, tire dismounted: 1.015-mm(0.040-in)
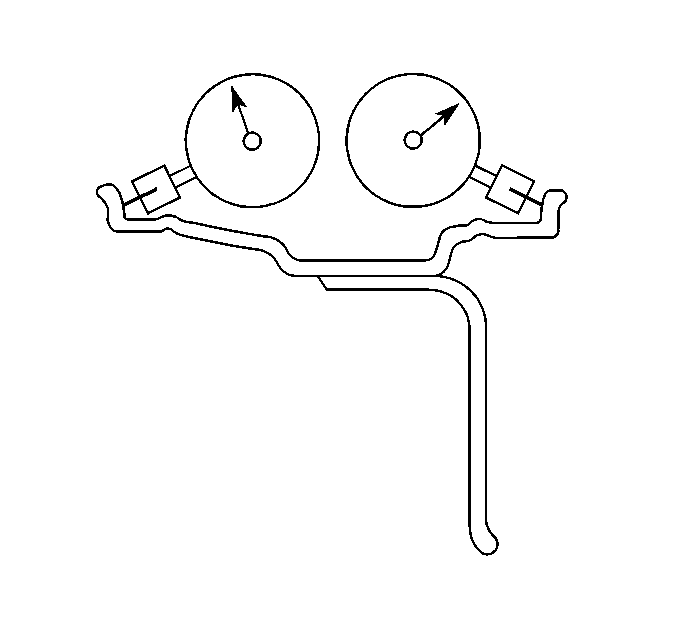
Position the dial indicator on the vertical inner surface ofthe wheel rim flange – with the tire dismounted– such that the dial indicator is perpendicular to therim flange surface.
Wheel runout should be measured on both the inboard andoutboard rim flanges. Ignore any jumps or dips due to paint drips,chips, or welds.
Slowly rotate the wheel one complete revolution in order tofind the low spot.Set the dial indicator to zero at the low spot.Slowly rotate the wheel one more complete revolution andmeasure the total amount of wheel lateral runout.Specification
Maximum aluminum wheel lateral runout – measuredoff-vehicle, tire dismounted: 0.762-mm(0.030-in)Maximum steel wheel lateral runout – measuredoff-vehicle, tire dismounted: 1.143-mm(0.045-in)Repeat steps 2-through-12 until all ofthe wheel radial and lateral runout measurements – tiredismounted – have been taken on each wheel with runoutmeasurements – tire mounted – which were NOTwithin specifications.If any of the wheel runout measurements – tiredismounted – were NOT within specifications, replace thewheel.
Always measure the runout of any replacement wheels.
For any of the wheel runout measurements which WERE withinspecifications, while the – tire and wheel –assembly runout measurements were NOT within specifications,replace the tire, then balance the assembly. Refer toTire and Wheel Assembly Balancing - Off Vehicle.Using the matchmarks made prior to dismounting the tire, ortires, mount the tire, or tires to the wheel, or wheels, thenbalance the assembly, or assemblies. Refer toTire and Wheel Assembly Balancing - Off Vehicle.Always measure the runout of any of the tire and wheelassemblies which have had the tires dismounted and mounted.
Using the matchmarks made prior to removal, install the tireand wheel assemblies to the vehicle.Lower the vehicle. Tire and Wheel Assembly Runout Measurement - On-Vehicle
Raise and support the vehicle.Closely inspect each tire for proper and even beadseating.If any of the tire beads were not properly or evenly seated,reseat the tire bead, then proceed to step-4. Refer ...
 Front Camber Adjustment Wheels
Raise and support the vehicle. Refer toLifting and Jacking the Vehicle.Remove the wheel and tire assemblies. Refer toTire and Wheel Removal and Installation.Remove the strut to knuckle nuts and bolts. ...
Other materials:
Rear Window Wiper Arm Replacement (Terrain) Wipers Wiper Arm
Rear Window Wiper Arm ReplacementCalloutComponent Name1Rear Window Wiper Arm Nut CoverTip:Lift the wiper arm nut cover in order to access the wiper arm nut.2Rear Window Wiper Arm NutCaution:Refer toFastener Caution.Tighten8-Y (71-lb-in)3Rear Window Wiper ArmProcedureRemove the rear window wiper arm. ...
