Chevrolet Equinox Service Manual: Rear Brake Rotor Replacement Disc Brakes
Special ToolsJ-41013Rotor Resurfacing KitJ-42450-AWheel Hub Resurfacing Kit
For equivalent regional tools, refer toSpecial Tools.
Removal ProcedureWarning:Refer toBrake Dust Warning.
Raise and support the vehicle. Refer toLifting and Jacking the Vehicle.Remove the tire and wheel assembly. Refer toTire and Wheel Removal and Installation.
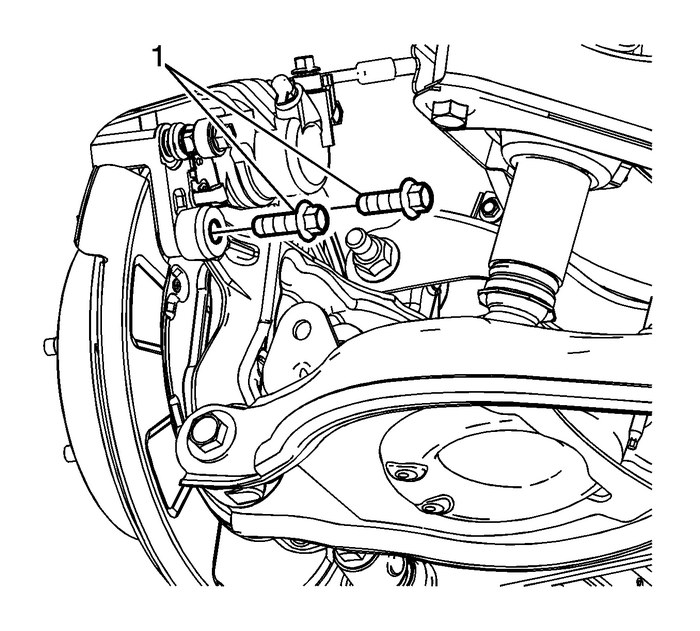
Remove the brake caliper bracket bolts-(1).
Caution:Support the brake caliper with heavy mechanic wire, orequivalent, whenever it is separated from its mount and thehydraulic flexible brake hose is still connected. Failure tosupport the caliper in this manner will cause the flexible brakehose to bear the weight of the caliper, which may cause damage tothe brake hose and in turn may cause a brake fluid leak.
Remove the brake caliper and bracket assembly and supportwith heavy mechanics wire or equivalent.
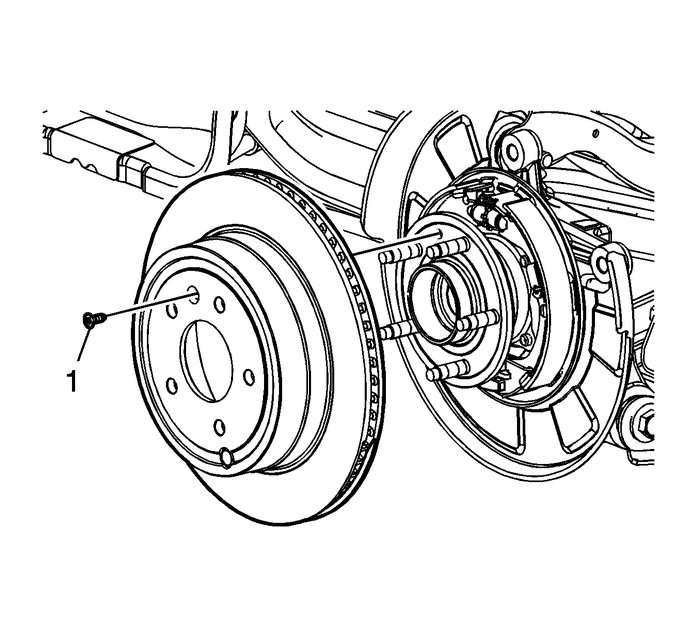
Remove the brake rotor bolt-(1)-and thebrake rotor.If the brake rotor is difficult to remove, remove the parkbrake shoe adjuster access plug on the face of the brake rotor togain access to the park brake adjuster and loosen the park brakeshoe adjuster.Installation ProcedureUsing theJ-42450-AWheel Hub Resurfacing Kit, thoroughly clean any rust or corrosion from the matingsurface of the hub/axle flange.Using theJ-41013Rotor Resurfacing Kit, thoroughly clean any rust or corrosion from the matingsurface of the rotor to the hub/axle flange.Install the brake rotor.

Caution:Refer toFastener Caution.
Install the brake rotor bolt-(1)-andtighten to-10-Y(89-lb-in).
Position the brake caliper and bracket assembly to thevehicle.
Note:If reusing the caliper bracket bolts the threads of thecaliper bracket bolts and the threads of the knuckle mounting holesmust be free of residue and debris prior to application ofthreadlocker in order to ensure proper adhesion and fastenerretention.
Prepare the bolts and the threaded holes for assembly:Thoroughly clean the residue from the bolt threads by usingdenatured alcohol or equivalent and allow to dry.Thoroughly clean the residue from the threaded holes by usingdenatured alcohol or equivalent and allow to dry.Apply threadlocker GM P/N-12345493 (CanadaP/N-10953488), or equivalentto-2/3-of the threaded length of the lowercaliper bracket bolts. Ensure there are no gaps in the threadlockeralong the length of the filled area of the bolts.Ensure there are no gaps in the threadlocker along the lengthof the filled area of the bolts.Allow the threadlocker to cureapproximately-10-minutes beforeinstallation.Install the brake caliper bracketbolts-(1)-and tighten to-125-Y(92-lb-ft).If necessary, adjust the park brake. Refer toParking Brake Adjustment.Install the tire and wheel assembly. Refer toTire and Wheel Removal and Installation.Burnish the brake pads and rotors. Refer toBrake Pad and Rotor Burnishing. Parking Brake Shoe Replacement Parking Brake
Special ToolsJ-38400Brake Shoe Spanner and Spring RemoverRemoval ProcedureWarning:Refer toBrake Dust Warning.Raise and support the vehicle. Refer toLifting and Jacking the Vehicle.Remove the tire and ...
 Brake Rotor Refinishing Disc Brakes Brake Rotors
Special ToolsJ-41013Rotor Resurfacing KitJ-42450-AWheel Hub Resurfacing KitNote:Do NOT refinish the brake rotors in order to correct any ofthe following complaints:Growl or squeal brake noisePremature ...
Other materials:
Rear Wheelhouse Liner Replacement (Terrain) Panels Wheel Well Liner
Rear Wheelhouse Liner ReplacementCalloutComponent NamePreliminary ProcedureRemove the tire and wheel assembly. Refer toTire and Wheel Removal and Installation.1Rear Wheelhouse Panel Liner Push-In Retainer(Qty:-7)2Rear Wheelhouse Panel Liner ScrewCaution:Refer toFastener Caution.Tighten6-Y(53-lb-in)3 ...
