Chevrolet Equinox Service Manual: Front Floor Console Replacement Consoles Center Console
Chevrolet Equinox Service Manual / Body / Body Interior / Front Floor Console Replacement Consoles Center Console

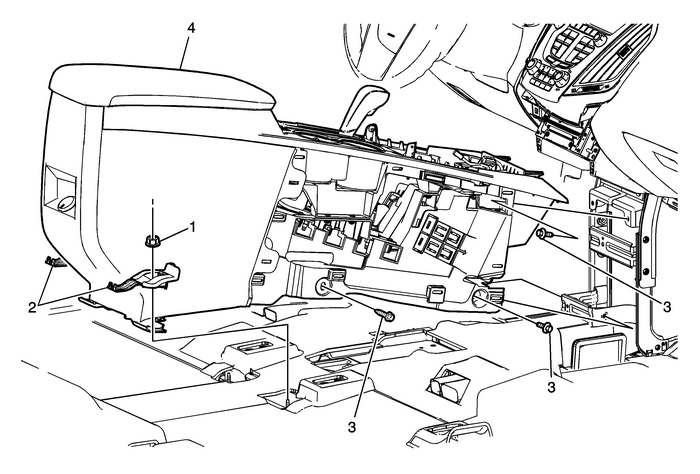
| Preliminary ProceduresRemove the front seats. Refer toDriver or Passenger Seat Removal and Installation.Remove the right and left front floor lower console sidefinish covers. Refer toFront Floor Lower Console Side Finish Cover Replacement - Right SideandFront Floor Lower Console Side Finish Cover Replacement - Left Side.Remove the instrument panel right and left lower extensions.Refer toInstrument Panel Lower Extension Replacement.Remove the instrument panel lower extension accessory bezel.Refer toInstrument Panel Lower Extension Accessory Bezel Replacement.Disconnect the range selector lever cable from thetransmission control assembly. Refer toRange Selector Lever Cable ReplacementorRange Selector Lever Cable Replacement | |
1 | Front Floor Console Nuts (Qty:-2) Procedure Use a suitable flat bladed tool to open the front floorconsole fastener covers in order to expose the console nuts. Caution:Refer toFastener Caution. Tighten9-Y(80-lb-in) |
2 | Front Floor Console Fastener Covers |
3 | Front Floor Console Bolts (Qty:-6) Tighten9-Y(80-lb-in) |
4 | Front Floor Console Assembly ProceduresDisconnect the electrical connections.When replacing the front floor console assembly, transfer allnecessary components. |
 Front Floor Console Rear Cover Replacement Consoles Center Console
Front Floor Console Rear Cover ReplacementCalloutComponent Name1Front Floor Console Rear CoverProceduresGrasp the console rear cover and pull it rearward away fromthe console assembly.Disconnect the e ...
 Front Floor Console Trim Plate Replacement Consoles Center Console
Front Floor Console Trim Plate ReplacementCalloutComponent NamePreliminary ProcedureRemove the front seat assemblies. Refer toDriver or Passenger Seat Removal and Installation.Remove the front floor c ...
Other materials:
Steering Column Accident Damage Inspection Steering Wheel and Column
Inspection ProcedureRemove the turn signal switch bracket. Refer toTurn Signal Switch Bracket Replacement.Caution:Vehicles involved in accidents that result in any of thefollowing kinds of damage or situations, may also have a damaged ormisaligned steering column:Frame damageMajor body damageSheet m ...
© 2017-2026 Copyright www.cequinox.com

