Chevrolet Equinox Service Manual: Air Conditioning Compressor Hose Replacement (LFX) Compressor
Special Tools
J-39400-A Halogen Leak Detector
For equivalent regional tools, refer toSpecial Tools.
Removal ProcedureRecover the refrigerant. Refer toRefrigerant Recovery and Recharging.Remove the left headlamp. Refer toHeadlamp Replacement.
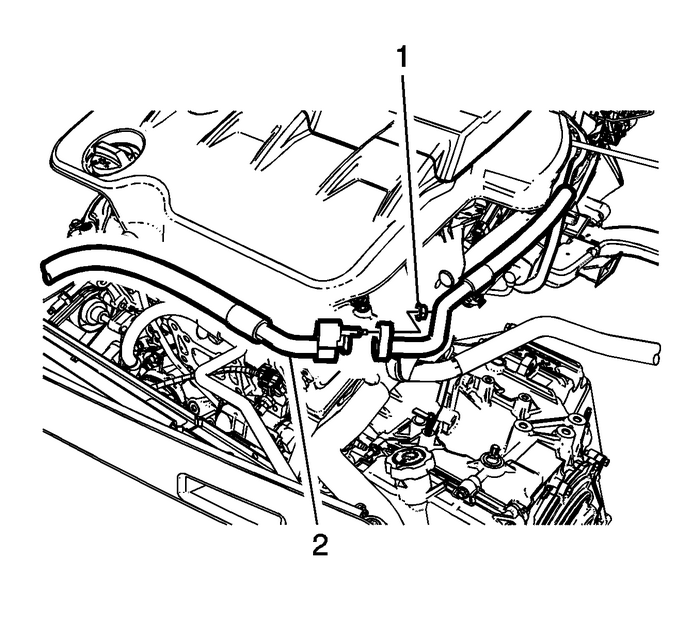
Remove the air conditioning compressor hose nut-(1) from the air conditioning evaporatorthermal expansion valve tube hose.Remove the air conditioning compressor hose-(2) from the air conditioning evaporatorthermal expansion valve tube hose.

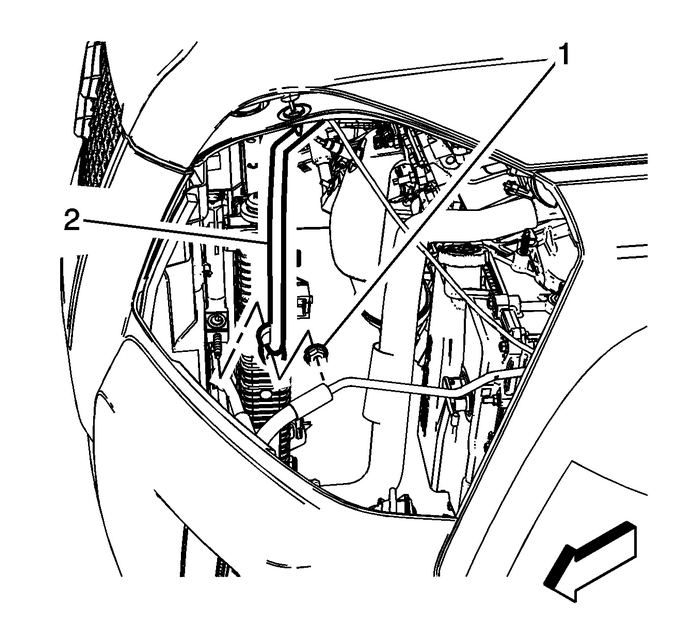
Remove the compressor hose nut-(1) from the condenser.Remove the compressor hose-(2) from the condenser.Raise and support the vehicle. Refer toLifting and Jacking the Vehicle.Disconnect the electrical connector from the air conditioning refrigerant pressuresensor valve.

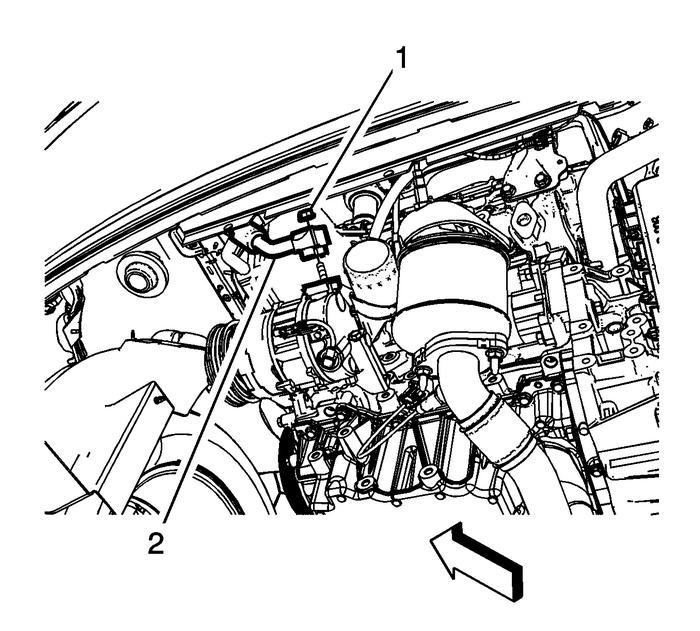
Remove the compressor hose nut-(1) at the compressor.Remove the compressor hose-(2) from the compressor.Remove the compressor hose from the vehicle.Remove and discard the sealing washers from the compressor hose. Refer toAir Conditioning System Seal Replacement.Installation Procedure

Install new seal washers to the compressor hose. Refer toAir Conditioning System Seal Replacement.Install the compressor hose-(2) to the compressor.
Caution:Refer toFastener Caution.
Install the compressor hose nut-(1) to the compressor and tighten the nut to 22-Y (16-lb-ft).Connect the electrical connector to the air conditioning refrigerant pressure sensorvalve.
Lower the vehicle.Position the compressor hose in the vehicle.Install a new sealing washer to the air conditioning evaporator thermal expansionvalve tube hose. Refer toAir Conditioning System Seal Replacement.Install the air conditioning evaporator thermal expansion valve tube hose-(2) to thecompressor hose.Install the compressor hose nut-(1) to the air conditioning evaporator thermal expansionvalve tube hose and tighten the nut to 22-Y (16-lb-ft).

Install a new sealing washer to the compressor hose at the condenser. Refer toAir Conditioning System Seal Replacement.Install the compressor hose-(2) to the condenser.Install the compressor hose nut-(1) to the condenser and tighten to 22-Y (16-lb-ft).Install the left headlamp. Refer toHeadlamp Replacement.Recharge the A/C system. Refer toRefrigerant Recovery and Recharging.Test the affected A/C joints for leaks using J-39400-A halogen leak detector.
 Refrigerant Recovery and Recharging
Special ToolsJ 34100Smart CartWarning:To prevent personal injury, avoid breathing A/C Refrigerantand lubricant vapor or mist. Work in a well ventilated area. Toremove refrigerant from the A/C System, ...
 Air Conditioning Refrigerant Service Valve Core Replacement
Special ToolsJ 39400-AHalogen Leak DetectorJ 46246Valve Core Removal ToolRemoval ProcedureRecover the refrigerant. Refer toRefrigerant Recovery and Recharging.UseJ 46246Valve Core Removal Toolor equiv ...
Other materials:
Water Pump and Balance Shaft Chain and Tensioner Installation Engine Block Cylinder Block Balance Shaft
Caution:Refer toFastener Caution.Note:If the balance shafts are not properly timed to the engine,the engine may vibrate and make noise.Install the upper balance shaft chain guide-(1)and bolts and tighten to12-Y-(106-lb-in).Install the small balance shaft chainguide-(1).Install the balance shaft chai ...
