
Chevrolet Equinox Service Manual: Sunroof Motor/Actuator Replacement Moonroof/Sunroof Power Moonroof Motor and Cables
Chevrolet Equinox Service Manual / Body / "Roof - Fixed, Leisure" / Sunroof Motor/Actuator Replacement Moonroof/Sunroof Power Moonroof Motor and Cables
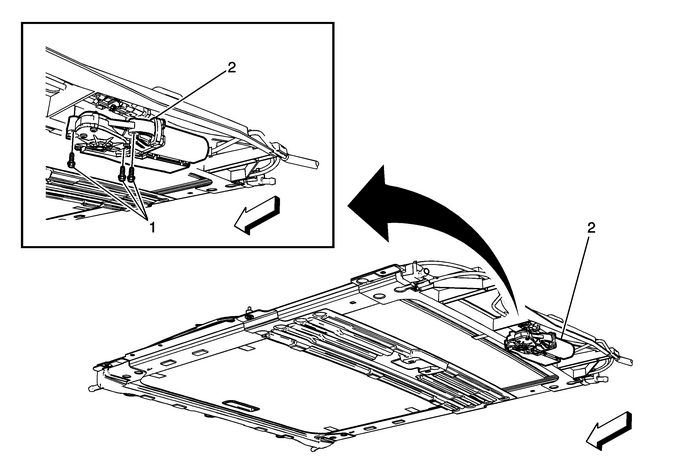
Preliminary Procedure It is only necessary to lower the headliner. Only perform thesteps in the headliner replacement procedure that will lower theheadliner enough to gain access to the part. Refer toHeadlining Trim Panel Replacement. | |
1 | Sunroof Motor/Actuator Screw (Qty:-3) Caution:Refer toFastener Caution. ProcedureThe sunroof window must be in the fully closed positionbefore disconnecting the harness, to ensure synchronization of thesunroof motor to the sunroof module.Disconnect the electrical connector from the sunroofmotor.Tighten5-Y(44-lb-in). |
2 | Sunroof Motor/Actuator ProcedurePull downward to disengage the motor/actuator from thesunroof module.Perform the timing/synchronization of the sunroof frame.Refer toSunroof Track Timing/Synchronization.Install the motor, verify the sunroof operation.Ensure the motor/actuator initialization/teach process hasbeen done. Refer toSunroof Motor/Actuator Initialization/Teach Process.Verify the proper operation of the sunroof before installingthe headliner.Install the headliner. Refer toHeadlining Trim Panel Replacement. |
 Sunroof Housing Rear Drain Hose Replacement Roof Drainage
Sunroof Housing Rear Drain Hose ReplacementCalloutComponent NamePreliminary ProceduresRemove the quarter window trim finish panel. Refer toQuarter Window Trim Finish Panel Replacement.Remove the body ...
 Sunroof Tilt Position Switch Replacement Moonroof/Sunroof
Sunroof Tilt Position Switch ReplacementCalloutComponent NamePreliminary ProcedureRemove the roof console. Refer toRoof Console Replacement.1Sunroof Tilt Position SwitchProcedureDisconnect electrical ...
Other materials:
Coolant Heater Replacement (LFX) Engine Cooling
Coolant Heater ReplacementCalloutComponent NamePreliminary ProcedureRaise and support the vehicle. Refer toLifting and Jacking the Vehicle.1Coolant HeaterTip:Be careful not to score inner surface of the engine blockwhen removing coolant heater. ...
© 2017-2026 Copyright www.cequinox.com
