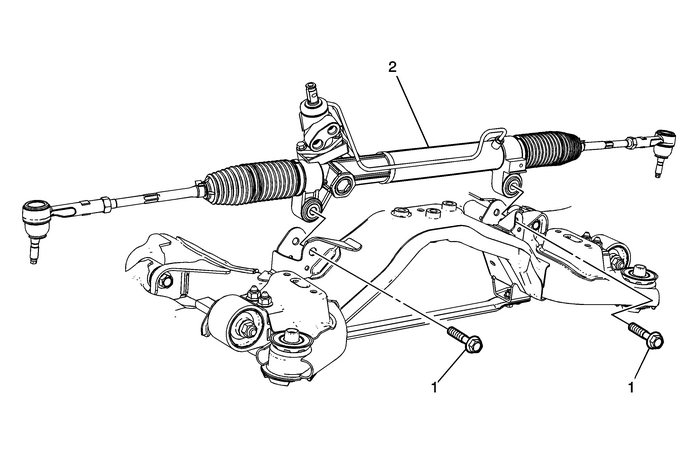
Chevrolet Equinox Service Manual: Steering Gear Replacement (3.6L) Steering Gear Assembly

Caution:With wheels of the vehicle facing straight ahead, secure the steering wheel utilizingsteering column anti-rotation pin, steering column lock, or a strap to prevent rotation.Locking of the steering column will prevent damage and a possible malfunction of theSIR system. The steering wheel must be secured in position before disconnecting thefollowing components: The steering columnThe intermediate shaft(s)The steering gearAfter disconnecting these components, do not rotate the steering wheel or move thefront tires and wheels. Failure to follow this procedure may cause the SIR coil assemblyto become un-centered and cause possible damage to the SIR coil. If you think theSIR coil has become un-centered, refer to your specific SIR coil’s centering procedureto re-center SIR Coil. Preliminary ProcedureWith the front wheels in the straight ahead position, turnthe ignition switch to the OFF position and remove the key from theignition lock cylinder.Rotate the steering wheel in order to lock the steeringcolumn.Place drain pans under the vehicle.Remove the intake manifold cover. Refer toIntake Manifold Cover Replacement.Remove as much power steering fluid from the power steeringfluid reservoir as possible.Disconnect the 2-outer tie rods from the steeringknuckles. Refer toSteering Linkage Outer Tie Rod Replacement.Disconnect the power steering gear inlet pipe from thesteering gear. Refer toPower Steering Gear Inlet Pipe/Hose Replacement.Disconnect the power steering fluid cooling pipe from thesteering gear. Refer toPower Steering Fluid Cooling Pipe Replacement.Disconnect the intermediate steering shaft from the steeringgear. Refer toIntermediate Steering Shaft Replacement.Position a jack stand under the rear of the drivetrain andfront suspension frame. Partially lower the rear of the drivetrainand front suspension frame in order to gain clearance for thesteering gear. Refer toDrivetrain and Front Suspension Frame Replacement. | |
1 | Steering Gear Bolt (Qty:-2) Caution:Refer toFastener Caution. Procedure Install NEW steering gear bolts. Tighten110-Y(81-lb-ft) |
2 | Steering Gear ProcedureCarefully remove the steering gear through the left frontwheel opening.After the installation is complete, fill and bleed the powersteering system. Refer toPower Steering System Bleeding.Clean any excess power steering fluid from thevehicle.Measure and adjust the front toe. Refer toWheel Alignment - Steering Wheel Angle and/or Front Toe Adjustment. |
 Steering Gear Replacement (2.4L) Steering Gear Assembly
Steering Gear ReplacementCalloutComponent NameCaution:Electrostatic discharge (ESD) can damage many solid-stateelectrical components. ESD susceptible components may or may not belabeled with the ESD s ...
 Steering Linkage Outer Tie Rod Replacement Tie Rods and Linkage
Steering Linkage Outer Tie Rod ReplacementCalloutComponent NamePreliminary ProcedureRemove the front tire and wheel assembly. Refer toTire and Wheel Removal and Installation.1Steering Linkage Outer Ti ...
Other materials:
Liftgate Replacement Panels
Liftgate ReplacementCalloutComponent NamePreliminary ProceduresDisconnect the battery. Refer toBattery Negative Cable Disconnection and Connection.Disconnect the liftgate actuator from the liftgate. Refer toLiftgate Hydraulic Actuator Replacement.Disconnect the liftgate strut. Refer toLiftgate Strut ...
