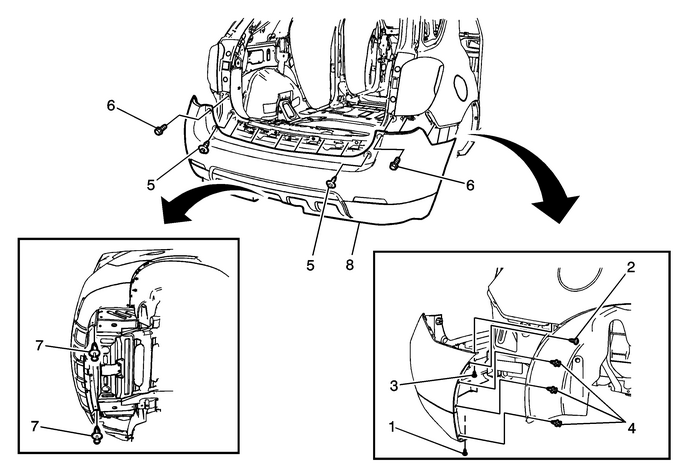
Chevrolet Equinox Service Manual: Rear Bumper Fascia Replacement Bumpers Rear Bumper

Preliminary Procedure Raise and support the vehicle. Refer toLifting and Jacking the Vehicle. | |
1 | Rear Fascia Lower Screw Caution:Refer toFastener Caution. Tighten7-Y(62-lb-in) |
2 | Rear Fascia Upper Screw Tighten7-Y(62-lb-in) |
3 | Rear Fascia Screw (Qty:-2) Tighten7-Y(62-lb-in) |
4 | Rear Fascia Push-In Retainer (Qty:-6) |
5 | Rear Fascia Screw (Qty:-2) Tighten7-Y(62-lb-in) |
6 | Rear Fascia Bolt (Qty:-2) Tighten7-Y(62-lb-in) |
7 | Rear Fascia Push-In Retainer (Qty:-2) |
8 | Rear Fascia ProcedureCarefully push a small nylon wedge between the fascia and therear fascia retainers. Insert a small flat-bladed tool into thefascia slot and depress the snaps one at a time and pull on thefascia at the same time to gradually remove the fascia from therear fascia retainers.Disconnect the electrical connector.Transfer parts as needed. |
 Rear Bumper Fascia Molding Replacement (Terrain) Bumpers Rear Bumper
Rear Bumper Fascia Molding ReplacementCalloutComponent NamePreliminary ProcedureRemove the rear bumper energy absorber. Refer toRear Bumper Energy Absorber Replacement.1Rear Bumper Fascia MoldingProce ...
 Rear Bumper Fascia Support Replacement Bumpers Rear Bumper
Rear Bumper Fascia Support ReplacementCalloutComponent NamePreliminary ProcedureRemove the rear bumper fascia. Refer toRear Bumper Fascia Replacement.1Rear Bumper Fascia Support Bolt (Qty:-4)Caution:R ...
Other materials:
Engine Flywheel Cleaning and Inspection Flywheel/Flexplate
Clean the flywheel in solvent.Warning:Refer toSafety Glasses Warning.Dry the flywheel with compressed air.Inspect the flywheel for the following:Damaged ring gear teethStress cracks around theflywheel-to-crankshaft bolt holelocationsWeight saving holes ...
