Chevrolet Equinox Service Manual: Fuel Pump Installation Fuel System Fuel Pumps
Special Tools
EN 48896 HP Fuel Pump Installation Alignment Gauge
For equivalent regional tools, refer toSpecial Tools.
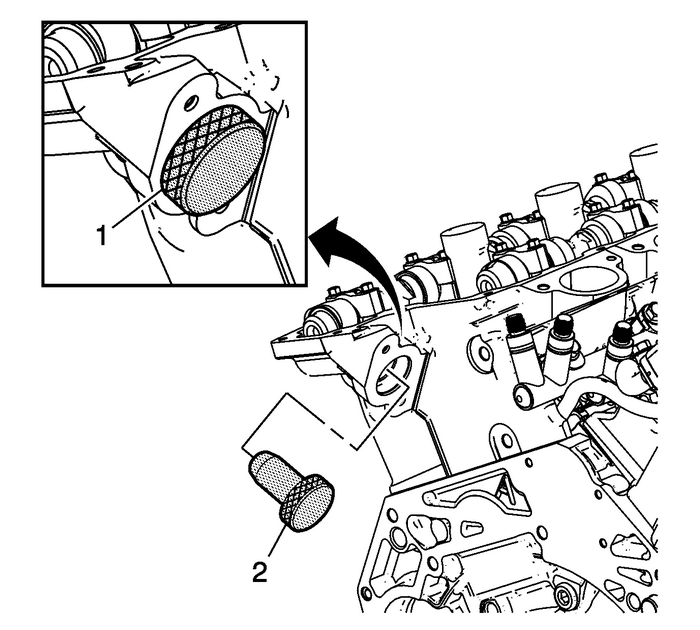
Note:The camshaft must be in the base circle position before the high pressure fuel pumpis installed.
Use the EN 48896 alignment gauge-(2) to ensure that the camshaft lobe is in the base circle position. At base circleposition, the tool will be flush with the head-(1).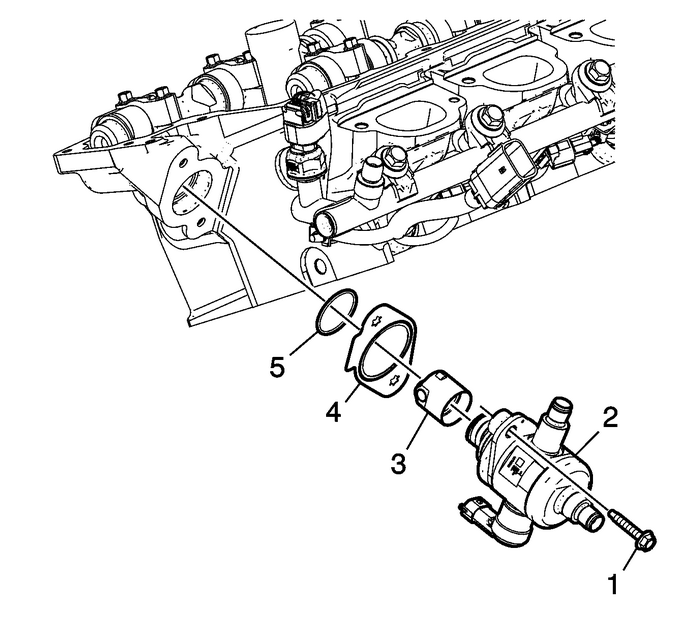
Lubricate the high pressure fuel pump cylinder head bore with 5W30 engine oil.
Note:Ensure that the high pressure fuel pump roller lifter is oriented properly, the camshaftis at base circle and the number-1 piston is at top dead center-(TDC) on the exhauststroke.
Lubricate the high pressure fuel pump roller lifter with 5W30 engine oil and installinto the cylinder head bore.Install a NEW high pressure fuel pressure fuel pump gasket-(4).Install a NEW high pressure fuel pump O-ring-(5).Note:Ensure the plastic bolt retainers are installed in the high pressure fuel pump mountingholes before installing.
Install the valve lifter follower-(3).Install the high pressure fuel pump-(2).Caution:Refer toFastener Caution.
Caution:Alternately hand-tighten the fuel pump bolts one turn at atime until the pump is fully seated. Trying to draw down the pumpwithout even side-to-side tightening may result in pump plungerdamage.
Caution:This vehicle is equipped with torque-to-yield or single use fasteners. Install a NEWtorque-to-yield or single use fastener when installing this component. Failure toreplace the torque-to-yield or single use fastener could cause damage to the vehicleor component.
Start and hand-tighten the NEW high pressure fuel pump bolts-(1) evenly and tightenthe high pressure fuel pump bolts to 15-Y (11-lb-ft).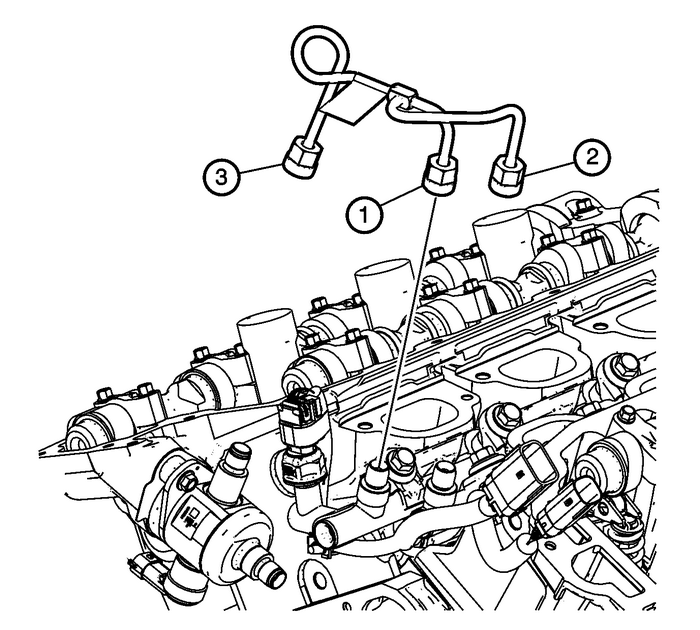
Note:
DO NOT reuse the high pressure fuel rail crossover pipe.The tightening order and torque are critical to proper fuel system fit and function.Be sure to follow installation and tightening steps exactly.Install the NEW high pressure LH to RH fuel rail crossover pipe by starting all threefuel crossover pipe fitting nuts-(1), (2) and (3) to finger-tight only.Tighten the fuel rail crossover pipe fittings to 30-Y (22-lb-ft)in the following order: (1)-Left Fuel Rail, (2)-Right Fuel Rail, then (3)-Fuel Pump.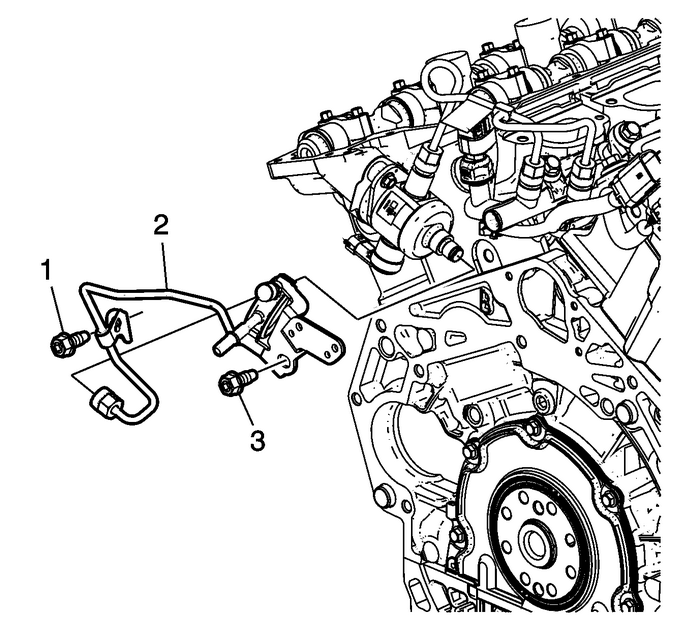
Install the NEW fuel feed pipe-(2) by installing the fuel line nut to the fuel pumpfinger-tight.Install the right fuel feed pipe bolt finger tight-(3).Install the left fuel feed pipe bolt finger tight-(1).Tighten the left fuel feed pipe bolt-(1) to 10-Y (89-lb-in).Tighten the right fuel feed pipe bolt-(3) to 10-Y (89-lb-in).Tighten the fuel feed pipe fitting nut to 50-Y (37-lb-ft).Install the fuel rail wiring connectors to the fuel feed pipe bracket.
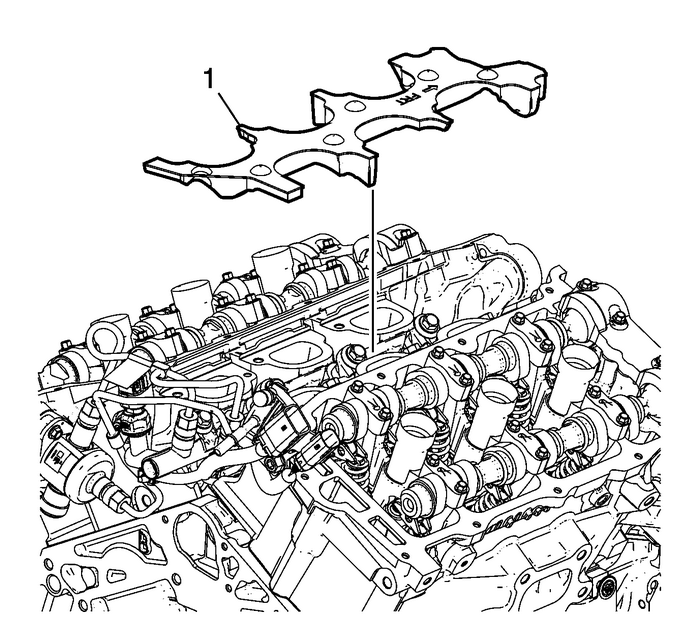
Install the fuel rail noise shield-(1).
 Intake Manifold Installation Intake and Forced Induction Intake Manifold
Special Tools EN-48896 HP Fuel Pump Installation Alignment GaugeFor equivalent regional tools, refer toSpecial Tools.Caution:Refer toFastener Caution.Install the intake manifold studs in the manifold ...
 Camshaft Timing Chain and Tensioner Removal (LAF, LEA, or LUK) Valvetrain Valvetrain Timing
Special ToolsEN-48953Camshaft Actuator Locking ToolFor equivalent regional tools, refer toSpecial Tools.Rotate the crankshaft to installEN-48953locking tool-(1).Note:Marking the chain and actuators is ...
Other materials:
Rear Side Door Window Belt Reveal Molding Replacement Doors
Rear Side Door Window Belt Reveal Molding ReplacementCalloutComponent Name1Rear Side Door Window Belt Reveal MoldingProcedurePlace the window in the fully down position.Apply masking tape to the applique to protect thefinish.Start at the front edge of the rear side door window revealmolding, pull up ...
