Chevrolet Equinox Service Manual: Fuel Injector and Fuel Rail Replacement Engine Control
Special ToolsEN-47909 Fuel Injector Bore and Sleeve Cleaning KitEN-49248 Injector Rail Assembly Remover
For equivalent regional tools, refer toSpecial Tools.
Removal ProcedureRelieve the fuel system pressure. Refer toFuel Pressure Relief.Remove the fuel pipe shield. Refer toFuel Pipe Shield Replacement.Remove the intake manifold. Refer toIntake Manifold Replacement.Remove the fuel feed intermediate pipe. Refer toFuel Feed Intermediate Pipe Replacement.Remove the foam insulator from the fuel rails.Remove the cylinder head. Refer toCylinder Head Replacement - Left Side-or-Cylinder Head Replacement - Right Side
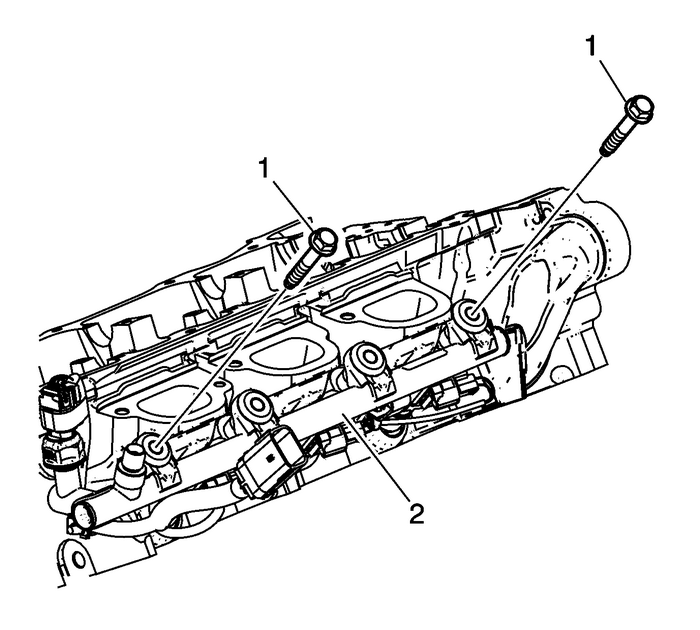
Remove the bolts-(1) from the bank-2 fuel rail.Remove the bank 1 fuel rail and injectors-(2) as an assembly. Refer toCylinder Head Disassemble.Disconnect the bank 1 fuel injector electrical connections.

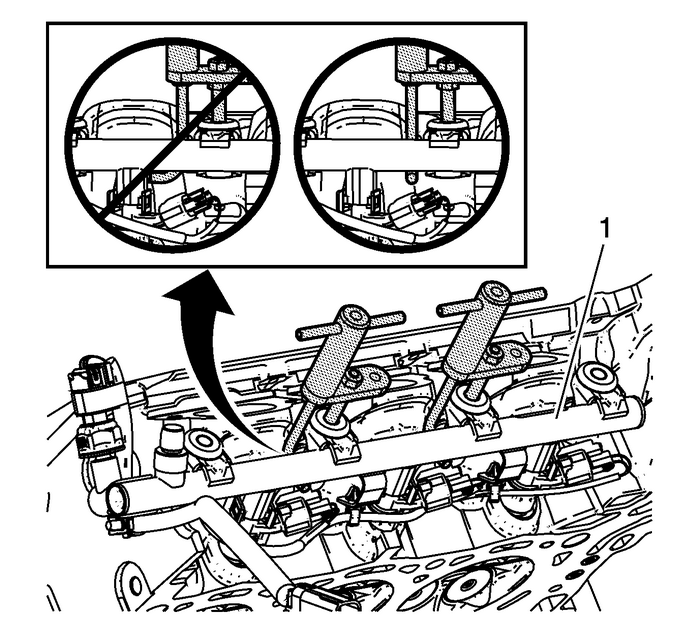
Using the EN-49248-4 hook , raise the fuel rail (1) as an assembly.Once the fuel rail is free, remove the EN-49248 special tool.If the bank 2 fuel rail or injectors are being serviced, remove them. Refer toCylinder Head Disassemble.Disconnect the bank 2 fuel injector and fuel pressure sensor electrical connections.
Note:The direct fuel injectors must be rebuilt whenever the injector has been releasedfrom the fuel rail or cylinder head.
It is necessary to rebuild the fuel injectors. Refer toFuel Rail and Injectors Cleaning and Inspection.Installation Procedure
Clean the fuel injector bores using EN-47909 kit.Ensure that the fuel injectors have been properly rebuilt and lubricated. Refer toFuel Rail and Injectors Cleaning and Inspection.Connect the bank 2 fuel injector and fuel pressure sensor electrical connections.Position the bank 2 fuel rail and evenly hand tighten the 2-outer fuel rail boltsto seat the injectors into the injector bores. Remove the bolts.Connect the bank 1 fuel injector electrical connections.Position the bank 1 fuel rail and evenly hand tighten the 2-outer fuel rail boltsto seat the injectors into the injector bores.Start and hand tighten the remaining fuel rail bolts.
Caution:Refer toFastener Caution.
Tighten the bank 1 and bank 2 fuel rail bolts to 25-Y (18-lb-ft).Replace any wire harness tie straps cut from the fuel rails.Install the cylinder head. Refer toCylinder Head Replacement - Left Side-or-Cylinder Head Replacement - Right SideInstall the fuel feed intermediate pipe. Refer toFuel Feed Intermediate Pipe Replacement.Inspect for fuel leaks using the following procedure:Turn ON the ignition, with the engine OFF for 2-seconds.Turn OFF the ignition, for 10-seconds.Turn ON the ignition, with the engine OFF.Inspect for fuel leaks.Note:Before installing the foam insulator, remove any remaining fuel from the injectorwell.
Install the foam insulator to the fuel rails.Install the intake manifold. Refer toIntake Manifold Replacement.Install the fuel pipe shield. Refer toFuel Pipe Shield Replacement.Install the low side fuel pressure service port cap. Metal Collar Quick Connect Fitting Service Engine Control
Special ToolsEN-37088-AFuel Line Disconnect Tool SetFor equivalent regional tools, refer toSpecial Tools.Removal ProcedureRelieve the fuel system pressure before servicing any fuelsystem connection. R ...
 Fuel Pump Replacement Engine Control
Special Tools EN-48896 High Pressure Fuel Pump Installation Alignment GaugeFor equivalent regional tools, refer toSpecial Tools.Removal ProcedureRelieve the low and high side fuel system pressure. Ref ...
Other materials:
Rear Seat Adjuster Handle Replacement Seats Rear
Rear Seat Adjuster Handle ReplacementCalloutComponent NamePreliminary ProcedureRemove the rear seat. Refer toRear Seat Removal and Installation1Rear Seat Adjuster Handle Fastener2Rear Seat Adjuster Handle ...
