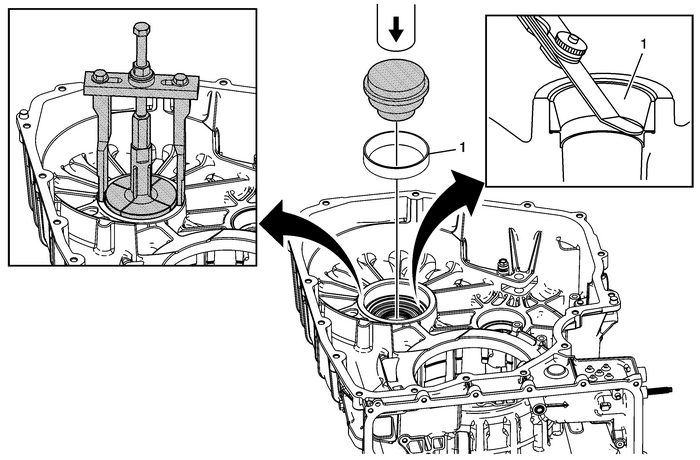
Chevrolet Equinox Service Manual: Front Differential Carrier Bearing Cup Replacement - Case Side Automatic Transmission Unit

1 | Front Differential Bearing Cup Caution:Support the back side of the case before installing thebearing cup. Apply a light coating of transmission fluid to thebore before pressing the cup into position. Install the bearing cupuntil it stops moving. Applying excessive pressure to the bearingcup once it is seated could cause damage to the casecasting. Caution:An unseated or improperly installed bearing cup will resultin premature bearing failure. Visually inspect the bearing cup toinsure there is“no gap” between the case,thrust washer, and the bearing cup. Use of a feeler gauge mayassist in identifying a bearing cup that is not fullyseated. Caution:Failure to apply the lubricant will cause damage to the boltand nut threads. Caution:There are first and second design front differential bearing cups. First design bearingcups are manufactured by Timken. Second design bearing cups are manufactured by NSK.Second design bearing cups require DT-45087-A cup installer. If installing seconddesign bearing cups, second design front differential carrier bearings must be used.All four parts must be kept as a set to prevent damage to the transmission. Note: Tighten DT-47927-2 which is part of DT-47927 cup remover until it fits snugly on the bearing cup.Adjust DT 45124 removal bridge so it sits on the torque converter housing surface just beyond the bearing cup opening.Apply the extreme pressure lubricant DT 23444-A extreme press lubricant to the puller bolt threads to prevent damage to the bolt threads during bearing cupremoval.Hold the puller bridge bolt and turn the nut to remove the bearing cup.Special ToolsDT 23444-A Extreme Press Lubricant-–-1/4 Ounce TubeDT-45087 Bearing Cup InstallerDT-45087-A Bearing Cup InstallerDT 45124 Removal BridgeDT-47927 Bearing Cup RemoverFor equivalent regional tools, refer toSpecial Tools. |
 Front Differential Carrier Bearing Cup and Washer Replacement - Torque Converter Housing Side Automatic Transmission Unit
Front Differential Carrier Bearing Cup and Washer Replacement - Torque Converter HousingSideCalloutComponent NamePreliminary ProceduresDo not install the bearing cup until after the selective washer m ...
 Front Differential Carrier Bearing Installation (AWD) Automatic Transmission Unit
Front Differential Carrier Bearing InstallationCalloutComponent Name1Front Differential Carrier BearingNote:Press the bearing until the tool stops against the housing to ensure the bearing isinstalled ...
Other materials:
Trailing Arm Replacement Control Arms
Removal ProcedureRaise and support the vehicle. Refer toLifting and Jacking the Vehicle.Remove the tire and wheel. Refer toTire and Wheel Removal and Installation.Remove the park brake cable bolt from the trailing arm andfrom the frame. Refer toParking Brake Rear Cable Replacement.Remove the trailin ...
