Chevrolet Equinox Service Manual: Camshaft Timing Chain Components Installation Valvetrain Valvetrain Timing
| Table 1: | Secondary Camshaft Intermediate Drive Chain Installation - Left Side - Step 1 |
| Table 2: | Secondary Camshaft Intermediate Drive Chain Installation - Left Side - Step 2 |
| Table 3: | Secondary Camshaft Drive Chain Guide and Shoe Installation - Left |
| Table 4: | Secondary Camshaft Drive Chain Tensioner Installation - Left Side |
| Table 5: | Primary Camshaft Intermediate Drive Chain Installation |
| Table 6: | Primary Timing Chain Guide Installation - Lower and Upper |
| Table 7: | Primary Camshaft Intermediate Drive Chain Tensioner Installation |
| Table 8: | Stage 1 Alignment Position to the Stage 2 Alignment Position |
| Table 9: | Secondary Camshaft Intermediate Drive Chain Installation - Right Side |
| Table 10: | Secondary Camshaft Drive Chain Guide and Shoe Installation - Right Side |
| Table 11: | Secondary Camshaft Drive Chain Tensioner Installation - Right Side |
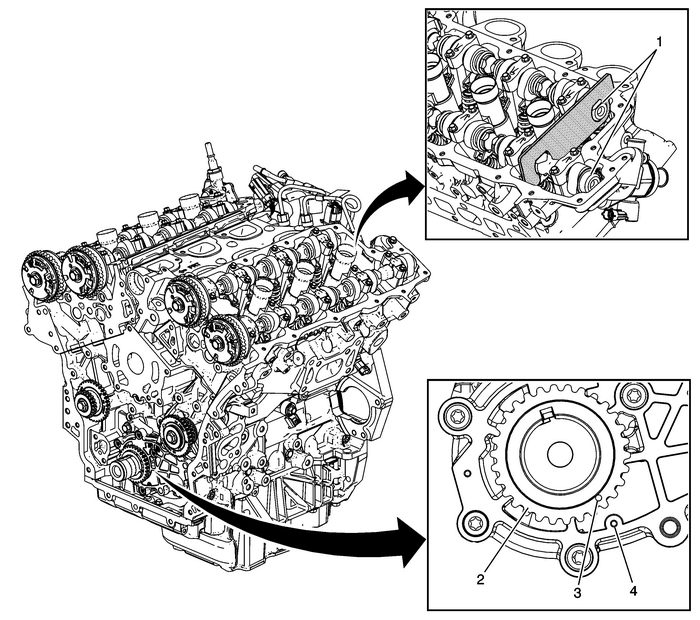
1 | Left Intake and Exhaust Camshaft ProcedureInstall the EN-48383–1 retaining tool onto the rear of the left camshafts.Ensure the EN-48383–1 retaining tool is fully seated onto the camshafts.Note: There should be no need to rotate the camshaft more than 10-degrees. Using the hexcast into the camshaft rotate the camshaft in order to install the EN-48383 retaining tools .All camshafts must be locked in place before installation of any camshaft drive chains.Special Tools EN-48383 Camshaft Retaining Tools For equivalent regional tools, refer toSpecial Tools. |
2 | Crankshaft Sprocket Note:Ensure the crankshaft is in the stage one timing position with the crankshaft sprockettiming mark-(3) aligned to the stage one timing mark on the oil pump cover-(4) usingthe EN-48589 socket. Refer toTiming Chain Alignment Diagram. Special Tools EN-48589 Crankshaft Rotation Socket For equivalent regional tools, refer toSpecial Tools. |
3 | Crankshaft Sprocket Timing Mark |
4 | Stage One Timing Mark On The Oil Pump Cover |
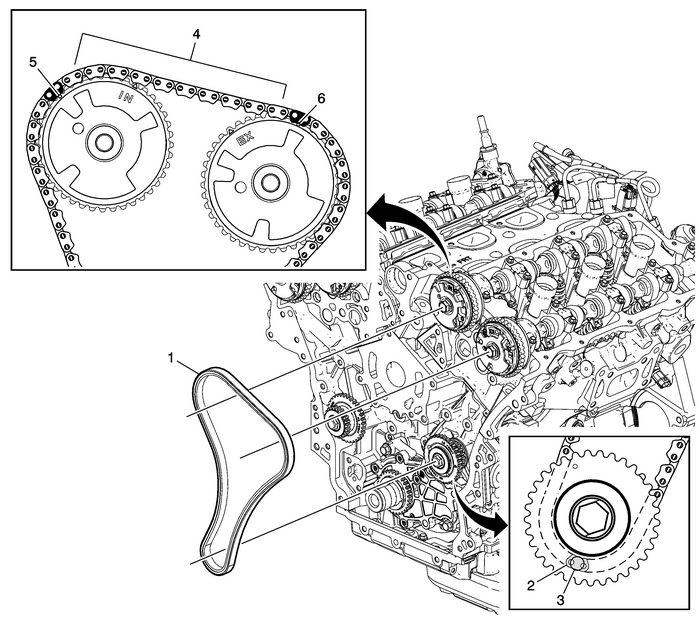
1 | Left Secondary Camshaft Drive Chain ProcedurePlace the left secondary camshaft drive chain around the inner sprocket of the leftcamshaft intermediate drive chain idler with the timing camshaft drive chain link-(2)aligned to the alignment access hole-(3) made in the left camshaft intermediate drivechain idler outer sprocket.Wrap the secondary camshaft drive chain around both left actuator drive sprockets.Ensure there are 10 links-(4) between the timing camshaft drive chain links for thecamshaft position actuator sprockets.Align the left intake camshaft position actuator sprocket alignment circle mark-(5)with the timing camshaft drive chain link.Align the left exhaust camshaft position actuator sprocket alignment circle mark-(6)with the timing camshaft drive chain link. |
2 | Timing Camshaft Drive Chain |
3 | Alignment Access Hole |
4 | 10-Links |
5 | Left Intake Camshaft Position Actuator Sprocket Alignment Circle Mark- |
6 | Left Exhaust Camshaft Position Actuator Sprocket Alignment Circle Mark |
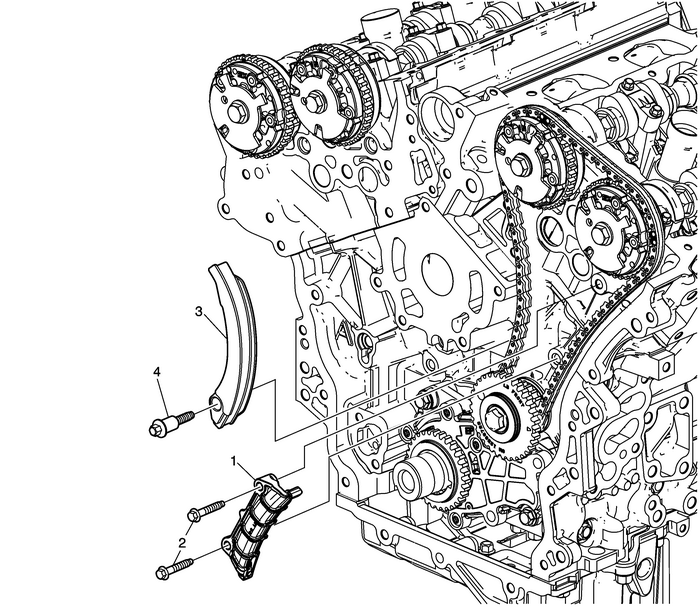
1 | Left Secondary Camshaft Drive Chain Guide |
2 | Left Secondary Camshaft Drive Chain Guide Bolt Caution:Refer toFastener Caution. Tighten25-Y (18-lb-ft) |
3 | Left Secondary Camshaft Drive Chain Shoe |
4 | Left Secondary Camshaft Drive Chain Shoe Bolt Tighten25-Y (18-lb-ft) |
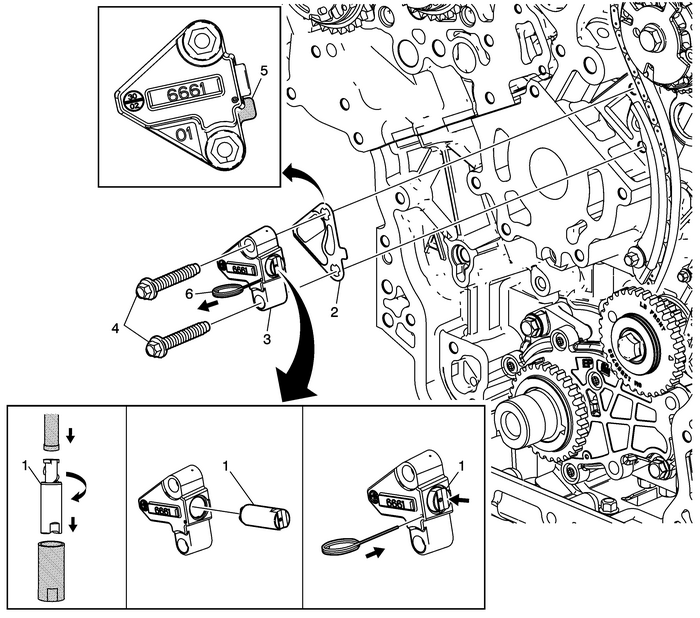
1 | Left Secondary Camshaft Drive Chain Tensioner Plunger. ProcedureReset the left secondary camshaft drive chain tensioner plunger using EN–45027 tensioner tool.Install left secondary camshaft drive chain tensioner plunger into body.Compress the plunger into the body and lock the left secondary camshaft drive chaintensioner by inserting the EN-46112 tensioner retraction pins into the access hole in the side of the left secondary camshaft drive chain tensionerbody.Slowly release pressure on the left secondary camshaft drive chain tensioner. Theleft secondary camshaft drive chain tensioner should remain compressed.Special ToolsEN-45027 Tensioner ToolEN-46112 Tensioner Retraction PinsFor equivalent regional tools, refer toSpecial Tools. |
2 | Left Secondary Camshaft Drive Chain Tensioner Gasket Note:Ensure the left secondary camshaft drive chain tensioner mounting surface on the leftcylinder head does not have any burrs or defects that would degrade the sealing ofthe NEW left secondary camshaft drive chain tensioner gasket. |
3 | Left Secondary Camshaft Drive Chain Tensioner |
4 | Left Secondary Camshaft Drive Chain Tensioner Bolt ProcedurePlace the chain tensioner into position and loosely install the bolts to the block.Verify the proper placement of the drive chain tensioner gasket tab-(5).Tighten the drive chain tensioner bolts in two passes.Release the drive chain tensioner by pulling out the EN–46112 tensioner retraction pins pin-(6) and unlocking the tensioner plunger.Verify the left secondary camshaft drive chain timing mark alignments by referringtoTiming Chain Alignment Diagram- Stage One.TightenFirst Pass 5-Y (44-lb-in)Second Pass 25-Y (18-lb-ft) |
5 | Drive Chain Tensioner Gasket Tab |
6 | EN–46112 Pin |
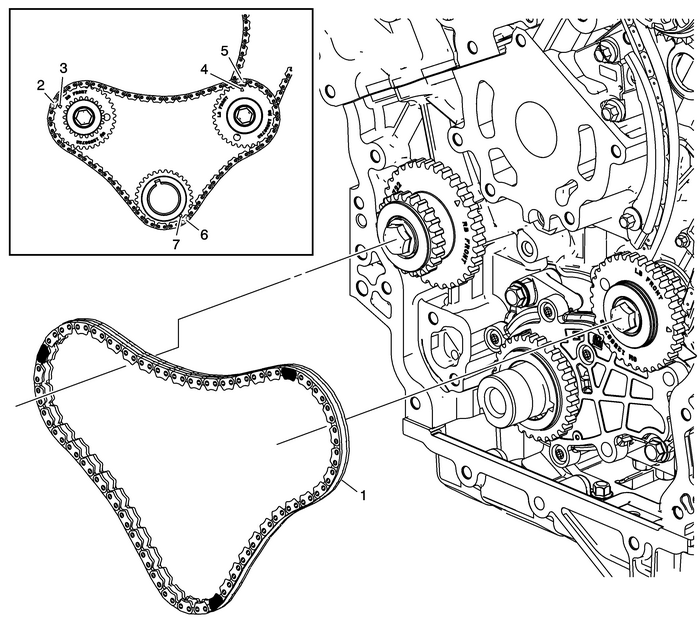
1 | Primary Camshaft Drive Chain ProcedureWrap the primary camshaft drive chain around the large sprockets of each camshaftintermediate drive chain idler and the crankshaft sprocket.The left camshaft intermediate drive chain idler timing mark-(2) will align with atiming camshaft drive chain link-(3).The right camshaft intermediate drive chain idler timing mark-(4) will align witha timing camshaft drive chain link-(5).The crankshaft sprocket timing mark-(7) will align with a timing camshaft drive chainlink-(6). |
2 | Left Camshaft Intermediate Drive Chain Idler Timing Mark |
3 | Timing Camshaft Drive Chain Link |
4 | Right Camshaft Intermediate Drive Chain Idler Timing Mark |
5 | Timing Camshaft Drive Chain Link |
6 | Timing Camshaft Drive Chain Link |
7 | Crankshaft Sprocket Timing Mark |
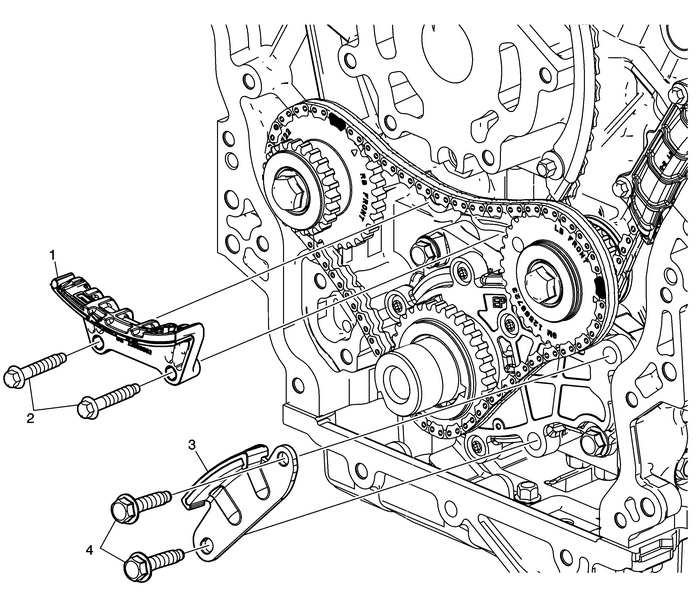
1 | Primary Camshaft Drive Chain Lower Guide |
2 | Primary Camshaft Drive Chain Lower Guide Bolt Tighten25-Y (18-lb-ft) |
3 | Upper Primary Camshaft Drive Chain Guide. |
4 | Upper Primary Camshaft Drive Chain Guide Bolt Tighten25-Y (18-lb-ft) |
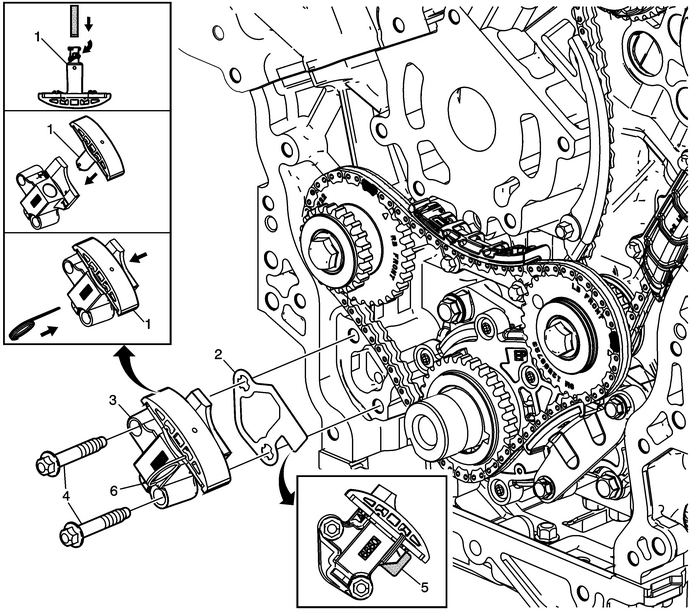
1 | Primary Camshaft Drive Chain Tensioner Plunger. ProcedureReset the primary camshaft drive chain tensioner plunger using EN–45027 tensioner tool.Install primary camshaft drive chain tensioner plunger into body.Compress the plunger into the body and lock the primary camshaft drive chain tensionerby inserting the EN-46112 tensioner retraction pins into the access hole in the side of the primary camshaft drive chain tensioner body.Slowly release pressure on the primary camshaft drive chain tensioner. The primarycamshaft drive chain tensioner should remain compressed.Special ToolsEN-45027 Tensioner ToolEN–46112 Tensioner Retraction PinsFor equivalent regional tools, refer toSpecial Tools. |
2 | Primary Camshaft Drive Chain Tensioner Gasket Note:Ensure the primary camshaft drive chain tensioner mounting surface on the engine blockdoes not have any burrs or defects that would degrade the sealing of the NEW primarycamshaft drive chain tensioner gasket. |
3 | Primary Camshaft Drive Chain Tensioner |
4 | Primary Camshaft Drive Chain Tensioner Bolt ProcedurePlace the drive chain tensioner into position and loosely install the bolts to theblock.Verify the proper placement of the drive chain tensioner gasket tab-(5).Tighten the drive chain tensioner bolts in two passes.Release the drive chain tensioner by pulling out the EN–46112pin-(6) and unlocking the tensioner plunger.Verify the primary and left secondary camshaft drive chain timing mark alignmentsby referring toTiming Chain Alignment Diagram- Stage One.TightenFirst Pass 5-Y (44-lb-in)Second Pass 25-Y (18-lb-ft) |
5 | Drive Chain Tensioner Gasket Tab |
6 | EN–46112 Pin |
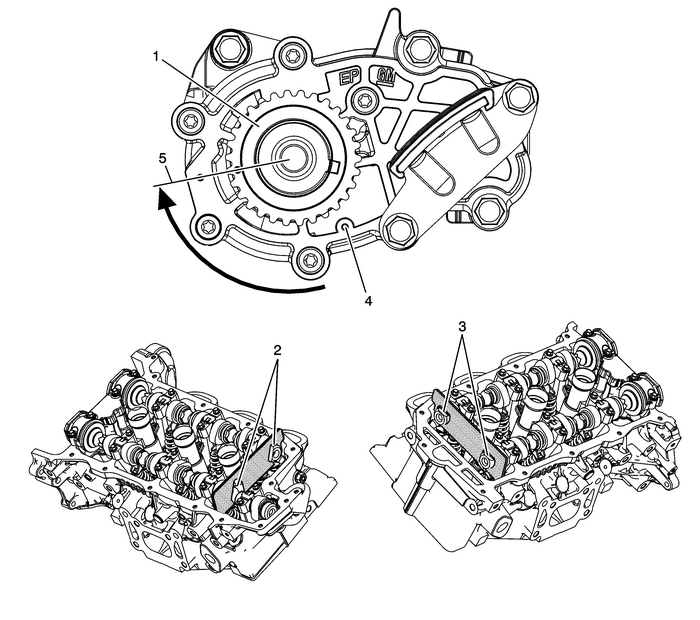
Preliminary Procedure Remove the EN 48383-1 from the rear of the left camshafts. | |
1 | Crankshaft Sprocket Procedure Using the EN–48589 crankshaft rotation socket, rotate the crankshaft and crankshaft sprocket from the stage one alignment position-(4)to the stage two alignment position-(5), 115 crankshaft degrees, in order to installthe right secondary camshaft drive chain components. Special Tools EN-48589 Crankshaft Rotation Socket For equivalent regional tools, refer toSpecial Tools. |
2 | Left Intake and Exhaust Camshaft ProcedureInstall the EN-48383-2 retainer onto the rear of the left camshafts.Ensure the EN-48383-2 retainer is fully seated onto the camshafts.Note: There should be no need to rotate the camshaft more than 10-degrees. Using the hexcast into the camshaft rotate the camshaft in order to install the EN-48383-2 retainer .All camshafts must be locked in place before installation of any camshaft drive chains.Special Tools EN-48383 Crankshaft Rotation Tools For equivalent regional tools, refer toSpecial Tools. |
3 | Right Intake and Exhaust Camshaft ProcedureInstall the EN-48383-3 retainer onto the rear of the right camshafts.Ensure the EN-48383-3 retainer is fully seated onto the camshafts.Note: There should be no need to rotate the camshaft more than 10-degrees. Using the hexcast into the camshaft rotate the camshaft in order to install the EN-48383-3 retainer .All camshafts must be locked in place before installation of any camshaft drive chains.Special Tools EN–48383 Crankshaft Rotation Tools For equivalent regional tools, refer toSpecial Tools. |
4 | Stage One Alignment Position |
5 | Stage Two Alignment Position |
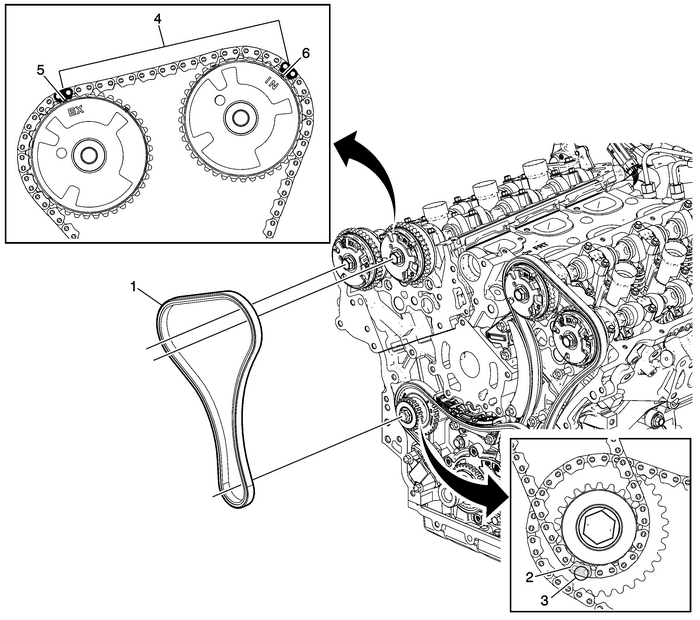
1 | Right Secondary Camshaft Intermediate Drive Chain Note:Ensure that the crankshaft is in the stage 2 timing drive assembly position. ProcedurePlace the secondary camshaft intermediate drive chain around the right camshaft intermediatedrive chain idler outer sprocket, aligning the timing camshaft drive chain link-(2)with the alignment access hole-(3) made in the right camshaft intermediate drive chainidler inner sprocket.Wrap the secondary camshaft intermediate drive chain around both right actuator drivesprockets.Ensure there are 10-links-(4) between the timing camshaft drive chain links for thecamshaft position actuator sprockets.Align the right intake camshaft position actuator sprocket alignment triangle mark-(5)with the timing camshaft drive chain link.Align the right exhaust camshaft position actuator sprocket alignment triangle mark-(6)with the timing camshaft drive chain link.There will be 22-links between the right camshaft intermediate drive chain idler timingcamshaft drive chain link and each right camshaft position actuator sprocket timingcamshaft drive chain link. |
2 | Timing Camshaft Drive Chain Link |
3 | Alignment Access Hole |
4 | 10-Links |
5 | Right Intake Camshaft Position Actuator Sprocket Alignment Triangle Mark |
6 | Right Exhaust Camshaft Position Actuator Sprocket Alignment Triangle Mark |
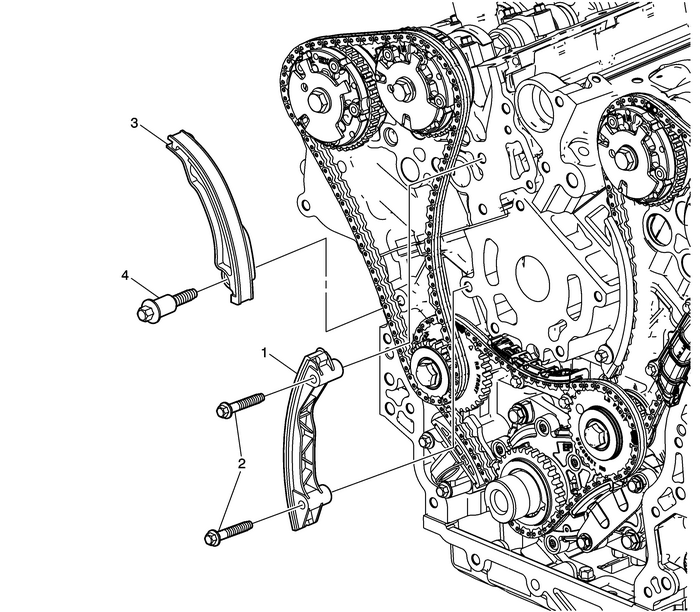
1 | Right Secondary Camshaft Drive Chain Guide |
2 | Right Secondary Camshaft Drive Chain Guide Bolt Tighten25-Y (18-lb-ft) |
3 | Right Secondary Camshaft Drive Chain Shoe |
4 | Right Secondary Camshaft Drive Chain Shoe Bolt Tighten25-Y (18-lb-ft) |
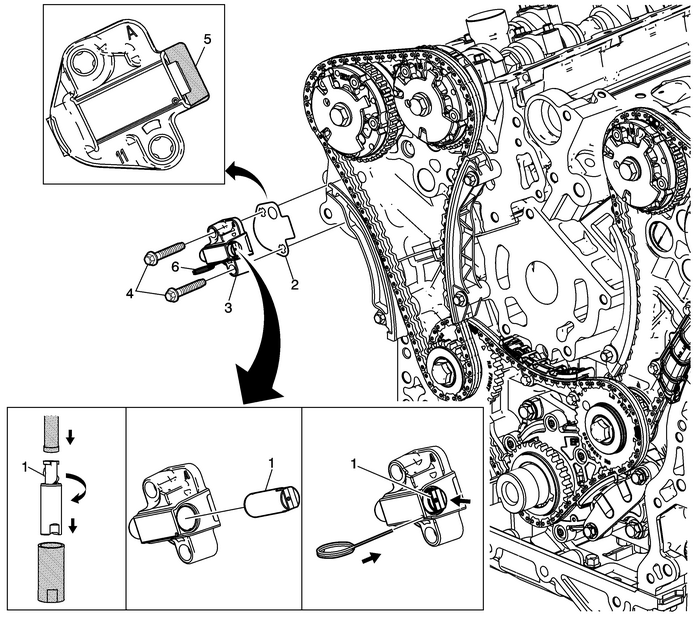
1 | Right Secondary Camshaft Drive Chain Tensioner Plunger ProcedureReset the right secondary camshaft drive chain tensioner plunger using EN–45027 tensioner tool.Install right secondary camshaft drive chain tensioner plunger into body.Compress the plunger into the body and lock the right secondary camshaft drive chaintensioner by inserting the EN–46112 tensioner retraction pins into the access hole in the side of the right secondary camshaft drive chain tensionerbody.Slowly release pressure on the right secondary camshaft drive chain tensioner. Theright secondary camshaft drive chain tensioner should remain compressed.Special ToolsEN-45027 Tensioner ToolEN–46112 Tensioner Retraction PinsFor equivalent regional tools, refer toSpecial Tools. |
2 | Right Secondary Camshaft Drive Chain Tensioner Gasket Note:Ensure the right secondary camshaft drive chain tensioner mounting surface on theright cylinder head does not have any burrs or defects that would degrade the sealingof the NEW right secondary camshaft drive chain tensioner gasket. |
3 | Right Secondary Camshaft Drive Chain Tensioner |
4 | Right Secondary Camshaft Drive Chain Tensioner Bolt ProcedurePlace the right secondary drive chain tensioner into position and loosely installthe bolts to the block.Verify the proper placement of the right secondary drive chain tensioner gasket tab-(5).Tighten the drive chain tensioner bolts in two passes.Release the right secondary drive chain tensioner by pulling out the EN–46112 pin-(6) and unlocking the tensioner plunger.Verify all primary and secondary camshaft drive chain timing mark alignments by referringtoTiming Chain Alignment Diagram- Stage One.TightenFirst Pass 5-Y (44-lb-in)Second Pass 25-Y (18-lb-ft) |
5 | Right Secondary Drive Chain Tensioner Gasket Tab |
6 | EN-46112 Pin |
 Camshaft Timing Chain Components Removal Valvetrain Valvetrain Timing
Table 1: Secondary Camshaft Drive Chain Components Removal - Right SideTable 2: Primary Camshaft Drive Chain Components RemovalTable 3: Secondary Camshaft Drive Chain Components Removal - Left SideSec ...
 Camshaft Actuator System Description Valvetrain Camshaft
The camshaft (CMP) actuator system enables the engine control module (ECM) to changecamshaft timing of all camshafts while the engine is running. The CMP actuator assemblyvaries the camshaft position ...
Other materials:
Brake Pedal Pushrod Inspection Hydraulic Brakes Brake Pedal Assembly
Disconnect the brake pedal pushrod-(1) from thebrake pedal.Inspect the brake pedal pushrod eyeletbushing-(2), if equipped, for cracks and/or excessivewear.Reposition the pedal pushrod boot-(3) toward thefront of the vehicle to expose as much of the pedalpushrod-(1) as possible.Inspect the brake peda ...
