Chevrolet Equinox Service Manual: Control Solenoid Valve and Transmission Control Module Assembly Replacement Automatic Transmission Unit
Removal ProcedureRemove the transmission control valve body cover. Refer toControl Valve Body Cover Replacement.

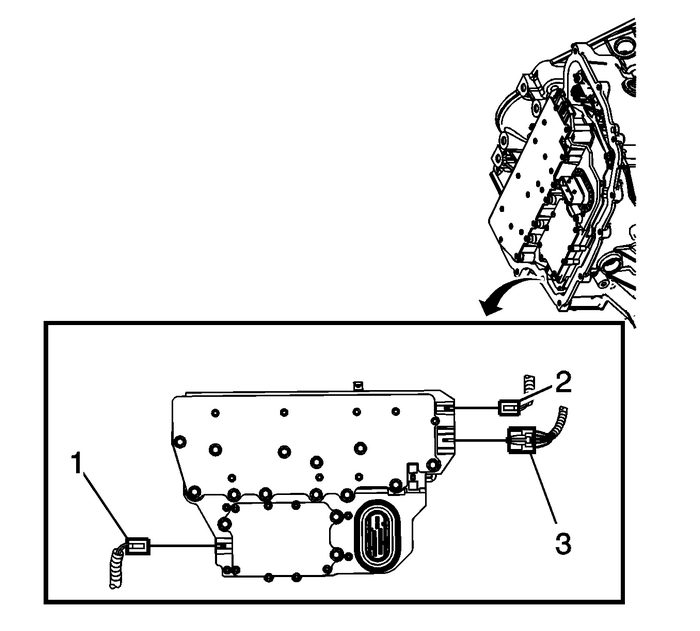
Disconnect the input speed sensor electrical connector-(1).Disconnect the output speed sensor electrical connector-(2).Disconnect the shift position switch electrical connector-(3).

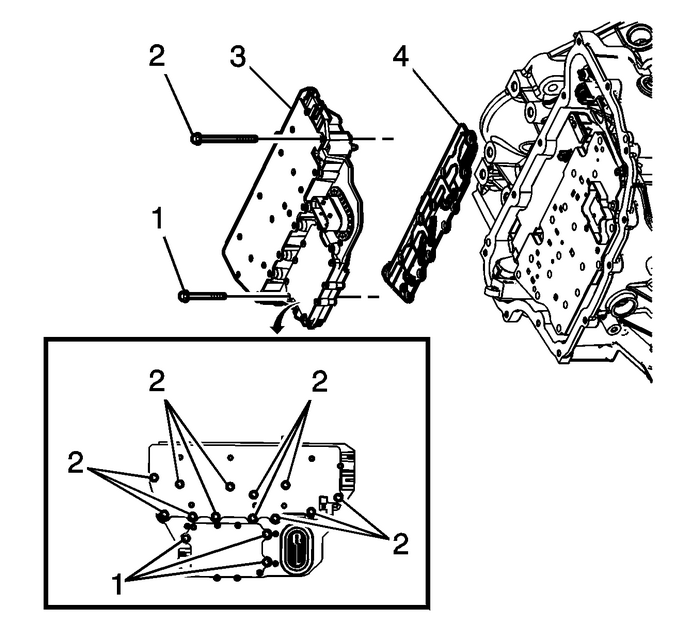
Remove the 3-control solenoid valve assembly bolts-(1) M5 x 40.5.Remove the 12-control solenoid valve assembly bolts-(2) M6 x 97.Remove the control solenoid valve assembly with transmission control module-(3).
Caution:Use care when removing or installing the filter plateassembly. A broken or missing retaining tab may not adequatelysecure the filter plate to the control solenoid valve assembly,resulting in possible damage or contamination.
Remove the control solenoid valve assembly filter plate-(4). Discard the filter plate.It is not reusable.Inspect the channel plate bolt pass through holes for damage or brinelling. Any damagewill cause incorrect pressure switch operation. Replace as necessary.Installation Procedure
Caution:Use care when removing or installing the filter plateassembly. A broken or missing retaining tab may not adequatelysecure the filter plate to the control solenoid valve assembly,resulting in possible damage or contamination.
Install a NEW control solenoid valve assembly filter plate-(4) to prevent fluid leakspast the fluid seals.Install the control solenoid valve assembly with transmission control module-(3).Hand start the control valve body bolts-(1,-2).
Caution:Refer toFastener Caution.
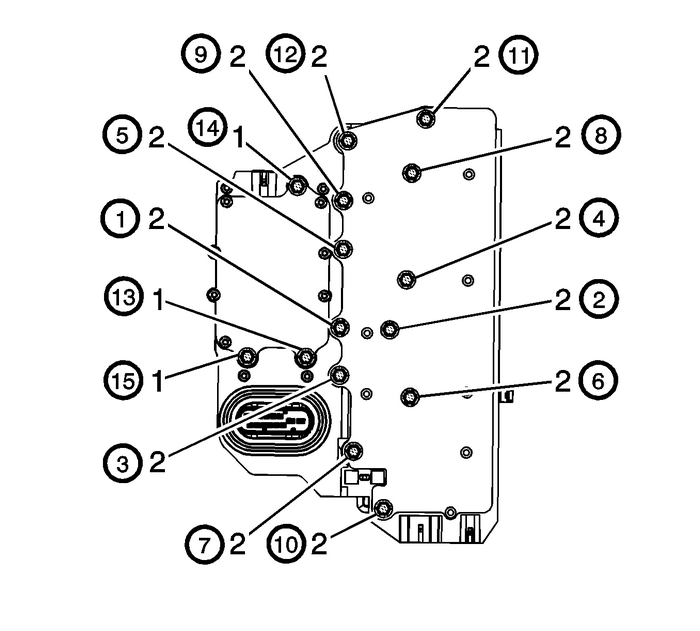
Secure the 12-control solenoid valve assembly bolts-(2) M6 x 97 and tighten in sequenceto 10-Y (89-lb-in).Secure the 3-control solenoid valve assembly bolts-(1) M5 x 40.5 and tighten in sequenceto 7-Y (62-lb-in).
Connect the input speed sensor electrical connector-(1).Connect the output speed sensor electrical connector-(2).Connect the shift position switch electrical connector-(3).Install the transmission control valve body cover. Refer toControl Valve Body Cover Replacement.If a NEW TCM has been installed into the vehicle, the NEW module needs to be reprogrammed.Refer toService Programming System (SPS).
Note:The Transmission Adaptive Values Learn procedure must be performed when one of thefollowing repairs have been made to the vehicle. Failure to perform the procedureafter one of the following repairs may result in poor transmission performance, aswell as transmission DTCs being set:
Transmission internal service/overhaulValve body repair or replacementControl solenoid valve assembly replacementTCM software/calibration updateAny service in response to a shift quality concernPerform the Transmission Adaptive Values Learn procedure. Refer toTransmission Adaptive Values Learn. Control Valve Lower Body and Upper Body Replacement Automatic Transmission Unit
Removal ProcedureRemove the control valve body cover. Refer toControl Valve Body Cover Replacement.\\Disconnect the input speed sensor electricalconnector-(1).Disconnect the output speed sensor electr ...
 Automatic Transmission Flex Plate Replacement Manual Clutch Pressure Plate Assembly
Removal Procedure..Remove the transmission. Refer toTransmission Replacement.Remove the flywheel. Refer toEngine Flywheel RemovalClean and inspect the flywheel. Refer toEngine Flywheel Cleaning and In ...
Other materials:
#03-08-46-004N: Part Restriction and Ordering Process Information for OnStar Vehicle Communication Interface Modules (VCIM) (GMNA Only) - (Aug 30, 2013)
Subject:Part Restriction and Ordering Process Information for OnStar® Vehicle CommunicationInterface Modules (VCIM) (GMNA Only)Models: 2012-2014 GM Cars and TrucksAll Equipped with OnStar® RPO UE1 This bulletin has been revised to add the 2014 model year and update ESC contact information.Please ...
