Chevrolet Equinox Service Manual: Relay Replacement (Within an Electrical Center) Relays
Chevrolet Equinox Service Manual / Electrical / "Fuses Junctions and Relays" / Relay Replacement (Within an Electrical Center) Relays
Special Tools
EL-43244 Relay Puller Pliers
Removal ProcedureRemove the electrical center cover.Note:
Always note the orientation of the relay.If equipped with a notch style relay; observe the location of the notch on the oldrelay to verify the new relay is installed with the notch in the same location.Ensure that the electrical center is secure, as not to put added stress on the wiresor terminals.Locate the relay. Refer toElectrical Center Identification Viewsto locate the electrical center where the relay exists.
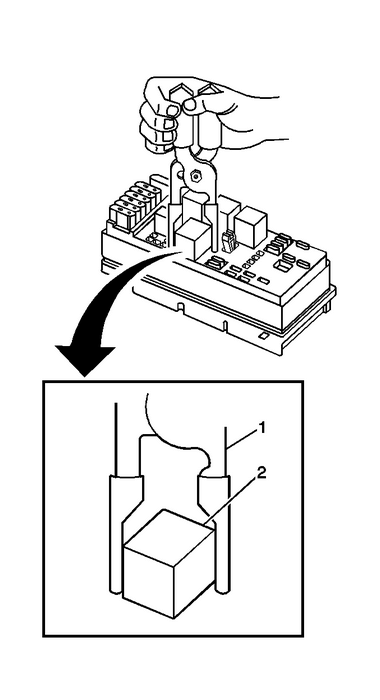
Using the EL-43244 (1) position the tool on opposing corners of the relay-(2).
Caution:UseEL-43244to pull the relay straight out from the electrical center terminals. The use of pliersor a flat bladed tool could damage the electrical center.
Remove the relay-(2) from the electrical center.Installation Procedure
Install the relay-(2) in the same position as removed.Install the electrical center cover.
 Relay Replacement (Attached to Wire Harness) Relays
Removal ProcedureLocate the relay. Refer to theMaster Electrical Component Listto locate the relay in the vehicle.Remove any fasteners which hold the relay in place.Remove any connector position assur ...
 Battery System
...
Other materials:
Wheel Drive Shaft Outer Joint Inspection Wheels
Disassembly ProcedureRemove the outer constant velocity (CV) joint and boot fromthe wheel drive shaft. Refer toFront Wheel Drive Shaft Outer Joint and Boot Replacement.Remove any lubricant from the CV joint.Note:Position the cage and the inner race so they arelevel.Install the outer CV joint assembl ...
© 2017-2026 Copyright www.cequinox.com

