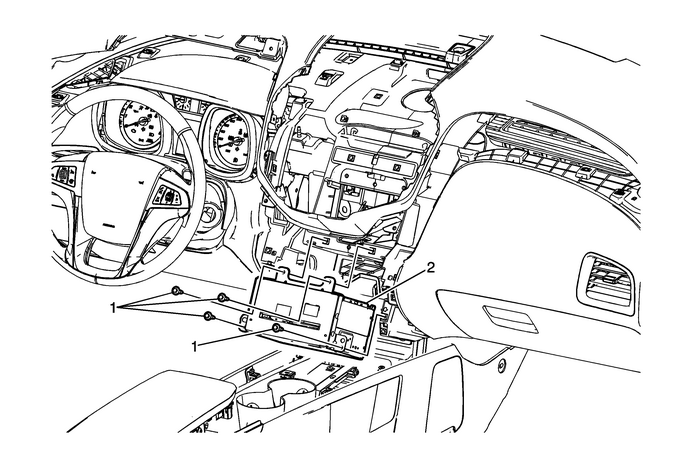
Chevrolet Equinox Service Manual: Radio Replacement

| Preliminary ProcedureRemove the radio control assembly. Refer toRadio Control Assembly ReplacementRemove the instrument panel center air outlet. Refer toInstrument Panel Center Air Outlet ReplacementRemove two screws from the lower side of the top pad and two screws from the upperside of the top pad.Remove the mat liner from the cd bezel.Remove the instrument panel lower extension bezel. Refer toInstrument Panel Lower Extension Accessory Bezel ReplacementRemove the cd bezel rearward and up to disconnect connector.Raise up the lower top pad to clear the radio for removal. Note:The Center of the Radio Assembly may have a mounted Bluetooth Antenna. Do not touchor apply any pressure to the Bluetooth Antenna during removal or installation. | |
1 | Radio Screw (Qty:-4) Caution:Refer toFastener Caution. Tighten23-Y (17-lb-ft) |
2 | Radio Assembly ProcedureDisconnect the electrical connections.Refer toControl Module Referencesfor programming and setup information. |
 Radio Rear Compartment Speaker Replacement
Radio Rear Compartment Speaker ReplacementCalloutComponent NamePreliminary ProcedureRemove the right body side trim panel. Refer toBody Side Trim Panel Replacement - Right Side.1Radio Rear Compartment ...
 Radio Speaker Amplifier Replacement
Radio Speaker Amplifier ReplacementCalloutComponent NamePreliminary ProcedureRemove the instrument insulator panel. Refer toInstrument Panel Insulator Panel Replacement - Left SideRemove the driver kn ...
Other materials:
Transmission Rear Mount Replacement Automatic Transmission Unit
Transmission Rear Mount ReplacementCalloutComponent NameDanger:To avoid any vehicle damage, serious personal injury or deathwhen major components are removed from the vehicle and the vehicleis supported by a hoist, support the vehicle with jack stands atthe opposite end from which the components are ...
© 2017-2025 Copyright www.cequinox.com

