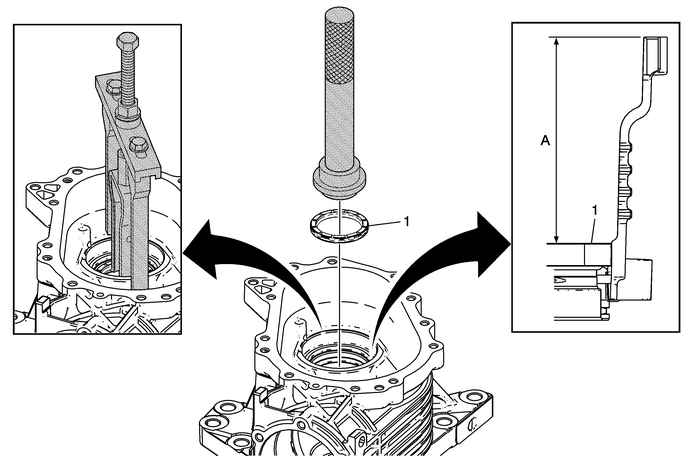
Chevrolet Equinox Service Manual: Input Shaft Seal Replacement - Left (RPO MHC) Automatic Transmission Unit

1 | Transfer Case Input Shaft Seal – Left Caution:Do not use a screwdriver or punch to remove or install theseal. Using a screwdriver or punch to remove or install the sealmay damage the aluminum housing sealing surface. ProcedureLightly lubricate the outer diameter-(OD) of the seal with clean gear lube prior toinstallation.To ensure proper alignment and depth of the seal, take four measurements every 90-degreesaround the seal circumference, verifying uniform depth. The distance from the topface of the machined surface of the bore to the metal flange of the seal (A) shouldbe 80.0-+/−-0.5-mm (3.15-+/−-0.02-in). Failure to follow these instructions will resultin replacement seal failure.Note:Alignment of seal is critical and use of correct tool is necessary. The machined surfaceof the bore must be clean and free from scratches or nicks. Special ToolsDT-48074 Input and Output Shaft Seal InstallerJ-8092 Driver HandleDT-26941/KM-J-26941 Bushing and Bearing Remover – 3–4-inDT-45124 Removal BridgeFor equivalent regional tools, refer toSpecial Tools |
 Input Shaft and Rear Output Drive Shaft Cleaning and Inspection Automatic Transmission Unit
Input Shaft and Rear Output Drive Shaft Cleaning and InspectionCalloutComponent NamePreliminary ProceduresClean all components in cleaning solvent and air dry.The transfer case internal components are ...
 Input Shaft Seal Replacement - Right Automatic Transmission Unit
Input Shaft Seal Replacement - RightCalloutComponent Name1Transfer Case Input Shaft Seal – RightCaution:Do not use a screwdriver or punch to remove the seal. Using ascrewdriver or punch to remove th ...
Other materials:
Digital Video Antenna Cable Replacement Entertainment
Digital Video Antenna Cable ReplacementCalloutComponent NamePreliminary ProceduresRemove the radio. Refer toRadio Replacement.Remove the driver side knee bolster reinforcement. Refer toDriver Knee Bolster Reinforcement Replacement.Remove the instrument panel compartment door. Refer toInstrument Pane ...
