Chevrolet Equinox Service Manual: Cylinder Head Installation - Right Side Engine Block Cylinder Head
Special Tools
EN 45059 Angle Meter
For equivalent regional tools, refer toSpecial Tools.

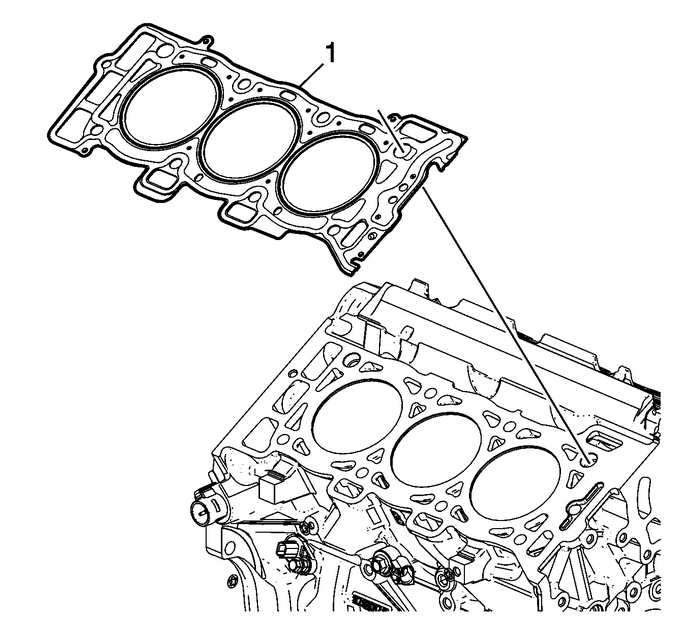
Ensure the cylinder head locating pins are securely mounted in the cylinder blockdeck face.Install a NEW right cylinder head gasket-(1) using the deck face locating pins forretention.

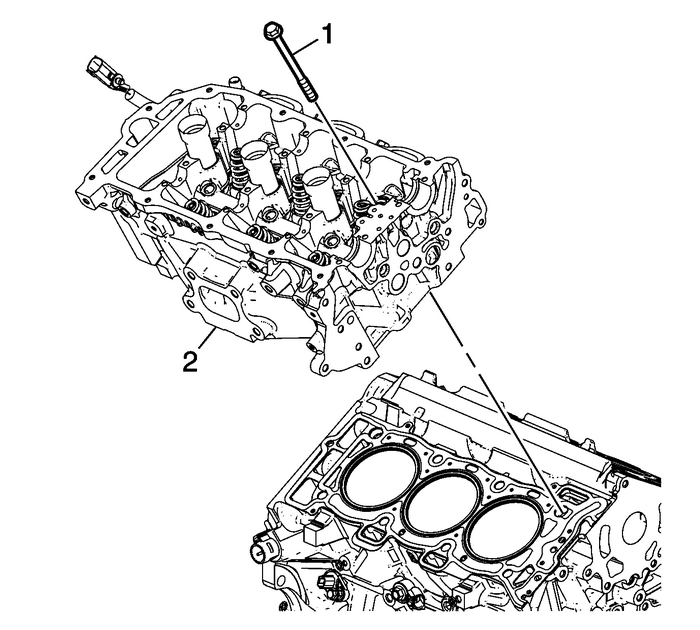
Align the right cylinder head-(2) with the deck face locating pins.Place the right cylinder head in position on the deck face.

Caution:Refer toFastener Caution.
Caution:This vehicle is equipped with torque-to-yield or single use fasteners. Install a NEWtorque-to-yield or single use fastener when installing this component. Failure toreplace the torque-to-yield or single use fastener could cause damage to the vehicleor component.
Note:DO NOT allow oil on the cylinder head bolt bosses.
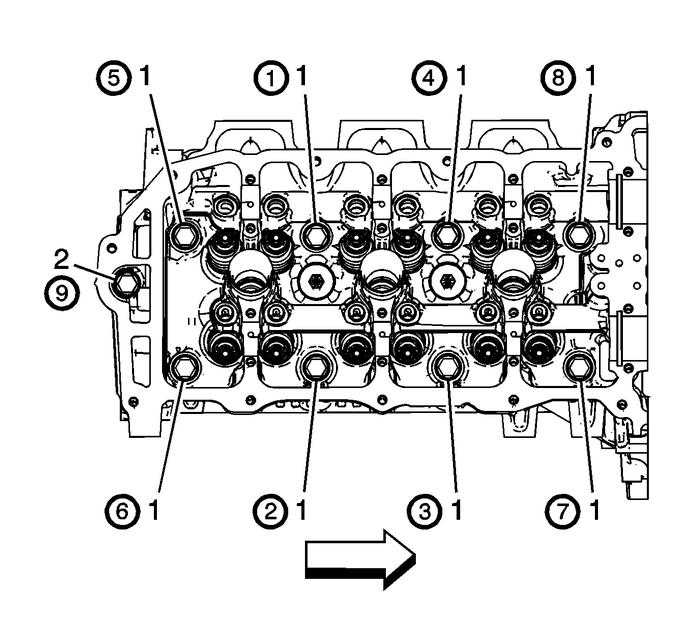
Install the NEW M11 cylinder head bolts-(1).Tighten the M11 cylinder head bolts a first pass in sequence to 30-Y (22-lb-ft).Tighten the M11 cylinder head bolts a second pass in sequence an additional 150-degrees using the EN 45059 meter.Install the NEW M8 cylinder head bolt-(2).Tighten the M8 cylinder head bolt a first pass to 15-Y (11-lb-ft).Tighten the M8 cylinder head bolt a second pass an additional 75-degrees using the EN 45059 meter. Cylinder Head Installation - Left Side Engine Block Cylinder Head
Special Tools EN 45059 Angle MeterFor equivalent regional tools, refer toSpecial Tools.Ensure the cylinder head locating pins are securely mounted in the cylinder blockdeck face.Install a NEW left cyl ...
 Lower Crankcase Installation Engine Block Cylinder Block
Special ToolsEN 45059Angle MeterFor equivalent regional tools, refer toSpecial Tools.Note:Crankshaft bearings MUST be separated, marked, or organizedin a way to ensure installation to their original l ...
Other materials:
Transmission Fluid Drain and Fill Automatic Transmission Unit
Transmission Fluid Drain and FillCalloutComponent NamePreliminary ProcedureRaise the vehicle. Refer toLifting and Jacking the Vehicle.1Fluid Drain PlugCaution:Refer toFastener Caution.Tip:Place a drain pan capable of containing more than5-quarts of fluid under the transmission before removingthe plu ...
