Chevrolet Equinox Service Manual: 3-5-Reverse and 4-5-6 Clutch Housing Disassemble Automatic Transmission Unit
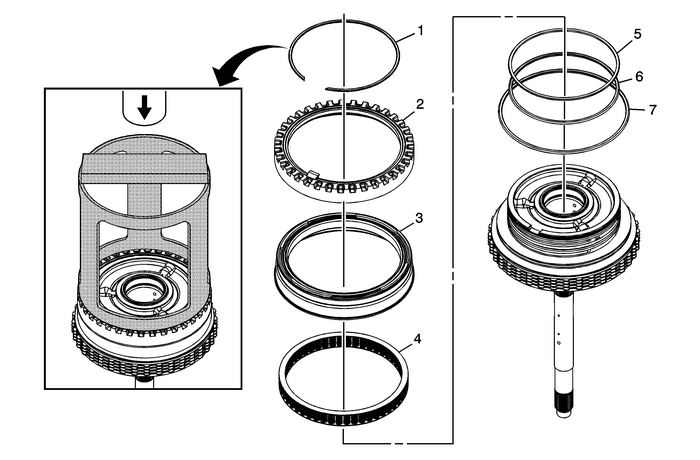
| Table 1: | Reluctor Wheel and Piston Removal |
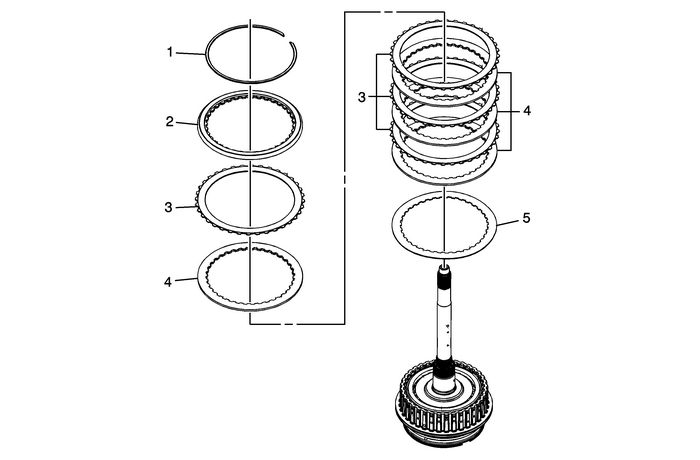
| Table 2: | Clutch Plate Removal |
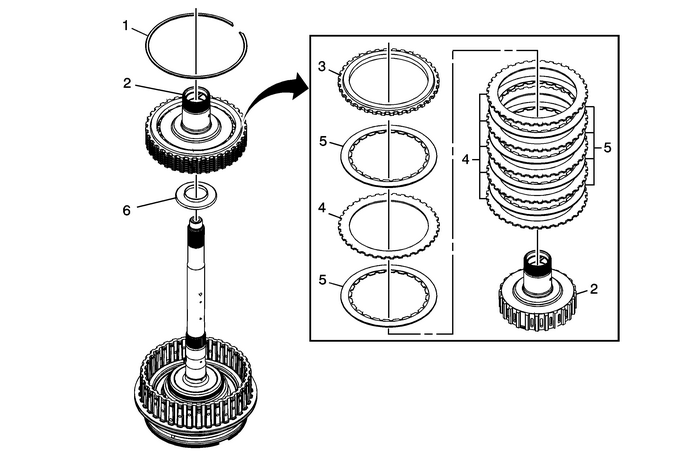
| Table 3: | 4–5–6 Clutch Hub Removal |
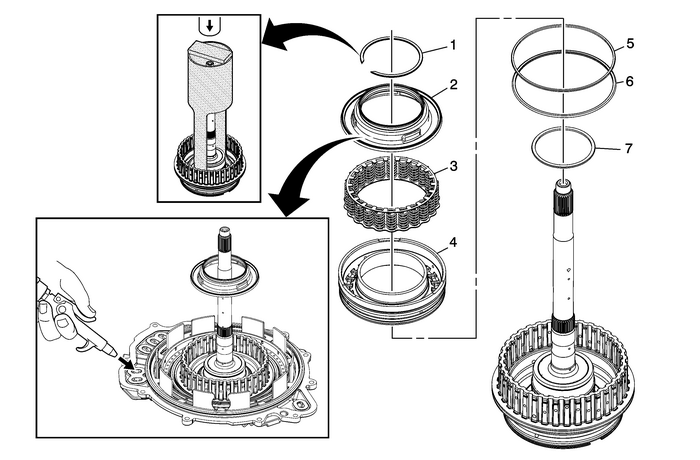
| Table 4: | 4–5–6 Clutch Piston Removal |

1 | A/Trans Input Shaft Speed Sensor Reluctor Ring Retaining Ring Caution:Compress the reluctor wheel just enough to clear theretainer. Over compressing the reluctor wheel will break thealignment tab and the clutch housing. Special Tools DT-47694 Piston Spring Compressor For equivalent regional tools, refer toSpecial Tools. |
2 | A/Trans Input Shaft Speed Sensor Reluctor Wheel |
3 | 3–5 Reverse Clutch Piston Note:Inspect piston seals for damage and/or wear. Piston is reusable. |
4 | 3–5 Reverse Clutch Spring Assembly |
5 | 3–5 Reverse Clutch Piston Inner Seal (Orange) |
6 | 3–5 Reverse Clutch Piston Inner Seal (Black) |
7 | 3–5 Reverse Clutch Piston Dam Seal |

1 | 3–5 Reverse Clutch Backing Plate Retaining Ring |
2 | 3–5 Reverse Clutch Backing Plate |
3 | 3–5 Reverse Clutch (w/Friction Material) Plate Assembly-(Qty: 4) |
4 | 3–5 Reverse Clutch Plate-(Qty: 4) |
5 | 3–5 Reverse Clutch (Waved) Plate |

1 | 4–5–6 Backing Plate Retaining Ring Note:Gently push down on the backing plate to get enough clearance between the backingplate and retainer. |
2 | Reaction Carrier Hub Assembly Note:The clutch plates will come out of the housing with the hub assembly. |
3 | 4–5–6 Clutch Backing Plate |
4 | 4–5–6 Clutch Plate (Qty: 6) |
5 | 4–5–6 Clutch (w/Friction Material) Plate Assembly-(Qty:-6) |
6 | 4–5–6 Clutch Hub Thrust Bearing Assembly Note:The bearing may stick to the reaction carrier hub. |

1 | 4–5–6 Clutch Dam Retaining Ring Special ToolsDT-47693 Dam ProtectorGE 8059 Snap Ring Pliers-Parallel Jawor equivalentFor equivalent regional tools, refer toSpecial Tools. |
2 | 4–5–6 Clutch Piston Fluid Dam Procedure:Place the 3–5–R and 4–5–6 clutch housing onto the case cover assembly.Apply shop air to the 4–5–6 clutch feed hole using a rubber tipped air gun to dislodgethe dam piston and the 4–5–6 clutch piston from the clutch housing. |
3 | 4–5–6 Clutch Spring Assembly |
4 | 4–5–6 Clutch Piston |
5 | 4–5–6 Clutch Piston Outer Seal-(Stepped) |
6 | 4–5–6 Clutch Piston Outer Seal-(Rounded) |
7 | 4–5–6 Clutch Piston Inner Seal |
 Torque Converter and Differential Housing Assembly Assemble Automatic Transmission Unit
Table 1: Pump Assembly InstallationTable 2: Transfer Drive Gear Assembly InstallationPump Assembly InstallationPump Assembly InstallationCalloutComponent Name1Driven Sprocket Thrust Washer2Drive Sproc ...
 Front Differential Carrier Bearing Replacement Automatic Transmission Unit
Table 1: RemovalTable 2: InstallationRemovalRemovalCalloutComponent Name1Front Differential Carrier Bearing AssemblySpecial ToolsDT-41816 Three Legged PullerDT 41816-2 Step PlateFor equivalent regiona ...
Other materials:
Power Steering System Bleeding Hydraulic Steering
Note:Use clean, new power steering fluid only. Refer toAdhesives, Fluids, Lubricants, and Sealers.Hoses touching the frame, body or engine may cause systemnoise. Ensure the hoses do not touch any other part of thevehicle.Loose connections may not leak, but could allow air into thesteering system. En ...
