Chevrolet Equinox Service Manual: 3-5-Reverse and 4-5-6 Clutch Housing Assemble Automatic Transmission Unit
| Table 1: | 4-5-6 Clutch Piston Installation |
| Table 2: | 4–5–6 Clutch Dam Installation |
| Table 3: | 4-5-6 Clutch Plates Installation |
| Table 4: | 3-5 Reverse Clutch Plates Installation |
| Table 5: | Piston and Reluctor Wheel Installation |
| Table 6: | 3-5-R and 4-5-6 Clutch Piston Air Check |
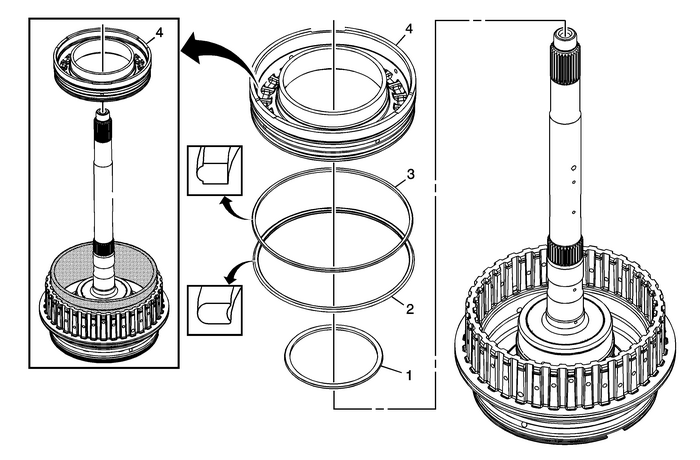
1 | 4-5-6 Clutch Piston Inner Seal |
2 | 4-5-6 Clutch Piston Outer Seal-(Rounded) |
3 | 4-5-6 Clutch Piston Outer Seal-(Stepped)-(Orange) |
4 | 4-5-6 Clutch Piston Note:DT-47859 outer seal protector prevents the piston seal lip from damage during installation. Apply a thin coat ofATF to the I.D. of DT-47859 outer seal protector to ease the installation of the piston. Special Tools DT-47859 Piston Outer Seal Protector For equivalent regional tools, refer toSpecial Tools. |
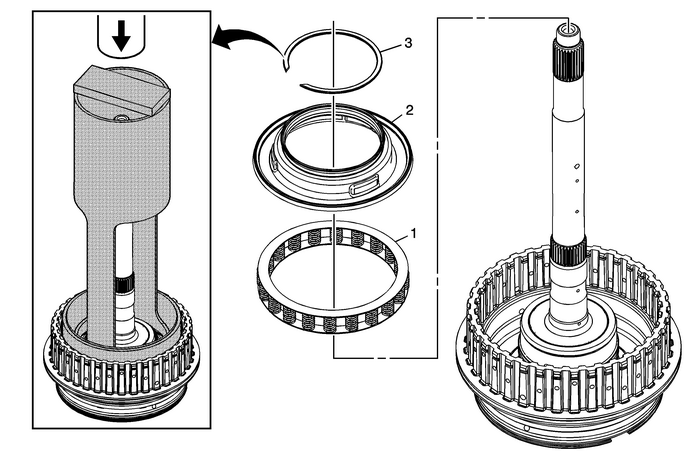
1 | 4-5-6 Clutch Spring |
2 | 4-5-6 Clutch Piston Fluid Dam Note:DT-47693-1 which is part of DT-47693 dam protector prevents the dam seal lip from damage during installation. Apply a thin coat of ATFto the I.D. of DT-47693-1 which is part of DT-47693 dam protector to ease the installation of the dam. Special Tools DT-47693 Dam Protector For equivalent regional tools, refer toSpecial Tools. |
3 | 4-5-6 Clutch Dam Retaining Ring Special ToolsDT-47693-2 Clutch Spring Compressor which is part of DT-47693 Dam ProtectorGE 8059 Snap Ring Pliers-Parallel Jaw or equivalentFor equivalent regional tools, refer toSpecial Tools. |
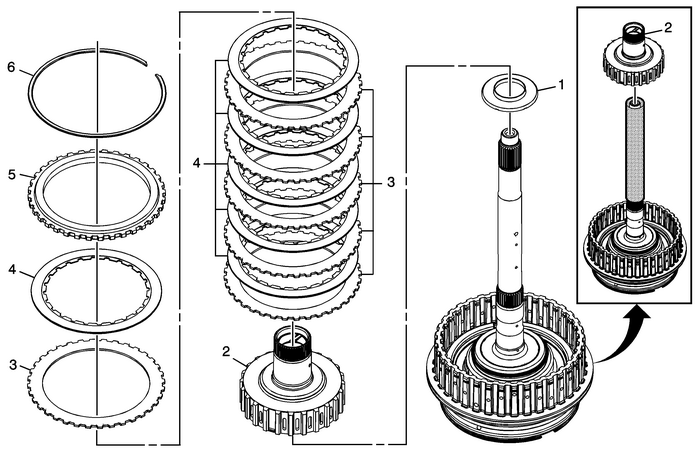
1 | 4-5-6 Clutch Hub Thrust Bearing Note:Note location of the orientation lip on bearing. All thrust bearings can only be assembledone way. |
2 | Reaction Carrier Hub Assembly Caution:Failure to use DT-48551 could cause damage to thehub assembly bushings which could cause premature transmissionfailure. Special Tools DT-48551 Reaction Hub Bushing Protector For equivalent regional tools, refer toSpecial Tools. |
3 | 4-5-6 Clutch Plate (Qty:-6) |
4 | 4-5-6 Clutch (w/Friction Material) Plate Assembly-(Qty:-6) |
5 | 4-5-6 Clutch Backing Plate |
6 | 4-5-6 Clutch Backing Plate Retaining Ring Note:Gently push down on the backing plate to get enough clearance between the backingplate and retainer. |
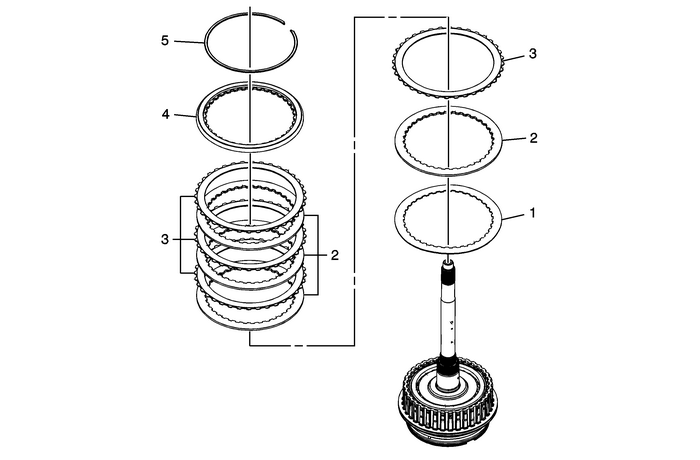
1 | 3-5 Reverse Clutch (Waved) Plate |
2 | 3-5 Reverse Clutch Plate (Qty:-4) |
3 | 3-5 Reverse Clutch (w/Friction Material) Plate Assembly-(Qty:-4) |
4 | 3-5 Reverse Clutch Backing Plate |
5 | 3-5 Reverse Clutch Backing Plate Retaining Ring |
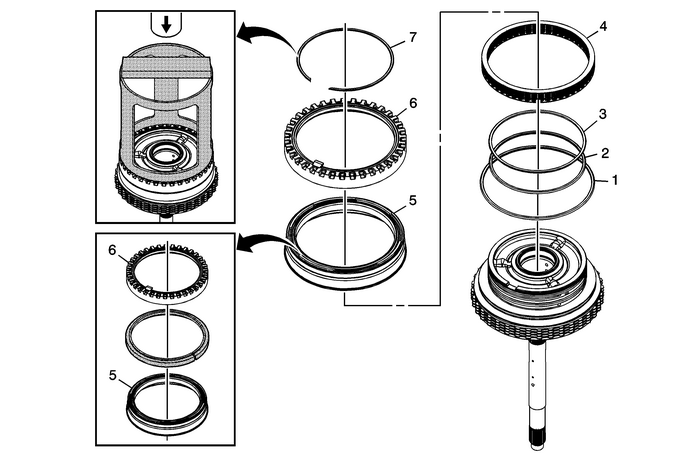
1 | 3-5 Reverse Clutch Piston Dam Seal |
2 | 3-5 Reverse Clutch Piston Inner Seal-(Black) Note:Apply a thin coat of ATF to the seal to ease the installation of the piston. |
3 | 3-5 Reverse Clutch Piston Inner Seal-(Orange) Note:Apply a thin coat of ATF to the seal to ease the installation of the piston. |
4 | 3-5 Reverse Clutch Spring Assembly |
5 | 3-5 Reverse Clutch Piston Note: DT-46622 seal protector prevents the piston seal lip from damage during installation. Apply a thin coat ofATF to the I.D. of DT-46622 seal protector to ease the installation of the piston.Install DT-46622 seal protector onto the speed sensor reluctor wheel. Push the 3–5 Reverse Clutch piston into thereluctor wheel until it stops against J-46622 seal protector. Remove DT-46622 seal protector by separating it at theopening.Special Tools DT-46622 Piston Seal Protector For equivalent regional tools, refer toSpecial Tools. |
6 | A/Trans Input Shaft Speed Sensor Reluctor Wheel |
7 | A/Trans Input Shaft Speed Sensor Reluctor Wheel Retaining Ring Caution:Compress the reluctor wheel just enough to clear the retainerring groove. Over compressing the reluctor wheel will break thealignment tab and the clutch housing. Special Tools DT-47694 Piston Spring Compressor For equivalent regional tools, refer toSpecial Tools. |
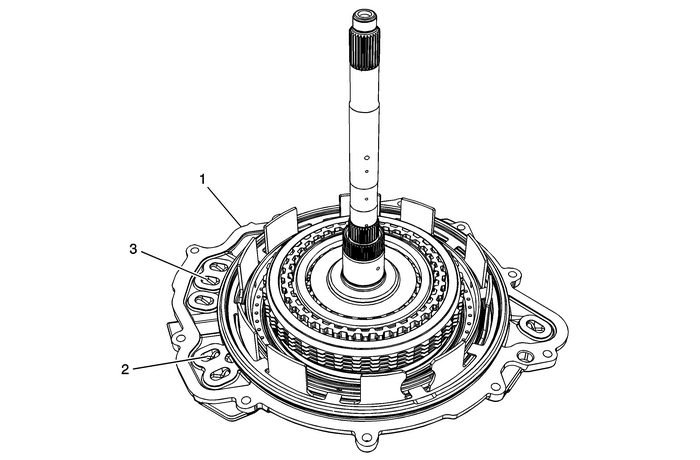
1 | Case Cover Assembly Note:The fluid seal rings should be in place and not damaged. |
2 | 4-5-6 Clutch Feed Fluid Passage Caution:Regulate the air pressure to 40-psi maximum. Highpressure could cause the piston to over travel and damage thepiston seals. ProcedureApply shop air to the 4-5-6 clutch feed passage.Observe the 4-5-6 piston movement.Note:Minimal piston movement and excessive air leaking could indicate damage to the 4-5-6piston seals or improper assembly. |
3 | 3-5 Rev Clutch Feed Fluid Passage Caution:Regulate the air pressure to 40-psi maximum. Highpressure could cause the piston to over travel and damage thepiston seals. ProcedureApply shop air to the 3-5-Rev clutch feed passage.Observe the 3-5-Rev piston movement.Note:Minimal piston movement and excessive air leaking could indicate damage to the 3-5-Revpiston seals or improper assembly. |
 Low and Reverse and 1-2-3-4 Clutch Housing Assemble Automatic Transmission Unit Automatic Clutches
Table 1: 1-2-3-4 Clutch Piston InstallationTable 2: Low and Reverse Clutch Piston Installation1-2-3-4 Clutch Piston Installation1-2-3-4 Clutch Piston InstallationCalloutComponent Name11-2-3-4 Clutch P ...
 3-5-Reverse and 4-5-6 Clutch Housing Assemble (6T40/45/50 - Gen 2) Automatic Transmission Unit
Table 1: 4–5–6 Clutch Piston InstallationTable 2: 4–5–6 Clutch Fluid Dam InstallationTable 3: 3–5 Reverse Clutch Plates InstallationTable 4: Reluctor Wheel and Piston InstallationTable 5: 4â ...
Other materials:
Driver Seat Adjuster Memory Switch Replacement Seats
Driver Seat Adjuster Memory Switch ReplacementCalloutComponent NamePreliminary ProcedureRemove the driver or passenger seat outer adjuster finishcover. Refer toDriver or Passenger Seat Outer Adjuster Finish Cover Replacement.1Driver Seat Adjuster Memory SwitchProcedurePull up gently on the memory sw ...
