Chevrolet Equinox Service Manual: Control Solenoid Valve and Transmission Control Module Assembly Inspection Automatic Transmission Unit

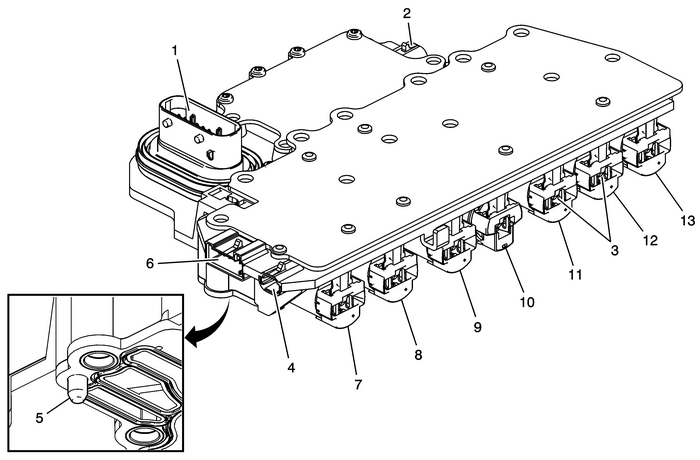
Verify the conditions listed below do not exist. Carefully inspect the control solenoidvalve assembly connectors and pins-(1, 2, 4, 6) for the condition. Repair or replaceas necessary.DamageBent pinsDebrisBroken retaining tabContaminationVerify there is no metallic debris inside the connectors near the terminal pins. Cleanas necessary.Verify the control solenoid valve assembly solenoid leads-(3) do not have contaminationor metallic debris. Clean as necessary.Verify the resistance between the leads of each solenoid valve is within the rangein the table below, with the solenoid valves at room temperature. If the resistanceof any solenoid valve is not within range, replace the Control Valve Body Assembly.Inspect the 2-control solenoid valve assembly filter plate retaining tabs-(5) forcracks and ensure proper tension when filter plate is attached.
Note:The connector on the TCC pressure control solenoid valve-(8) will be either clear/transparentor yellow. The clear/transparent connector will have a color contrast when comparedto the connectors on pressure control solenoid valve-2-(11) and pressure control solenoidvalve-4-(12).
Pressure Control Solenoid Valve-3 | 7 | 4.55–5.75 |
Pressure Control Solenoid Valve-5 | 8 | 4.55–5.75 |
TCC Pressure Control Solenoid Valve | 9 | 3.42–4.18 Clear/transparent Connector 4.55–5.75 Yellow Connector |
Shift Solenoid Valve-1 | 10 | 16.2–19.8 |
Pressure Control Solenoid Valve-2 | 11 | 4.55–5.75 |
Pressure Control Solenoid Valve-4 | 12 | 4.55–5.75 |
Line Pressure Control Solenoid Valve | 13 | 4.55–5.75 |
 Vehicle, Engine and Transmission ID and VIN Location, Derivative and Usage Automatic Transmission Unit
Vehicle, Engine and Transmission ID and VIN Location, Derivative and UsagePositionDefinitionCharacterDescription Vehicle Identification Number (VIN) SystemThe VIN plate-(1) is the legal identifier of ...
 Park Brake and P (Park) Mechanism Check Automatic Transmission Unit Parking Lock Mechanism
Warning:When you are doing this check, the vehicle could begin tomove. You or others could be injured and property could be damaged.Make sure there is room in front of the vehicle in case it beginsto ...
Other materials:
Airbag System Check
The airbag system does not need
regularly scheduled maintenance or
replacement. Make sure the airbag
readiness light is working. See
Airbag Readiness Light.
Caution
If an airbag covering is damaged,
opened, or broken, the airbag
may not work properly. Do not
open or break the ...
