Chevrolet Equinox Service Manual: 3-5-Reverse and 4-5-6 Clutch Fluid Seal Ring Replacement (Gen 2) Automatic Transmission Unit

Special Tools DT-46620Seal Installer For equivalent regional tools, refer toSpecial Tools. | |
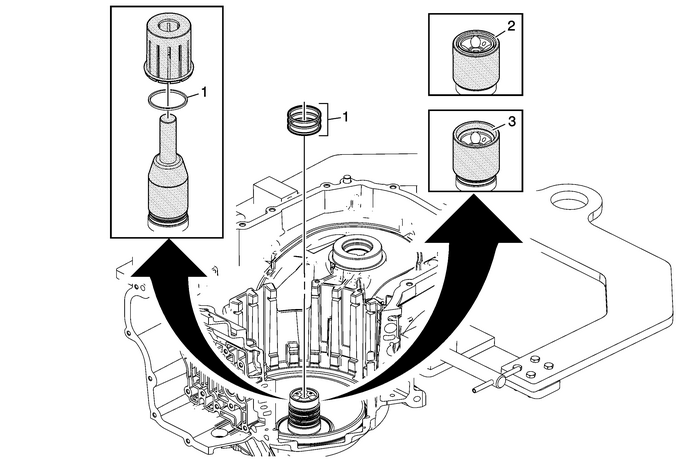
1 | 3–5 Reverse and 4–5–6 ClutchFluid Seals-(Qty:-3) ProcedurePlace DT-46620-3 which is part ofDT-46620seal installerover the case hub and adjust it so that only the bottomseal ring is exposed.Place a NEW fluid seal ring ontoDT-46620-3 which is part ofDT-46620seal installer.Use DT-46620-2 which is part ofDT-46620seal installerto push the fluid seal ring down overDT-46620-3 which is part ofDT-46620seal installerinto the hub ring groove.Repeat the above steps to install all 3-sealrings, adjusting DT-46620-3 which is part ofDT-46620seal installerto the appropriate ring groove. |
2 | Small Chamfer Up Caution:Do not force the seal installer down over the seals as thiswill roll and damage the seals. The large chamfer is designed tofit over the over stretched seal. Use a hand to help shrink theseal if the seal installer is difficult to install over the sealrings. Procedure Install DT-46620-1 which is part ofDT-46620seal installerwith the large chamfer end down over the fluid seal ringsand leave DT-46620-1 which is part ofDT-46620seal installeron the seals for at least 60 seconds. |
3 | Large Chamfer Up ProcedureInstall DT-46620-1 which is part ofDT-46620seal installerwith the small chamfer end facing down for at least 60seconds. This will properly size the bottom seal ring.Leaving DT-46620-1 which is part ofDT-46620seal installeron the fluid seal rings for an extended period of timecould cause a fluid leak on the initial clutch piston circuit untilthe seal rings warm up and expand to the proper dimension. |
 Control Valve Channel Plate Cleaning and Inspection (6T40/45/50 - Gen 2) Automatic Transmission Unit
34Control Valve Channel Plate Cleaning and InspectionCalloutComponent Name1Control Valve Body Spacer Plate Retainer2Channel Plate to Valve Body Spacer Plate Assembly3Actuator Feed Accumulator Piston-( ...
 3-5-Reverse and 4-5-6 Clutch Housing, and Input, Reaction, and Output Carrier Installation Automatic Transmission Unit
3-5-Reverse and 4-5-6 Clutch Housing, and Input, Reaction, and Output Carrier InstallationCalloutComponent Name13–5 Reverse and 4–5–6 Clutch Housing Thrust Bearing22–6 Clutch Apply Plate (Wave ...
Other materials:
Fuel Pump Removal Fuel System Fuel Pumps
Remove the fuel rail noise shield-(1).Remove the fuel rail wiring connectors from the fuel feedpipe bracket.Remove the fuel feed pipe bolts-(1).Remove and discard the fuel feed pipe-(2).Remove and discard the high pressure LH to RH fuel railcrossover pipe-(1).Remove and discard high pressure fuel pu ...
