Chevrolet Equinox Service Manual: Camshaft Timing Drive Components Cleaning and Inspection Valvetrain Valvetrain Timing
Cleaning ProcedureClean all the following components with solvent:Crankshaft sprocketPrimary timing drive chainPrimary timing drive chain shoePrimary timing drive chain guidesPrimary timing drive chain tensionerSecondary timing drive chainsSecondary timing drive chain shoesSecondary timing drive chain guidesSecondary timing drive chain tensionersTiming component fastening boltsClean each camshaft position actuator's exterior with solvent.
Warning:Refer toSafety Glasses Warning.
Dry the timing components with compressed air.Visual InspectionCamshaft Thrust Washers (If Equipped)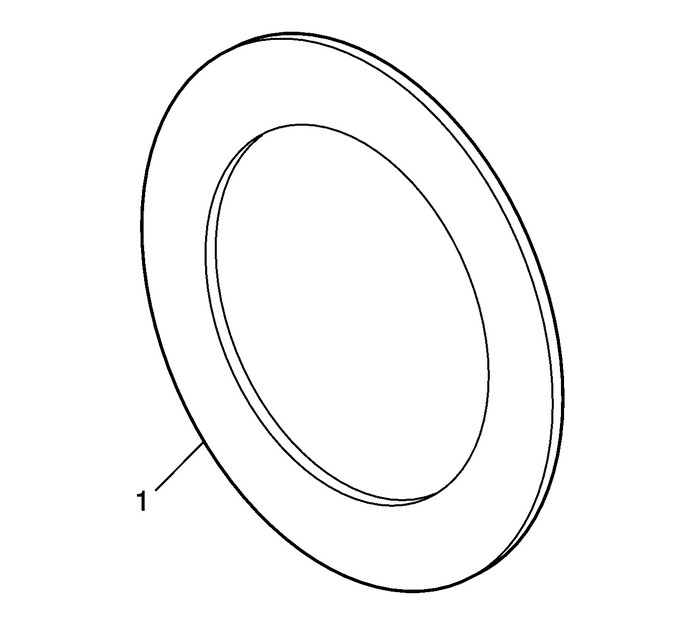
Inspect the camshaft thrust washers for deep scoring or uneven wear-(1).Replace as necessary.Camshaft Position Actuators
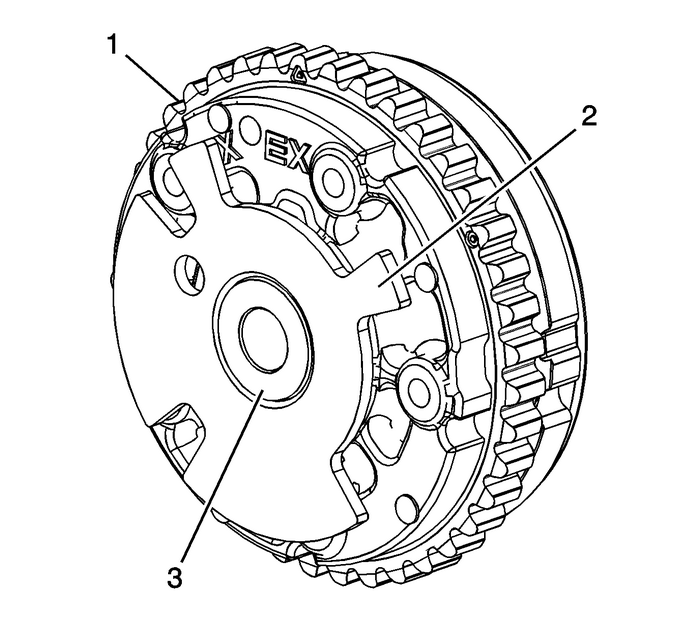
Note:Actual camshaft position actuators may vary in appearance from the ones shown.
Inspect the front of the exhaust camshaft position actuators for the following:Sprocket damage-(1)Reluctor/sensor wheel damage-(2)Camshaft position actuator bolt seating/sealing inner hub flange damage-(3)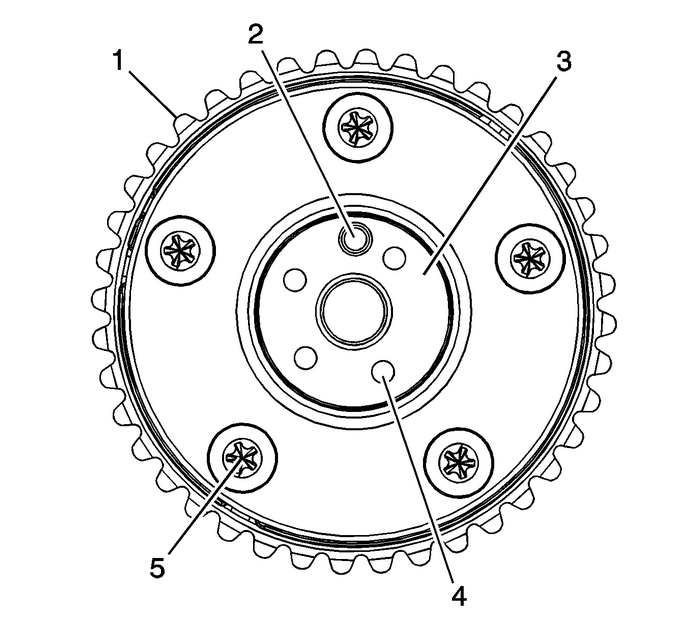
Inspect the back of the exhaust camshaft position actuators for the following:Sprocket damage-(1)Camshaft locating pin damage-(2)Camshaft seating/sealing inner hub flange damage-(3)Blockage to the oil passages-(4)Loose or missing housing bolts-(5)
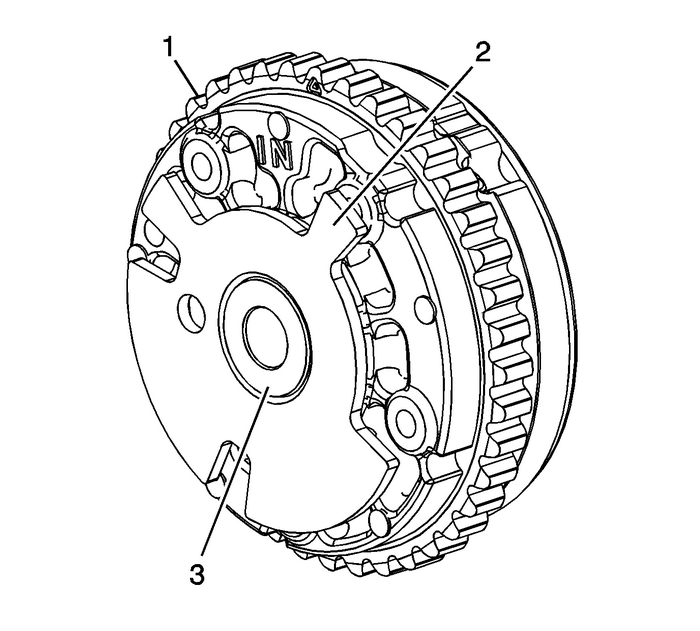
Inspect the front of the left intake camshaft position actuators for the following:Sprocket damage-(1)Reluctor/sensor wheel damage-(2)Camshaft position actuator oil control valve bolt seating/sealing inner hub flangedamage-(3)
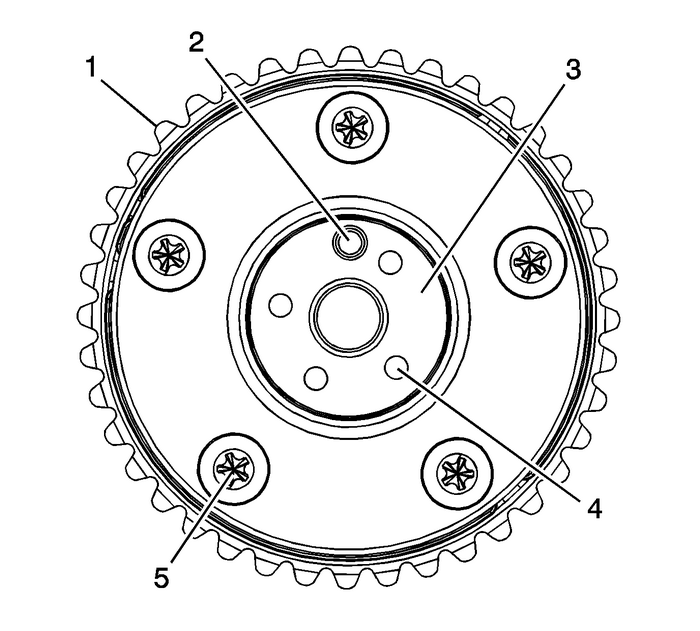
Inspect the back of the left intake camshaft position actuators for the following:Sprocket damage-(1)Camshaft locating pin damage-(2)Camshaft seating/sealing inner hub flange damage-(3)Blockage to the oil passages-(4)Loose or missing housing bolts-(5)
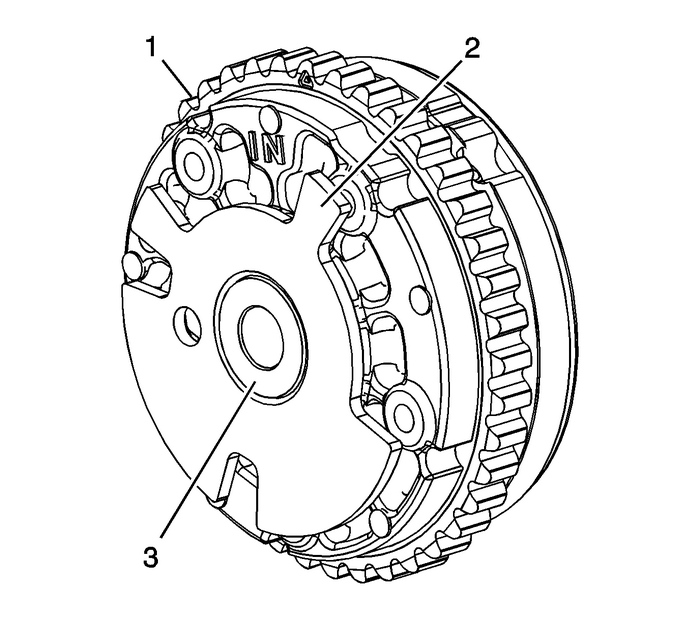
Inspect the front of the right intake camshaft position actuators for the following:Sprocket damage-(1)Reluctor/sensor wheel damage-(2)Camshaft position actuator oil control valve bolt seating/sealing inner hub flangedamage-(3)

Inspect the back of the right intake camshaft position actuators for the following:Sprocket damage-(1)Camshaft locating pin damage-(2)Camshaft seating/sealing inner hub flange damage-(3)Blockage to the oil passages-(4)Loose or missing housing bolts-(5)Replace a damaged camshaft position actuator.Camshaft Position Actuator Oil Control Valves
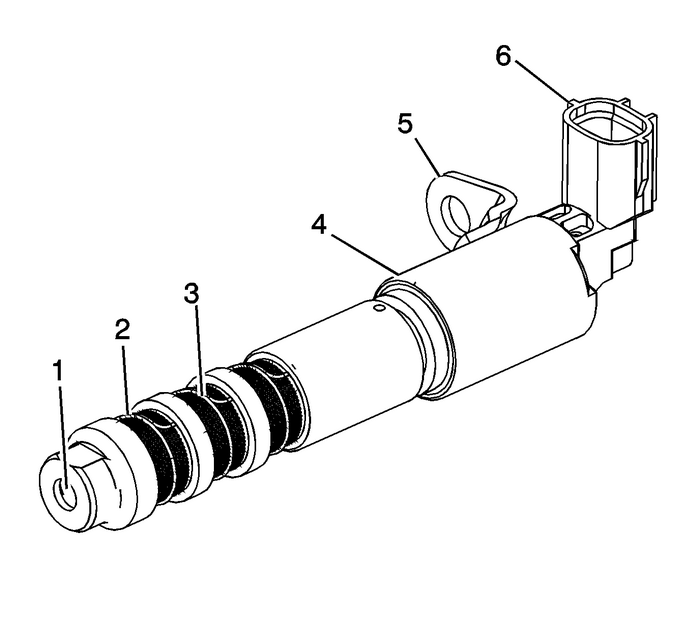
Inspect the camshaft position actuator oil control valves for the following:Blockage to the oil passage-(1)Missing or damaged oil screen clip-(2)Blockage or damage to the oil screen-(3)Damage to the sealing surface for the camshaft position actuator oil control valvesolenoid oil seal-(4)Damage to the bracket-(5)Damage to the wiring harness connection and/or terminals-(6)Replace a damaged camshaft position actuator oil control valve.Left Intermediate Sprocket with Primary and Secondary Inverted Tooth (IT) Chain
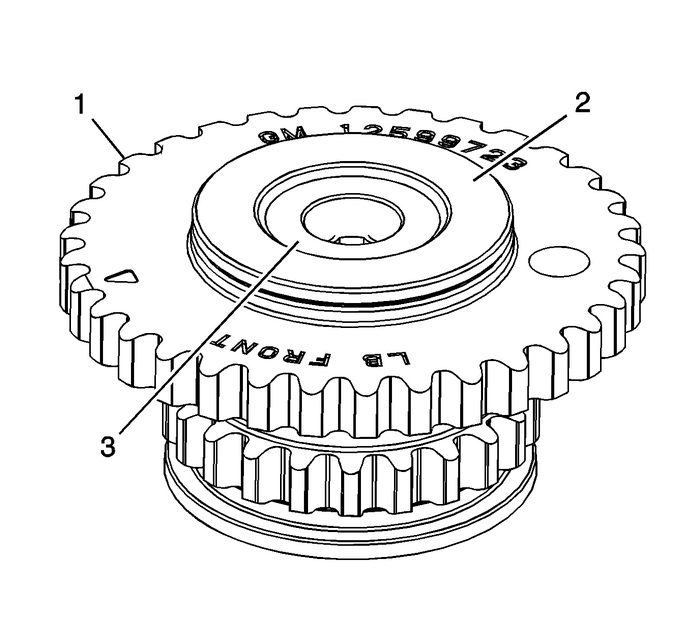
Inspect the front of the left intermediate sprocket for the following:Damage to the primary camshaft drive chain sprocket-(1)Damage to the hub bearing-(2)—Ensure the hub bearing spins freely. If the hub bearingwobbles, is noisy, or feels rough when rotated, replace the intermediate sprocket.Damage to the bolt flange seating/sealing surface-(3)
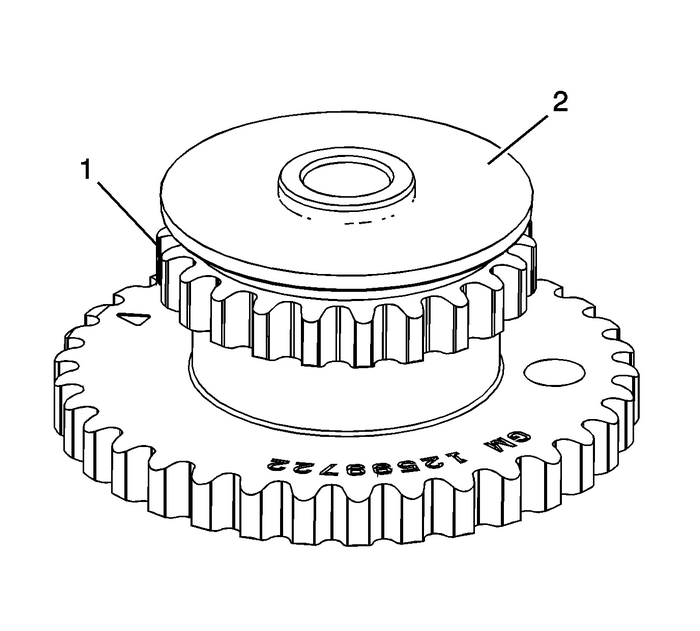
Inspect the back of the left intermediate sprocket for the following:Damage to the left secondary camshaft drive chain sprocket-(1)Damage to the bearing hub-to-engine block sealing surface-(2)Replace a damaged left intermediate sprocket.Right Intermediate Sprocket with Primary and Secondary Inverted Tooth (IT) Chain
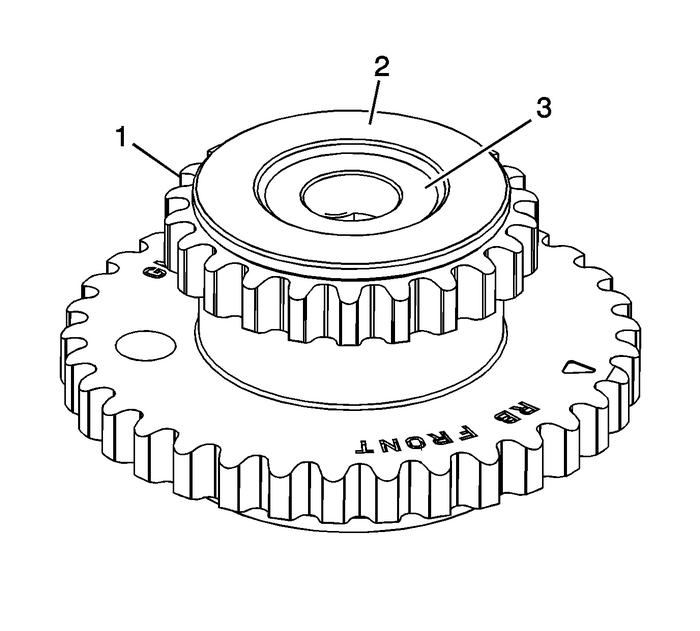
Inspect the front of the right intermediate sprocket for the following:Damage to the right secondary camshaft drive chain sprocket-(1)Damage to the hub bearing-(2)—Ensure the hub bearing spins freely. If the hub bearingwobbles, is noisy, or feels rough when rotated, replace the intermediate sprocket.Damage to the bolt flange seating/sealing surface-(3)
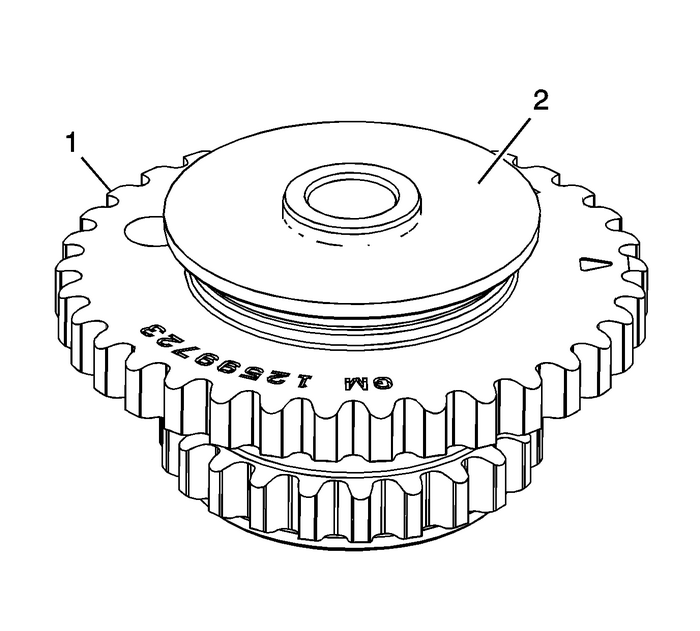
Inspect the back of the right intermediate sprocket for the following:Damage to the primary camshaft drive chain sprocket-(1)Damage to the bearing hub-to-engine block sealing surface-(2)Replace a damaged right intermediate sprocket.Crankshaft Sprocket with Primary Inverted Tooth (IT) Chain
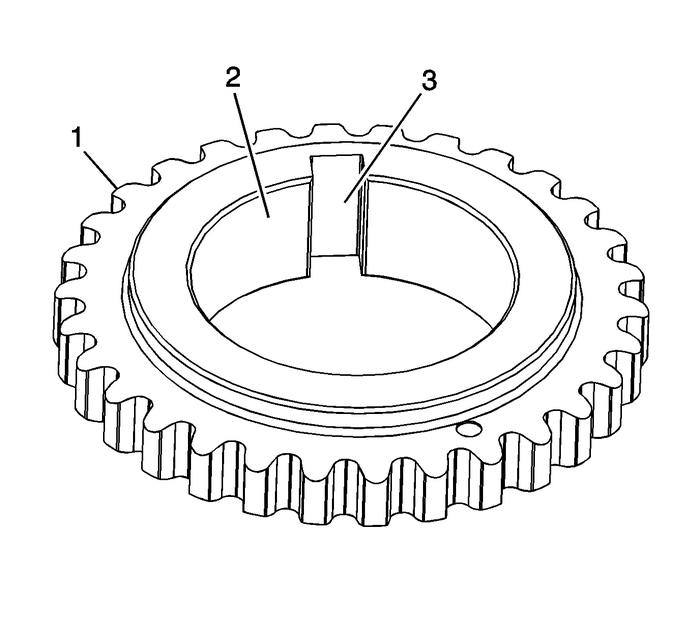
Inspect the crankshaft sprocket for the following:Sprocket damage-(1)Bore damage-(2)Keyway damage-(3)Replace a damaged crankshaft sprocket.Secondary Timing Chains with Inverted Tooth (IT) Chain
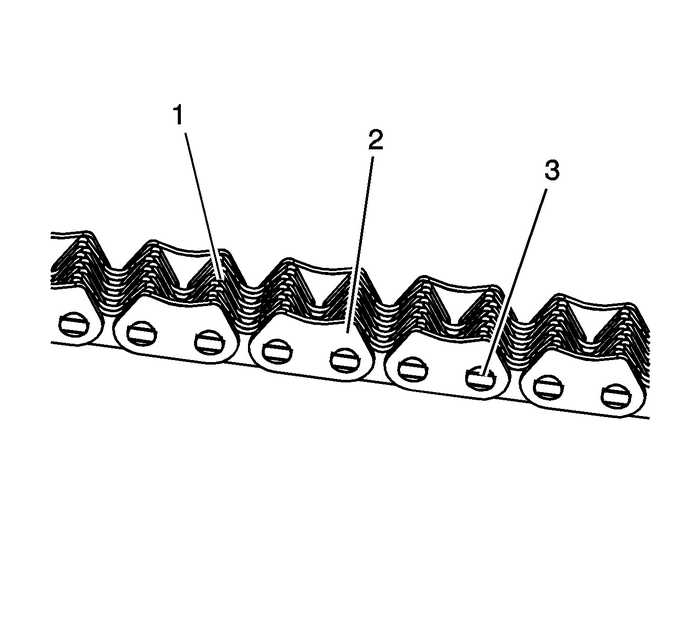
Inspect the secondary timing chain for the following:Binding or worn links-(1)Loose links-(2)Loose pins-(3)Replace a damaged secondary timing chain.Primary Timing Chain with Inverted Tooth (IT) Chain

Inspect the primary timing chain for the following:Binding or worn links-(1)Loose links-(2)Loose pins-(3)Replace a damaged primary timing chain.Primary Timing Chain Upper Guide
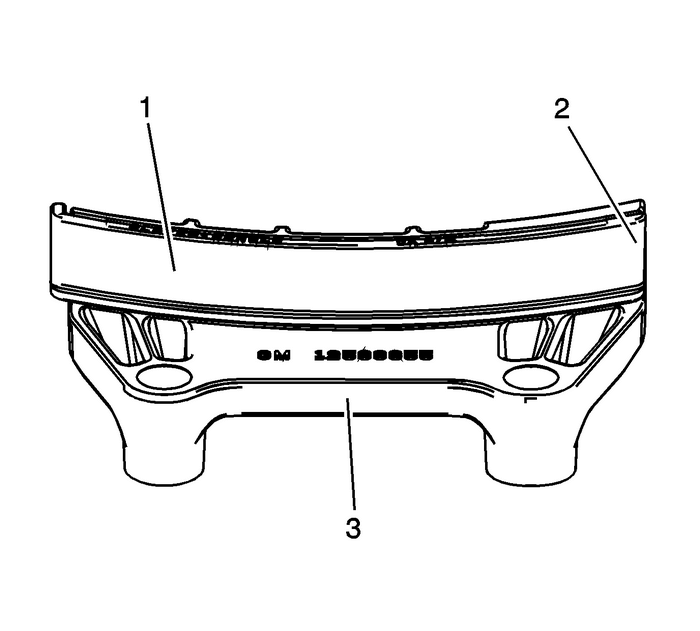
Inspect the primary timing chain upper guide for the following:Worn guide surface-(1)Cracked or broken guide surface-(2)Cracked or damaged guide base-(3)Replace a damaged primary timing chain upper guide.Primary Timing Chain Lower Guide
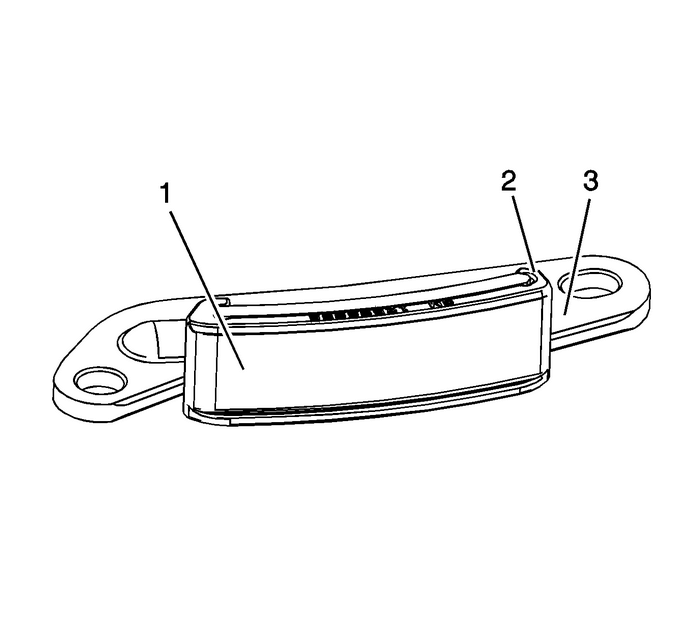
Inspect the primary timing chain lower guide for the following:Worn guide surface-(1)Cracked or broken guide surface-(2)Cracked or damaged guide base-(3)Replace a damaged primary timing chain lower guide.Left Secondary Timing Chain Guide
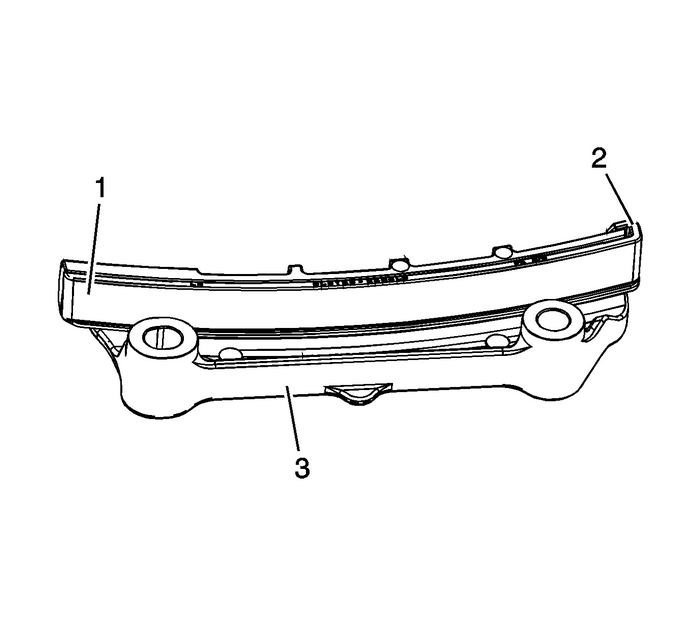
Inspect the left secondary timing chain guides for the following:Worn guide surface-(1)Cracked or broken guide surface-(2)Cracked or damaged guide base-(3)Replace a damaged left secondary timing chain guide.Right Secondary Timing Chain Guide
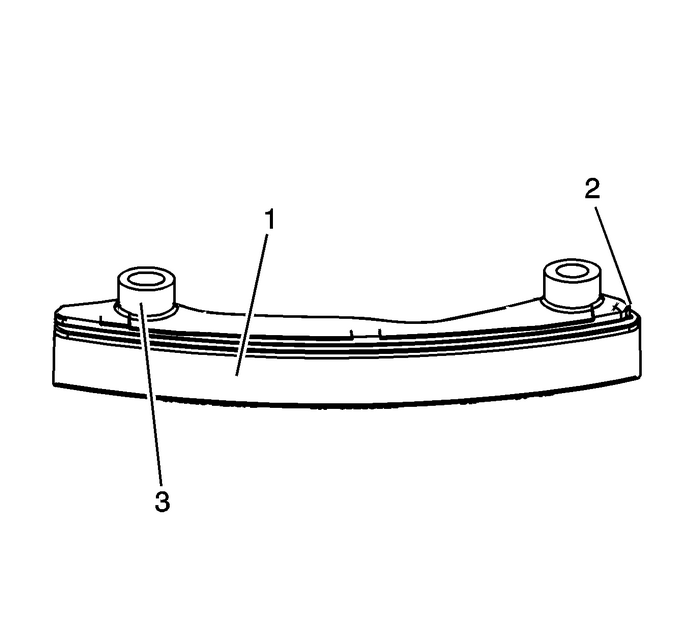
Inspect the right secondary timing chain guides for the following:Worn guide surface-(1)Cracked or broken guide surface-(2)Cracked or damaged guide base-(3)Replace a damaged right secondary timing chain guide.Left Secondary Timing Chain Shoe
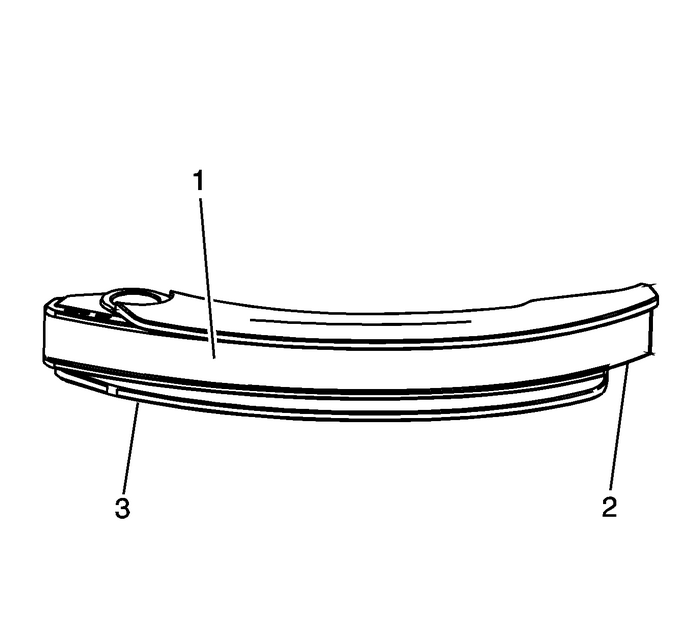
Inspect the front of the left secondary timing chain shoe for the following:Worn shoe surface-(1)Cracked or broken shoe surface-(2)Cracked or damaged shoe-(3)
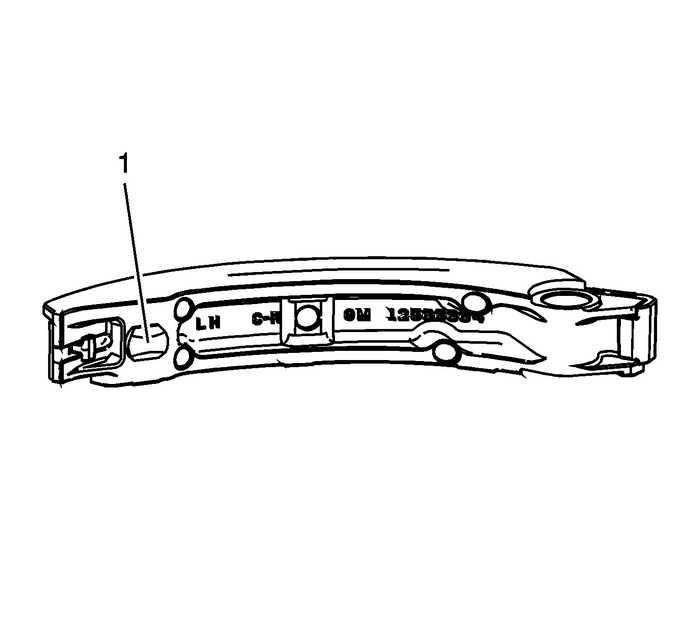
Inspect the back of the left secondary timing chain shoe for a damaged, worn, or missingleft secondary timing chain tensioner contact pad-(1).Replace a damaged left secondary timing chain shoe.Right Secondary Timing Chain Shoe
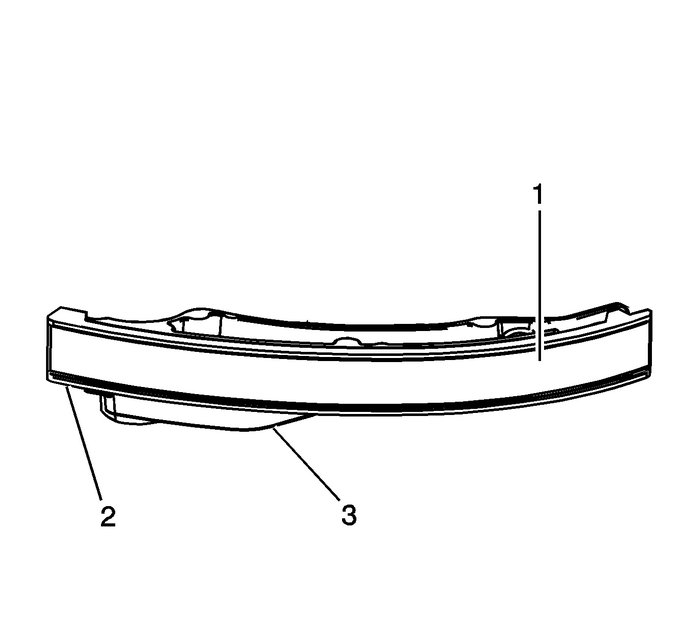
Inspect the front of the right secondary timing chain shoe for the following:Worn shoe surface-(1)Cracked or broken shoe surface-(2)Cracked or damaged shoe-(3)
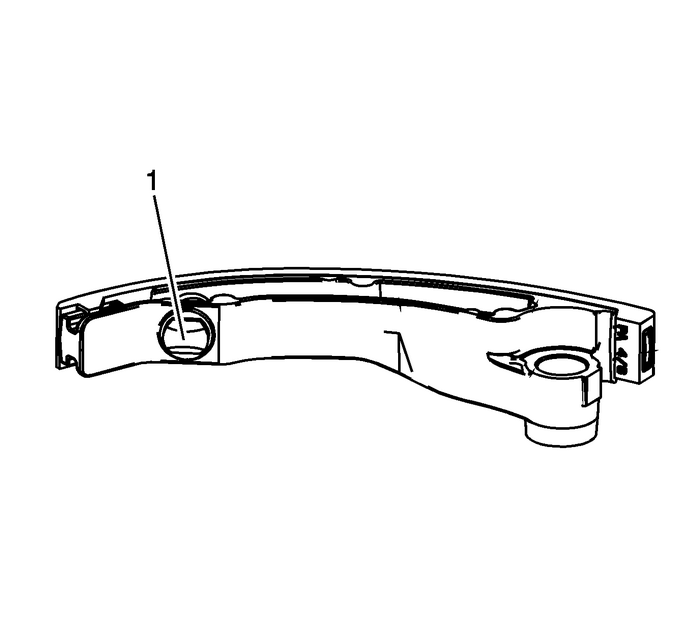
Inspect the back of the right secondary timing chain shoe for a damaged, worn, ormissing right secondary timing chain tensioner contact pad-(1).Replace a damaged right secondary timing chain shoe.Primary Timing Chain Tensioner
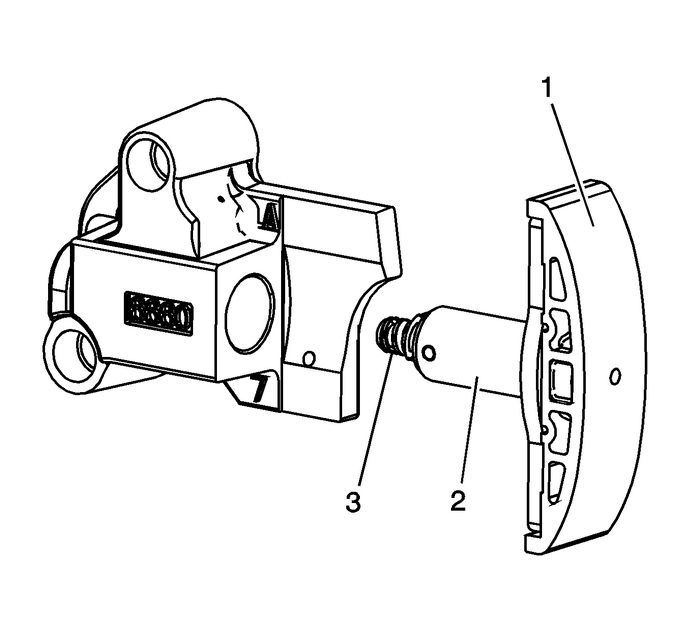
Inspect the primary timing chain tensioner for worn primary timing chain tensionershoe surface-(1).Inspect the primary timing chain tensioner for locked or binding timing chain tensioner.Reset the plunger-(3) and ensure the plunger moves freely-(2) in and out of the bodyof the tensioner. Refer toPrimary Camshaft Intermediate Drive Chain Tensioner Installation.Replace a damaged primary timing chain tensioner.Left Secondary Timing Chain Tensioner
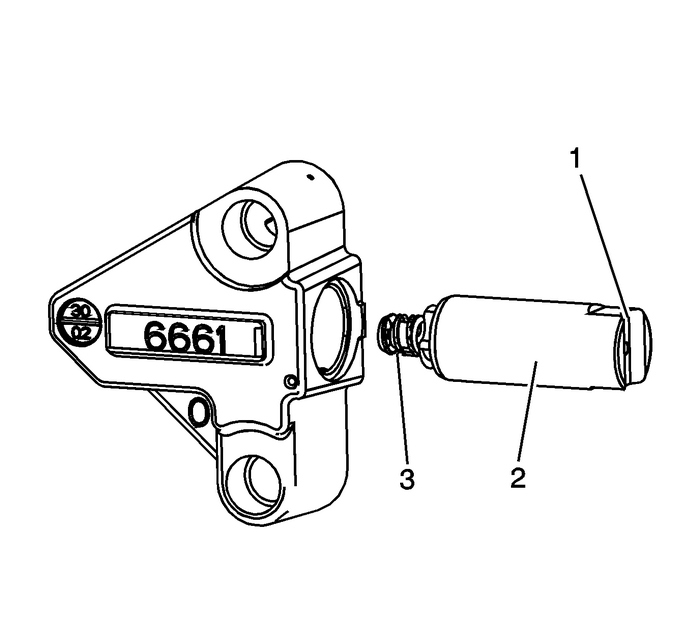
Inspect the left secondary timing chain tensioner for damaged plunger-to-shoe contactsurface-(1).Inspect the left secondary timing chain tensioner for locked or binding timing chaintensioner. Reset the plunger-(3) and ensure the plunger moves freely-(2) in and outof the body of the tensioner. Refer toSecondary Timing Chain Tensioner Installation - Left Side.Replace a damaged left secondary timing chain tensioner.Right Secondary Timing Chain Tensioner
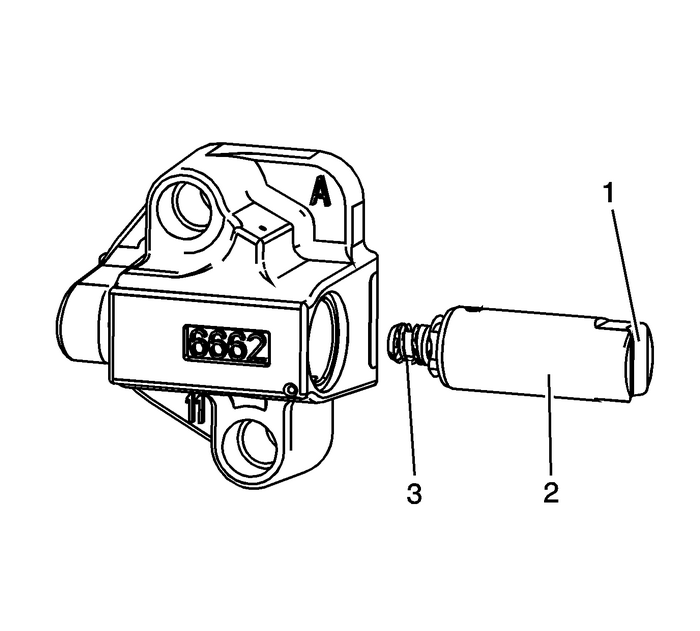
Inspect the right secondary timing chain tensioner for damaged plunger-to-shoe contactsurface-(1).Inspect the right secondary timing chain tensioner for locked or binding timing chaintensioner. Reset the plunger-(3) and ensure the plunger moves freely-(2) in and outof the body of the tensioner. Refer toSecondary Timing Chain Tensioner Installation - Right Side.Replace a damaged right secondary timing chain tensioner.
 Water Pump Cleaning and Inspection Engine Cooling Coolant Pump
Cleaning ProcedureCaution:Do not immerse the water pump in solvent. The solvent mayenter the water pump's permanently lubricated bearings and causepremature bearing failure.Remove the old gasket mater ...
 Camshaft Cover Cleaning and Inspection Valvetrain Camshaft
Cleaning ProcedureClean the camshaft covers in solvent.Warning:Refer toSafety Glasses Warning.Dry the camshaft covers with compressed air.Inspection ProcedureInspect each camshaft cover for the dents ...
Other materials:
Radio Control Assembly Replacement Entertainment Audio
Radio Control Assembly ReplacementCalloutComponent NamePreliminary ProcedureFor vehicles equipped with the instrument panel center trimplate. Refer toInstrument Panel Upper Center Trim Panel Replacementfor removal. For vehiclesequipped with the instrument panel center compartment. Refer toInstrument ...
